
Harley Davidson Troubleshooting Codes are stored in your motorcycle’s speedometer display to help you pinpoint mechanical or electrical faults. You can view these digits by holding the odometer reset button while turning the ignition switch to the “on” position. This method works for most fuel-injected models equipped with a digital diagnostic display.
Understanding Harley Davidson Troubleshooting Codes
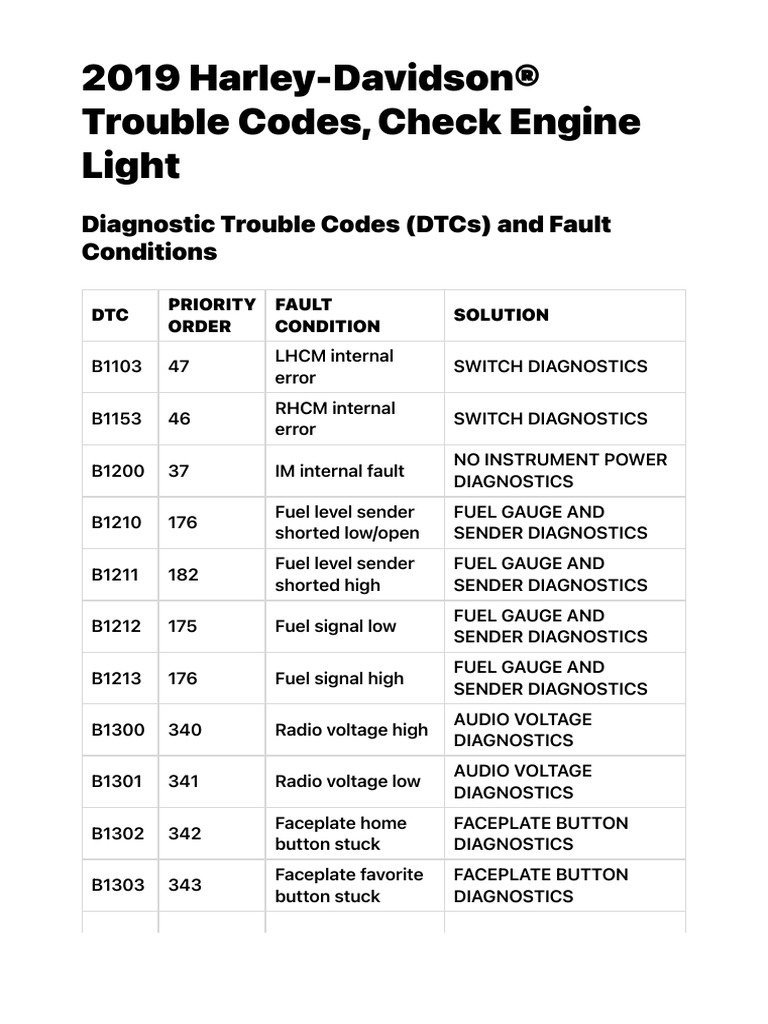
The diagnostic system records these codes when the Electronic Control Module detects a signal outside of the normal operating range. This often happens because of a loose electrical connection, a failing sensor, or a temporary voltage drop during a cold start. Your motorcycle monitors systems like the fuel pump, the ignition coil, and the oxygen sensors constantly. If one of these components sends an irregular signal, the computer saves the event as a fault code to assist with repairs.
Another common cause is battery health. A battery with low voltage can trigger false diagnostic codes across multiple systems. Even if the bike starts, the voltage drop during the ignition process can confuse sensitive electronic sensors. If you have recently changed your battery or had a loose terminal, the system may have stored old codes that no longer represent an active problem.
Environmental factors also play a part. Moisture in the wiring harness or corrosion on plug connectors can create high resistance. This resistance changes the voltage readings that the sensors send to the computer. The computer interprets this as a fault, even if the part itself is functional. In these cases, the code is a symptom of the wiring condition rather than a failed component. You should check the official Harley-Davidson owner documentation for your specific motorcycle model to understand the diagnostic capabilities unique to your machine. Always verify your findings against the manual, as the meaning of a specific code can change between different years and engine configurations.
Use the diagnostic display
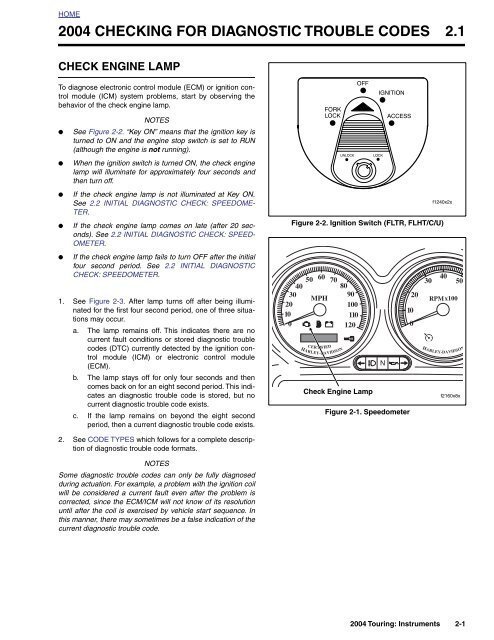
This process is for riders who want to identify the source of a warning light without specialized tools. To begin, ensure the motorcycle is in neutral and the run switch is set to “run.” Press and hold the odometer reset button while turning the ignition switch to the “on” position. Keep holding the button until the word “diag” appears on the speedometer face. Once you see this, release the button. You can now cycle through the available modules by pressing the reset button once for each step.
If a module shows “none,” there are no active or historic codes for that specific system. If you see a code, it will appear as a series of letters and numbers, such as “P0118.” This code indicates a specific issue with the engine temperature sensor. If you aren’t comfortable working with electrical components, stop here and take your findings to a dealer. Attempting to repair complex electronic systems without training can void your warranty or lead to damaged wiring. This method isn’t for riders who lack basic mechanical confidence, as it requires you to interpret data that may lead to difficult repairs. If the code persists after you have cleared it, the problem is likely a hard fault that requires a professional.
Check your battery connections
A loose or corroded battery connection is a frequent culprit for mysterious error codes. If the computer loses contact with the battery for even a fraction of a second, it will log a voltage-related fault. You can check this by locating the battery terminals and ensuring the bolts are tight. Use a wrench to verify that the cables don’t move when you apply firm pressure.
If you find white or blue powder on the terminals, clean it off with a wire brush. This residue acts as an insulator and prevents a clean electrical flow. After cleaning, apply a thin layer of dielectric grease to prevent future corrosion. Once the connections are secure, you can clear the historical codes by holding the reset button while the code is displayed on the screen. If the code returns immediately after a ride, you have a persistent fault that needs further investigation. This fix isn’t for people who don’t have basic hand tools or who are uncomfortable working near a battery. If you notice any fraying on the cables, don’t attempt a repair; replace the cables or contact a service department. A short circuit here can cause significant damage to the electrical system.
Inspect the wiring harnesses
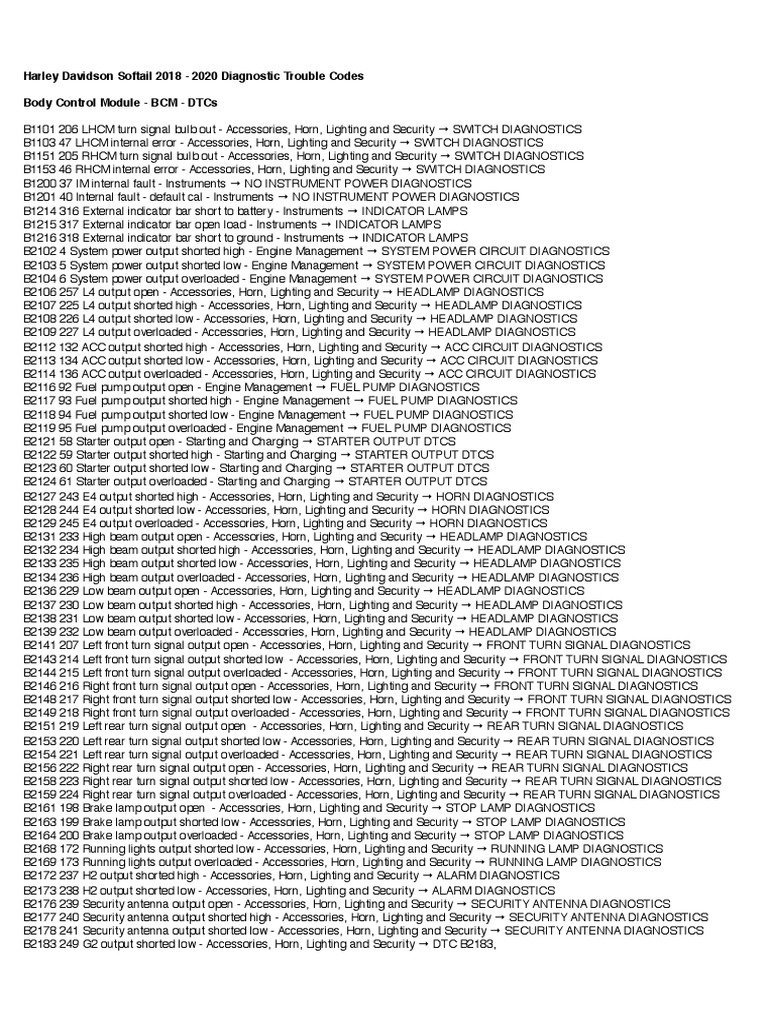
When codes point to a specific sensor, the issue is often a damaged wire rather than the sensor itself. Look for areas where wires rub against the frame or engine. Vibration can wear through the plastic insulation over time, causing the copper wire inside to touch the metal frame. This creates a ground fault, which the computer will report as a sensor failure.
Check the plugs connected to your fuel injectors and sensors. Ensure they’re pushed in all the way and locked into place. If a plug is loose, the connection will be intermittent. A simple “click” when pushing the plug back in can resolve the issue instantly. If the wiring appears damaged or melted, don’t attempt to patch it with electrical tape. This is a temporary measure that will eventually fail, potentially leaving you stranded. When you find damaged wiring, the professional approach is to replace the harness section or have a technician perform a proper splice. This requires specialized tools to ensure the connection is waterproof and vibration-resistant. If you lack these tools, it’s safer to have a professional handle the repair.
What not to do
- Don’t clear codes before writing them down, as you’ll lose the history needed to find the intermittent problem.
- Don’t spray liquid cleaners directly into electrical connectors, because this can push debris deeper into the pins and cause a permanent short.
- Don’t use a metal screwdriver to pry open plastic electrical plugs, as you’ll likely break the locking tabs and force a full harness replacement.
- Don’t ignore a “check engine” light just because the bike seems to run fine, as some faults cause the engine to run lean or hot, which can lead to long-term internal damage.
How to stop it happening again
Regular maintenance of your electrical system keeps the motorcycle running smoothly and prevents these codes from appearing.
| If you’re doing this | Do this instead | Why |
|---|---|---|
| Using water to wash | Use a damp cloth | High pressure water forces moisture into seals |
| Forcing tight plugs | Use dielectric grease | Lubrication allows easier, safer connections |
Frequently asked questions
Can I fix all diagnostic codes myself?
No, you can’t fix all codes yourself because some require specialized software to recalibrate the fuel map or update the computer’s internal firmware. While you can identify the source of the problem, the actual repair for internal engine or transmission faults often requires dealer-level diagnostic tools. If the code persists after you have checked the wiring and battery, it’s time to stop and contact a professional.
Why does my bike show a code after a battery change?
The system often logs a “low voltage” or “communication” code because the battery was disconnected while the computer was still active. These are usually “historic” codes that don’t indicate a current fault. You can clear these by following the diagnostic cycle, and if they don’t return, you can safely ignore them.
How long does it take to clear a code?
It takes only a few seconds to clear a code once you have accessed the diagnostic menu. You simply hold the reset button for several seconds while the specific code is on the screen. If the code is “active,” it will return immediately after you cycle the ignition, which tells you the problem is still present.
Is it safe to ride with an active code?
It depends on the code, but you shouldn’t ride if the engine is running poorly or if the check engine light is flashing. A steady light usually means you can ride to a shop, but a flashing light indicates a critical issue that could destroy the engine. When in doubt, have the motorcycle towed to a qualified shop.
What happens if I ignore the codes?
Ignoring these codes often leads to a “limp mode” where the computer limits your speed and power to prevent damage. Over time, a small electrical fault can cause other components to fail due to the irregular voltage. Addressing the issue early is always cheaper than waiting for a total system failure.
Final Thoughts
Once you have identified the specific error, consult your service manual to understand what the repair entails. Don’t feel discouraged if the fix seems complex; many minor issues are easy to handle at home. If you’re still unsure about the safety of your bike, it’s best to contact a professional mechanic.
Related guides
- Samsung Clothes Washer Troubleshooting: Fix Common Error Codes
- Milnor Washing Machine Troubleshooting: Fix Common Error Codes
- Bryant Plus 90t Furnace Troubleshooting: Fix Common Error Codes