If your trailer lights aren’t working right, it can be frustrating and even dangerous. Knowing how to troubleshoot your 4 wire trailer wiring can save you time, money, and stress.
This guide will help you quickly find and fix common wiring problems so your trailer stays safe on the road. Keep reading to learn simple steps that anyone can follow, even if you’re not an expert. Your trailer’s lighting system will thank you!
Basic Components Of 4 Wire Trailer Wiring
The basic components of 4 wire trailer wiring are essential to understand for safe and proper trailer operation. This wiring system connects your vehicle to the trailer’s lights and signals. Knowing the parts helps in troubleshooting issues quickly and easily. Each wire has a specific role in the system. Identifying these parts makes repair simpler and prevents costly mistakes.
Wire Colors And Their Functions
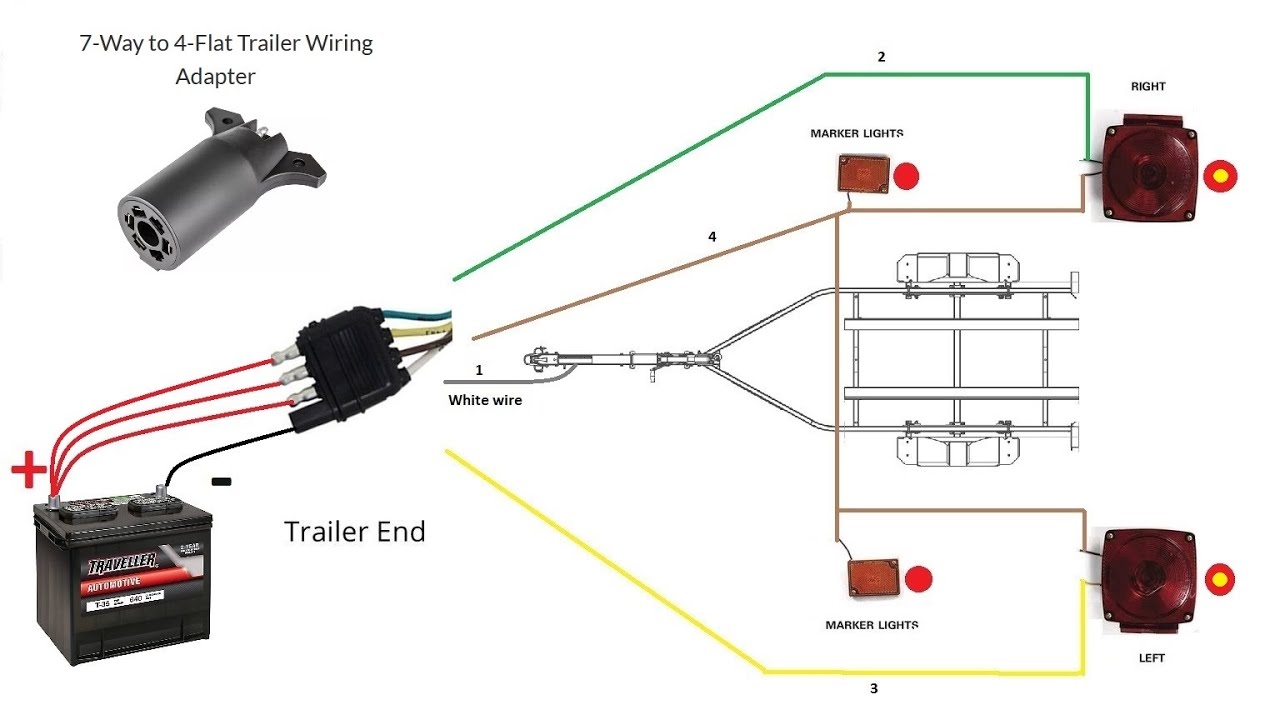
The 4 wire trailer wiring uses standard colors for different functions. The white wire is for the ground connection. It completes the electrical circuit by connecting to the trailer frame.
The brown wire powers the tail lights and running lights. It stays on while driving to keep the trailer visible.
The yellow wire controls the left turn signal and brake light. It flashes when you signal a left turn or apply brakes.
The green wire controls the right turn signal and brake light. It works the same as the yellow wire but for the right side.
Understanding these colors helps trace wiring problems and fix them faster.
Common Trailer Connector Types
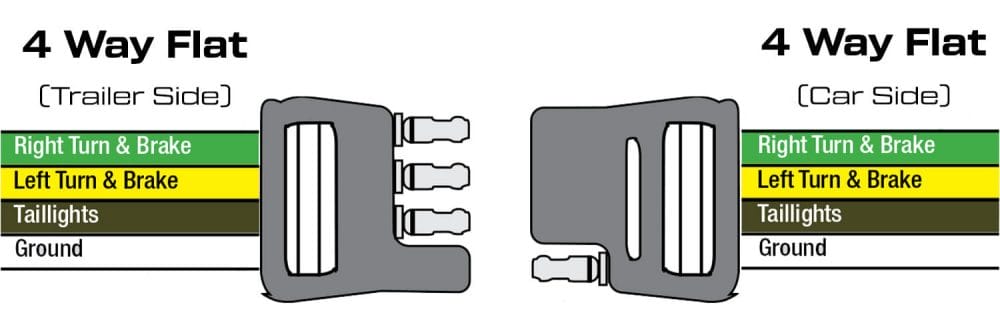
Two common trailer connectors use 4 wire systems: the flat 4-pin and the round 4-pin connectors. The flat 4-pin connector is most popular. It is easy to plug in and fits most light trailers.
The round 4-pin connector is less common but more secure. It locks in place to prevent accidental unplugging.
Both connectors carry the same signals but look different. Knowing your connector type helps in buying the right parts and tools.
Credit: www.youtube.com
Tools Needed For Troubleshooting
Troubleshooting a 4 wire trailer wiring system needs the right tools. These tools help find problems fast and fix them safely. Using proper equipment saves time and avoids damage. It also makes the job easier and more accurate.
Essential Testing Equipment
A multimeter is key for checking voltage and continuity. It shows if wires carry power correctly. A test light helps find power in each wire. Wire strippers remove insulation without damage. Electrical tape insulates repaired wires. A wiring diagram guide helps match wires to their functions. All these tools work together for quick and clear diagnosis.
Safety Gear And Precautions
Wear safety glasses to protect your eyes from sparks. Use gloves to avoid cuts and shocks. Work in a dry area to prevent electrical hazards. Disconnect the trailer from power before testing. Keep tools insulated to avoid short circuits. Safety gear reduces risks and keeps the work safe. Always follow safety steps strictly during troubleshooting.
Common Wiring Issues
Common wiring issues cause most trailer light problems. These issues stop signals from reaching the trailer lights. Troubleshooting wiring helps find and fix faults fast. Simple checks can save time and money.
Broken Or Frayed Wires
Wires can break or fray from bending or rubbing. Exposed wires cause shorts or open circuits. Look for cuts, cracks, or worn insulation. Replace or repair damaged wires to restore connection.
Corroded Connectors
Moisture and dirt cause connector corrosion. Corroded connectors block electrical signals. Clean connectors with a wire brush or sandpaper. Use dielectric grease to prevent future corrosion.
Poor Ground Connections
A weak ground stops current flow. Check ground wires for tight, clean connections. Rust or paint on contact points reduces grounding. Sand or replace ground wires for better contact.
Faulty Trailer Lights
Lights may fail even with good wiring. Burned-out bulbs or broken sockets cause no light. Test bulbs with a power source. Replace faulty bulbs or sockets to fix lighting issues.
Credit: www.etrailer.com
Step-by-step Troubleshooting Process
Troubleshooting a 4 wire trailer wiring diagram can seem hard at first. A clear step-by-step process helps find and fix wiring issues fast. This method keeps the work organized and efficient. Follow each step carefully to avoid missing small problems. This guide focuses on practical checks anyone can do.
Inspecting The Wiring Harness
Start by looking at the wiring harness closely. Check for cracks, cuts, or worn spots on the wires. Damaged wires often cause shorts or open circuits. Make sure wires are not pinched or bent sharply. Look for signs of corrosion on connectors or wire ends. Clean or replace damaged parts to ensure good connection.
Testing Voltage And Continuity
Use a multimeter to test voltage at different points in the wiring. Check if power reaches the trailer lights from the vehicle. Test continuity to find broken wires inside the harness. No voltage or no continuity means a problem in that section. Mark bad spots for repair or replacement to keep power flowing.
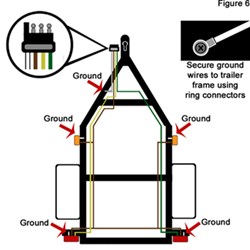
Checking Ground Connections
Ground wires often cause trailer light failures. Ensure the ground wire is firmly connected to clean metal. Rust or paint can block the ground connection and stop lights from working. Tighten loose ground screws and clean the contact area. A good ground is essential for proper trailer wiring function.
Verifying Connector Pinouts
Check the pin layout on trailer and vehicle connectors. Each pin has a specific wire color and function. Compare with the wiring diagram to confirm correct wiring. Wrong pin connections cause lights to malfunction or not work. Rearrange wires or use adapters to match correct pinouts.
Simple Fixes For Common Problems
Simple fixes can solve many common problems with a 4 wire trailer wiring system. These issues often cause lights to stop working or blink irregularly. By checking and repairing basic components, you can restore full function without needing professional help. This section covers easy steps to fix typical wiring troubles.
Replacing Damaged Wires
Damaged wires cause poor electrical connections or shorts. Look for cracks, cuts, or worn insulation along the wire. Cut out the damaged section using wire cutters. Strip back insulation from the ends of good wire. Use wire connectors or solder to join new wire segments. Cover the connection with electrical tape or heat shrink tubing. This restores a clean, strong electrical path.
Cleaning And Securing Connectors
Dirty or loose connectors block electrical flow. Disconnect the trailer plug and wiring harness. Use a wire brush or sandpaper to clean the metal contacts. Spray with electrical contact cleaner to remove grime and corrosion. Reconnect the plug tightly. Secure any loose connectors with zip ties or electrical tape. This ensures a solid, reliable connection.
Improving Grounding
Bad grounding causes flickering or non-working trailer lights. Locate the ground wire on the trailer frame. Check for rust, paint, or dirt where the ground wire attaches. Sand the area until bare metal shows. Tighten the ground wire securely to the frame. Use a new grounding wire if the old one is broken. Proper grounding completes the electrical circuit effectively.
Fixing Or Replacing Trailer Lights
Burned-out bulbs or broken light housings stop trailer lights from working. Remove the light cover and test bulbs with a 12V power source. Replace any bulbs that do not light up. Inspect the light housing for cracks or water damage. Replace damaged housings to prevent future problems. Secure the light assembly firmly to the trailer frame.
Credit: johnsontrailerparts.com
Preventive Tips To Avoid Wiring Issues
Preventing wiring problems saves time and money. Simple steps keep your trailer wiring safe and reliable. These tips help avoid common 4 wire trailer wiring issues. Follow them to ensure smooth trailer operation.
Regular Maintenance Checks
Check your trailer wiring often. Look for cracks, frays, or loose connections. Test the lights before every trip. Clean any dirt or corrosion on the connectors. Early detection stops bigger problems later.
Protecting Wires From Damage
Keep wires away from sharp edges and moving parts. Use wire loom or conduit to cover exposed wires. Secure wires tightly to prevent rubbing or pulling. Avoid water buildup around connectors to reduce rust.
Using Quality Connectors And Materials
Choose strong, weather-resistant connectors for better durability. Use good-quality wire with proper gauge size. Avoid cheap materials that wear out fast. Reliable parts reduce the chance of wiring faults.
Frequently Asked Questions
What Is A 4 Wire Trailer Wiring Diagram?
A 4 wire trailer wiring diagram shows how to connect trailer lights. It uses four wires for power, brake, and signal lights. This makes installation easier and safer.
How To Identify Each Wire In A 4 Wire Trailer Setup?
Each wire has a specific color and function. Usually, white is ground, brown is tail lights, yellow is left turn, and green is right turn. Checking colors helps avoid wiring mistakes.
Why Is My Trailer Light Not Working With 4 Wire System?
A broken connection or bad ground wire often causes trailer lights to fail. Check all wires for damage or loose connections. Testing the trailer light fuse can also help.
Can I Use A 4 Wire Diagram For A 5 Wire Trailer?
No, a 4 wire diagram lacks the extra wire needed for electric brakes in a 5 wire system. Using the wrong diagram can cause light or brake issues. Match your trailer’s wiring count exactly.
How To Test A 4 Wire Trailer Wiring For Faults?
Use a multimeter to check for power and continuity in each wire. Test lights by connecting wires to the trailer plug one at a time. This helps locate faulty wires quickly.
What Tools Are Needed For 4 Wire Trailer Wiring Troubleshooting?
A multimeter, wire strippers, electrical tape, and a test light are essential. These tools help find shorts, breaks, and bad connections. Having the right tools makes troubleshooting simple and fast.
Conclusion
Troubleshooting a 4 wire trailer wiring diagram can save time and money. Check each wire carefully for breaks or loose connections. Use a tester to verify power and ground signals. Fix issues step-by-step to avoid confusion. Clear wiring helps your trailer lights work safely and reliably.
With patience, anyone can solve common wiring problems. Keep this guide handy for quick reference on the road. Trust your skills and stay safe while towing. Simple checks make a big difference.