
Dealing with a samsung dryer not heating is a common frustration for homeowners, but the underlying issue is often a straightforward component failure rather than a catastrophic machine breakdown. Whether you’re facing long drying times, damp clothes after a full cycle, or a completely cold drum, the path to a solution involves identifying the specific part that has lost electrical continuity or airflow. Typical professional repair costs for these appliances range from $150 to $450 depending on the complexity of the internal part replacement and labor fees. By systematically troubleshooting the power supply, ventilation, and internal thermal components, you can often restore your appliance to full functionality without needing a complete replacement.
Key Takeaways

- Always disconnect the power supply before removing the back or top panels of your dryer.
- A clogged dryer vent is the most common cause of thermal fuse failure.
- Ensure your 240-volt outlet is providing full power to both legs of the circuit.
- Clear all lint buildup from the exhaust ducting to prevent future overheating issues.
Power Supply and Circuit Breakers
Before assuming the dryer is broken, verify that the unit is receiving adequate electricity. Samsung dryers require a 240-volt power source to operate the heating element. If the dryer drum spins but produces no heat, it’s possible that only one leg of the 240-volt circuit is active. Check your home’s electrical panel for tripped breakers. Even if the breaker doesn’t look tripped, flip it to the “off” position and back to “on” to reset the connection.
Checking the Wall Outlet
If the breaker is fine, the issue might be the outlet itself. Loose wires behind the wall plate can cause intermittent power loss. If you feel comfortable using a multimeter, measure the voltage between the two outer slots of the dryer outlet; it should read approximately 240 volts. If you see 120 volts, you have lost one leg of power, and you should contact a licensed electrician to inspect your home wiring.
Is Your Venting Blocked?
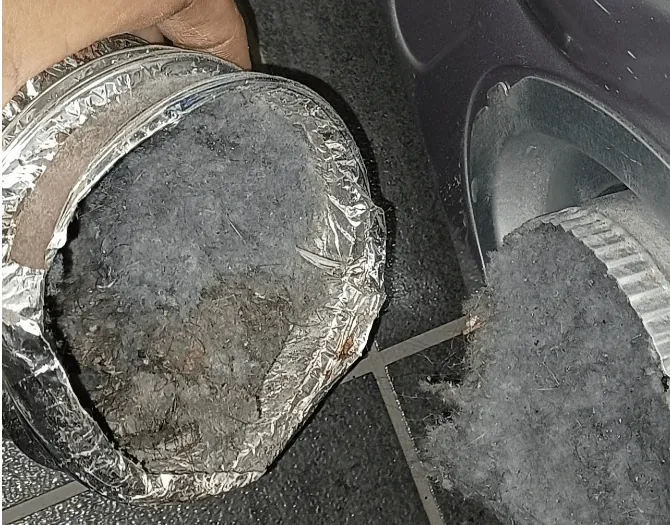
Restricted airflow is the leading cause of premature component failure in modern dryers. If the exhaust path is blocked, heat builds up inside the cabinet, triggering safety devices that kill the heating element to prevent a fire.
| Component | Function | Potential Failure |
|---|---|---|
| Exhaust Vent | Airflow exit | Clogged with lint |
| Wall Duct | Home exhaust | Blocked by debris |
| Hood Flap | External exit | Stuck or frozen |
Testing the Thermal Fuse
The thermal fuse is a safety device designed to blow if the dryer overheats. Once this fuse blows, it creates an open circuit, meaning the heating element won’t turn on even if the rest of the dryer functions normally. To test this, you must access the internal wiring, usually by removing the back panel.
Replacing the Fuse
Use a multimeter set to the continuity or ohms setting. Remove the wires from the fuse and touch the probes to the terminals. If the meter shows no continuity, the fuse is blown and must be replaced. Never attempt to bypass a blown thermal fuse; it’s a critical safety component that protects your home from overheating.
The Heating Element Assembly
If your thermal fuse is intact, the heating element itself may have burned out. This is a large coil of wire wrapped around a frame inside the dryer cabinet. Over time, the coils can break or short out against the metal housing. Inspect the coil visually for breaks; a broken coil acts like a burnt-out lightbulb filament.
Understanding the Cycling Thermostat
The cycling thermostat regulates the temperature inside the drum by turning the heating element on and off. If this thermostat fails, the dryer may fail to heat because it mistakenly thinks the target temperature has already been reached. In many Samsung models, this component is located near the blower housing.
Troubleshooting Steps
- Locate the thermostat near the blower fan.
- Disconnect the wires leading to the thermostat.
- If the thermostat is stuck in the open position, replace it immediately.
Checking the Dryer Timer
On models with mechanical dials, the timer assembly controls the sequence of the drying cycle. If the internal contacts within the timer are worn or damaged, the signal to engage the heating element might never be sent. While less common than a blown fuse, a faulty timer can mimic the symptoms of a dead heating element.
Inspecting the Main Control Board
Modern Samsung dryers rely on a main control board to manage all functions, including the heat relay. If the relay on the board has failed, it will stop sending power to the heating element. This is a more expensive repair and should only be considered after you have ruled out cheaper parts like the thermal fuse, thermostats, and the element itself.
How to Clean Exhaust Ducts
Pro Tip: Always disconnect your dryer from the wall and pull it forward before attempting to clean the exhaust ducting. Use a flexible brush kit to clear the entire length of the vent pipe, including the section inside the wall. If you notice the dryer still fails to heat after a thorough cleaning, the airflow restriction may have already damaged the internal thermal sensors.
Selecting Replacement Parts
When buying parts, always use your specific model number found on the tag inside the dryer door frame. Generic parts may not match the required voltage specifications or physical dimensions of your specific Samsung unit.
| Part Name | Typical Cost Range | Difficulty Level |
|---|---|---|
| Thermal Fuse | $10 – $35 | Easy |
| Heating Element | $40 – $120 | Moderate |
| Cycling Thermostat | $15 – $40 | Easy |
| Control Board | $150 – $300 | Advanced |
Safety During Appliance Repair
Warning: Always wear work gloves when handling heating elements or blower housings, as these areas often have sharp metal edges. Additionally, ensure the dryer is unplugged for at least ten minutes before touching any internal electrical components to allow the capacitors on the control board to discharge fully.
Frequently Asked Questions
Why does my dryer run but stay cold?
This usually indicates a failure in the heating circuit. The most frequent culprits are a blown thermal fuse, a broken heating element, or a tripped circuit breaker. Because the drum motor runs on a different electrical circuit than the heating element, the dryer can continue to spin even when the heat-producing components have failed. Check these parts sequentially to isolate the specific point of failure.
Can I fix a Samsung dryer myself?
Yes, many common dryer repairs are well within the capabilities of a DIYer with basic hand tools. Replacing a thermal fuse or a heating element requires only a screwdriver and a multimeter to test for continuity. However, if you’re uncomfortable working with high-voltage electrical appliances, it’s safer to hire a professional technician to ensure the repair meets safety standards.
Does a clogged vent really stop the heat?
Yes, restricted airflow is a major cause of heating failure. Most Samsung dryers have high-limit thermostats designed to cut power to the heating element if the internal temperature exceeds a safe threshold. If your vent is clogged, heat builds up rapidly, triggering this safety mechanism to prevent a fire. Clearing the vent often resolves the problem immediately without needing to replace any parts.
How much does a professional repair cost?
Professional repair costs for a Samsung dryer generally range from $150 to $450. This figure includes the cost of the replacement parts and the labor for the technician to diagnose and install them. Simple repairs like a thermal fuse replacement will fall on the lower end of this range, while complex issues involving the main control board or motor will push the cost toward the higher end.
Conclusion
If you’re still feeling uncertain after checking these parts, don’t hesitate to reach out to a local technician. It’s better to be safe than sorry when you’re working with electrical components. Once you’ve got everything running smoothly again, you’ll be glad you didn’t give up on your appliance too soon.