
You can resolve most speed queen washer problems by checking the door lock, the water supply hoses, and the drain pump for blockages. When a machine stops mid-cycle, the most frequent cause is a faulty lid switch or a clogged debris filter that prevents the cycle from advancing. If your unit is under warranty, check your specific model’s service manual or contact the manufacturer directly to avoid voiding your coverage.
Why your Speed Queen washer has problems
Mechanical issues often arise from simple environmental factors or heavy usage patterns. A primary reason for operational trouble is an imbalanced load, which triggers the machine’s safety sensors to stop the spin cycle to prevent internal damage. If the floor isn’t perfectly level, the machine can’t distribute weight effectively, leading to excessive shaking and premature wear on the suspension springs.
Another frequent issue involves the water level sensor or pressure switch. If you notice the tub fails to fill or continues to overflow, the small plastic tube connected to the pressure switch may be detached or pinched. This happens when the machine vibrates during a heavy load, causing internal components to shift slightly.
Finally, electrical surges can disrupt the control board. If the screen is blank or the buttons are unresponsive, the issue is often a tripped circuit breaker or a blown thermal fuse within the control panel. Always verify your home’s power source before assuming the machine’s internal components have failed. For specific error codes, you can consult the Speed Queen official support resources to see if your model requires a reset procedure or a professional inspection.
Reset the electronic control board
If your washer is stuck in a loop or flashing lights, a hard reset often clears the temporary error. First, unplug the machine from the wall outlet completely. Leave it disconnected for 10 minutes to allow the capacitors to discharge their stored energy. This step is essential because it forces the control board to dump its current memory state.
After waiting, plug the machine back into the wall outlet. If you have a digital display, try selecting a fresh, short cycle like a “Rinse and Spin” to see if the system responds correctly. If the machine begins to fill and spin normally, the problem was likely a software glitch.
If you find the machine still unresponsive, check the door latch assembly first. A faulty latch sensor often mimics a dead control board by preventing the cycle from initiating.
This fix is for users who have machines with digital interfaces; if you have a mechanical timer dial, this step won’t help. If the error lights return immediately after the reset, the control board may have a physical short, which requires a certified technician to replace.
Never attempt to open the control panel housing yourself, as internal components can hold a dangerous electrical charge even when unplugged. Attempting to bypass the board with jumper wires risks permanent damage to the motor control unit, turning a simple software reset into a costly hardware replacement.
Clear the drain pump and filter
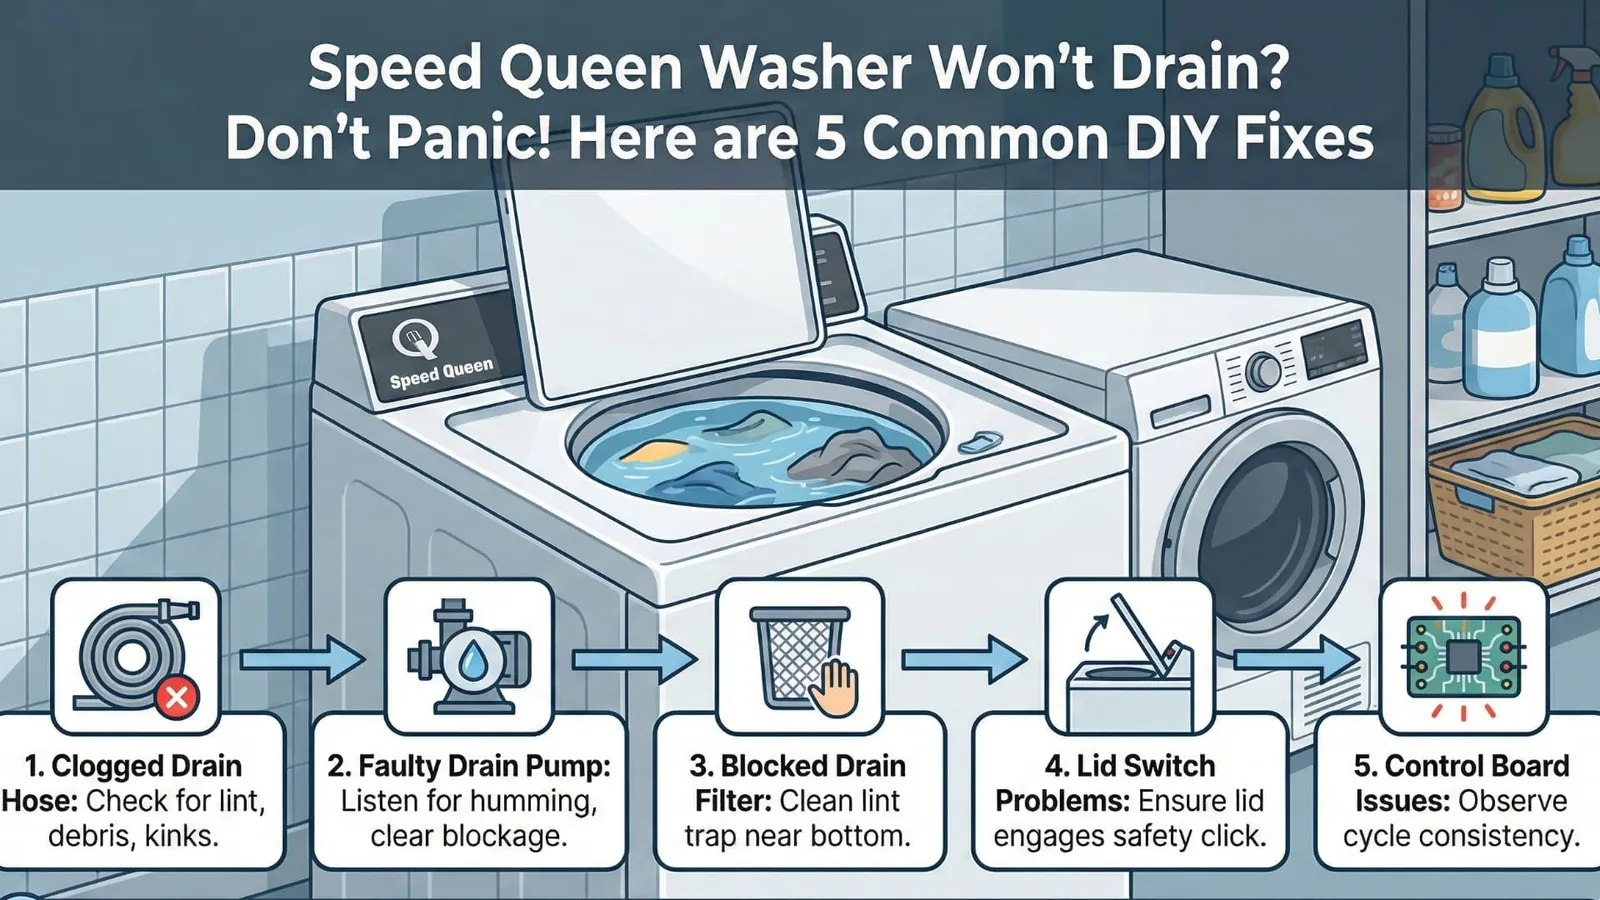
A machine that refuses to drain is usually suffering from a physical obstruction in the pump. You can check this by locating the drain filter, which is typically found behind a small access panel at the bottom front of the unit. Before opening this, place a shallow tray and a towel on the floor to catch the water that will inevitably spill out.
Expect at least one to two cups of standing water to pour out immediately. If the water doesn’t flow, the blockage is likely in the drain hose rather than the filter itself. In that case, disconnect the hose from the back of the machine and check for a clog before proceeding.
Unscrew the filter cap slowly. You’ll often find small items like coins, hairpins, or loose buttons that have slipped past the agitator. Remove all debris and rinse the filter under warm water to clear out any soap scum or lint buildup. Ensure the filter is screwed back in tightly, as a loose fit will cause a leak during the next fill cycle.
If the pump makes a loud grinding noise after you have cleared the filter, the internal impeller may be damaged. This is common if the machine has been run with heavy objects like keys or metal buckles inside.
If the pump still doesn’t move water after cleaning, you must call a repair professional to replace the pump motor. Don’t attempt to force the impeller by hand, as this often snaps the plastic housing and turns a simple cleaning into a full pump replacement.
Inspect the water inlet valves
If the machine takes an unusually long time to fill or doesn’t fill at all, the inlet valve screens are likely blocked by mineral deposits. Turn off the hot and cold water supply faucets at the wall. Unscrew the hoses from the back of the washer, keeping a bucket nearby to catch the water left in the lines.
Inside the intake ports on the back of the washer, you’ll see small mesh screens. Use a pair of needle-nose pliers to gently pull these screens out. If they’re covered in white or brown sediment, soak them in white vinegar for 30 minutes to dissolve the buildup. Rinse them thoroughly before sliding them back into place.
Most homeowners make the mistake of scrubbing these screens with a wire brush, which punctures the fine mesh and allows debris to enter the internal valve mechanism. This ruins the solenoid seal, forcing a complete valve replacement. Use only a soft toothbrush if the vinegar soak fails to clear the debris.
This fix is only effective if your home has hard water that deposits calcium over time. If the screens are clean but the water flow remains weak, the issue may be the pressure in your home’s pipes or a faulty valve solenoid.
If you hear a faint humming noise but no water enters, the solenoid has failed electrically. If you aren’t comfortable working with pressurized plumbing connections, contact a local plumber to avoid accidental water damage to your laundry room floor.
Mistakes to avoid during maintenance
Overloading the drum with heavy blankets puts extreme stress on the suspension and often leads to an unbalanced error code. If the machine vibrates aggressively during the spin cycle, stop the cycle immediately and remove half the load to prevent permanent motor damage.
Using too much detergent leaves a waxy residue that clogs internal sensors and causes the machine to report false errors. Always stick to the manufacturer’s fill line; if you see suds lingering after the rinse cycle, you’re using double the necessary amount.
Forcing the lid open when the lock light is on snaps the plastic latch mechanism, costing hundreds in professional repairs. If the cycle stalls, wait three full minutes for the solenoid to disengage.
Ignoring small leaks under the machine usually indicates a failing pump seal. If you find water pooling, replace the seal now to avoid water damage to your flooring.
Preventing future mechanical issues
Regular maintenance keeps the machine running at its peak efficiency. Adjust your habits based on the load size and the type of items you wash to ensure the internal parts don’t wear out prematurely.
If you’re washing heavy rugs, use a delicate cycle to prevent drum imbalance. Using extra soap creates a residue that triggers false error codes; always stick to the manufacturer’s recommended amount to stop sensor buildup. Closing the lid hard eventually snaps the plastic housing, so guide it down gently to protect the latch. If you notice the machine shaking, level the legs immediately. Ignoring vibrations causes the internal suspension springs to stretch, which leads to permanent motor stress.
If your machine makes a rhythmic clicking sound during the spin cycle, a small object like a coin is likely trapped in the pump filter. Clear this debris monthly to avoid a pump failure that costs hundreds in repairs. If the machine smells musty, leave the door ajar between loads to dry out the gasket.
Related guides
- Craftsman Power Washer Troubleshooting: Fix Common Problems in 2026
- Maytag Washer Bravos XL Troubleshooting: Fix Common Errors
- Craftsman Power Washer Troubleshooting: Fix Pressure Issues
Frequently asked questions
How long should a washer last?
A machine typically lasts between 10 and 15 years. This lifespan depends on your water hardness and how often you clean the filters and hoses. Note that increased noise often indicates natural bearing wear.
Is it safe to fix a leaking washer?
Only attempt to fix leaks if the water comes from a loose hose connection at the back. Leaks from underneath the center indicate a failed seal or cracked tub requiring professional repair. Improper disassembly may void your warranty.
Why is my washer shaking so much?
The machine is shaking because the load is unbalanced or the leveling legs aren’t level. Press down on each corner to check for rocking and adjust the legs accordingly. Ensure clothes are distributed evenly to prevent the drum from hitting the sides.
How often should I clean the drain filter?
You should clean the drain filter regularly to prevent buildup that leads to drainage errors. The frequency depends on your usage, so consult your owner’s manual for specific guidance. Keeping this filter clear ensures the water pump doesn’t have to work harder than necessary.
What happens if I ignore an error code?
Ignoring an error code often leads to secondary damage, such as a burned-out pump or a ruined control board. A code is the machine’s way of telling you that a specific component is under stress or failing to perform its job. If you continue to run the washer while it’s displaying a warning, you risk turning a small, inexpensive repair into a total failure of the appliance.
Can I use a different brand of parts?
Only use parts specifically designed for your model to ensure safe and correct operation. Generic or incompatible parts can cause improper fits, leaks, or electrical shorts. Always verify your model number against the manufacturer’s parts list before ordering.
Conclusion
Maintaining your appliance with these simple steps will help you avoid the most common service calls. By keeping the filters clear and the machine balanced, you ensure that it remains a reliable part of your home for many years.