If you rely on hydraulic systems, you know how important directional control valves are for smooth operation. But what happens when these valves stop working properly?
You might face slow movements, unexpected stops, or even complete system failure. Don’t let valve issues disrupt your work or cause costly downtime. You’ll discover simple, effective ways to troubleshoot hydraulic directional control valves. By the time you finish reading, you’ll feel confident identifying problems and fixing them quickly—saving you time, money, and frustration.
Keep reading to make sure your hydraulic system stays reliable and efficient.
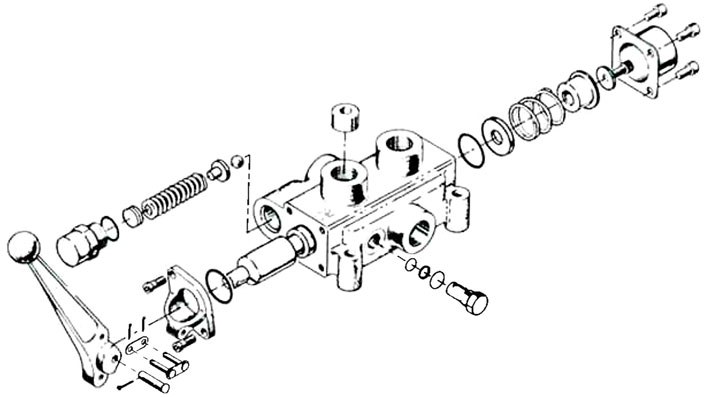
Credit: crossmfg.com
Common Valve Types
Hydraulic directional control valves guide fluid flow in hydraulic systems. They control the movement and direction of hydraulic fluid. Different types of valves serve different purposes. Understanding these common valve types helps in troubleshooting and maintenance.
Spool Valves
Spool valves use a cylindrical spool that slides inside a bore. The spool blocks or opens fluid paths to control flow. They are popular for their smooth operation and reliability. Spool valves can handle high pressure and flow rates. Problems often occur from spool wear or contamination. Cleaning and inspection can often fix these issues.
Poppet Valves
Poppet valves use a round or conical plug that moves to open or close ports. They provide quick and tight sealing. These valves are good for high-pressure systems with fast response needs. Common problems include sticking or leaking due to dirt or wear. Regular cleaning and replacing worn parts keeps them working well.
Rotary Valves
Rotary valves control fluid flow by rotating a part inside the valve body. They are compact and simple in design. These valves suit systems where space is limited. Wear and seal failure can cause leaks or poor performance. Checking seals and lubrication helps prevent problems in rotary valves.
Typical Valve Failures
Hydraulic directional control valves guide fluid flow in machines. These valves face common problems that reduce performance. Knowing typical valve failures helps fix issues faster. Regular checks catch these problems early, saving time and cost.
Leakage Issues
Leakage in valves causes pressure drops and fluid loss. It happens due to worn seals or damaged valve seats. Dirt and debris can also create gaps for leaks. Leaks reduce system efficiency and can cause overheating.
Check seals and seats for wear or damage. Clean the valve to remove dirt inside. Replace any broken parts to stop leakage and restore function.
Sticking Spools
Spools inside valves move to control fluid direction. Sometimes, spools stick and do not move smoothly. Sticking occurs from corrosion, dirt buildup, or lack of lubrication. This causes slow or no response in valve operation.
Inspect the spool for rust or dirt. Clean and lubricate it properly. Replace the spool if it is damaged to ensure smooth movement.
Pressure Loss
Pressure loss means the valve cannot maintain the required fluid pressure. Causes include worn internal parts, wrong settings, or clogged passages. Low pressure affects the machine’s power and accuracy.
Test the valve pressure regularly. Adjust settings as needed and clean clogged parts. Replace worn components to restore correct pressure levels.
Diagnostic Techniques
Diagnostic techniques help find problems in hydraulic directional control valves. These methods show where the valve may be faulty or blocked. Using simple tests, you can spot issues fast and fix them before damage grows.
Proper diagnosis saves time and money. It also keeps your hydraulic system working smoothly. Here are key techniques to check and test the valve condition.
Visual Inspection
Start with a close look at the valve and its parts. Check for leaks, cracks, or worn seals. Look for dirt or rust that may block valve movement. Loose or broken connections also cause valve failure. Clean the valve surface to see damage clearly. A careful eye can catch many problems early.
Flow Testing
Flow testing checks if oil moves properly through the valve. Connect a flow meter to measure fluid speed and volume. Low flow rates may mean a stuck spool or clogged passage. Compare flow results to manufacturer specs. This test helps spot internal blockages or wear. Flow testing ensures the valve lets oil pass as it should.
Pressure Measurement
Pressure measurement shows if the valve holds or releases pressure correctly. Attach pressure gauges at key points on the valve. Watch for pressure drops or spikes during operation. Abnormal pressure means internal leaks or spool damage. Use a hydraulic test bench for accurate readings. Pressure tests confirm the valve controls force as designed.

Credit: www.thefabricator.com
Troubleshooting Steps
Troubleshooting hydraulic directional control valves requires a clear, step-by-step process. It helps find and fix problems quickly. This section breaks down essential steps to guide you.
Identifying Symptoms
Start by observing the valve’s behavior. Look for leaks, unusual noises, or slow movements. Check if the valve sticks or does not shift properly. Note any changes in system pressure or flow. These signs point to possible issues in the valve or connected parts.
Isolating The Fault
Next, isolate the problem area. Shut off the system and release pressure safely. Test each section of the valve and hydraulic circuit separately. This process helps narrow down the faulty component. Keep track of which tests show normal function and which do not.
Component Testing
Finally, test individual components like spools, springs, and seals. Use a multimeter or pressure gauge to check electrical and hydraulic parts. Replace any worn or damaged components. Clean parts that appear dirty or clogged. This ensures smooth valve operation and prevents future failures.
Repair Methods
Repair methods for hydraulic directional control valves focus on restoring proper function. These methods address common issues like leaks, sticking spools, and weak springs. Fixing these problems improves the valve’s performance and extends its life. Each repair step requires careful attention to detail and safety.
Cleaning And Replacing Seals
Seals often wear out and cause leaks. Cleaning the valve removes dirt and debris that block flow. Old seals must be replaced with new ones that fit correctly. This stops fluid leaks and keeps pressure steady. Use the right tools to avoid damaging the seals during removal.
Spool Realignment
The spool controls fluid direction inside the valve. Misalignment causes poor flow or sticking. Realigning the spool restores smooth movement. Check the spool for wear or damage before realignment. Adjust the spool carefully to ensure it moves freely without binding.
Spring Replacement
Springs maintain spool position and return it to neutral. Weak or broken springs cause valve malfunction. Replace old springs with ones that match the valve model. Correct spring tension helps the spool respond accurately. Test the valve after spring replacement for proper action.
Credit: www.china-gowin.com
Preventive Maintenance Tips
Preventive maintenance helps keep hydraulic directional control valves in good working order. It reduces unexpected breakdowns and extends valve life. Simple steps can stop many common problems early.
Regular Fluid Analysis
Check hydraulic fluid often. Clean fluid prevents valve wear and blockages. Look for dirt, water, or metal bits in the fluid. Testing fluid helps find issues before they cause damage. Change fluid on schedule to keep it fresh and effective.
Routine Valve Inspection
Examine valves regularly for leaks and damage. Tighten loose parts and replace worn seals. Check valve operation to ensure it moves smoothly. Early detection stops small faults from becoming big problems. Keep a log of inspections to track valve health.
Proper System Filtration
Use quality filters to catch contaminants. Clean or change filters based on usage. Proper filtration protects valves from dirt and particles. It improves system performance and reduces repair costs. Always match filters to your hydraulic system’s needs.
Advanced Troubleshooting Tools
Advanced troubleshooting tools make diagnosing hydraulic directional control valve issues faster and more accurate. These tools help detect problems that are hard to see with the naked eye. They save time and reduce guesswork. Using the right tools leads to better repairs and longer valve life.
Ultrasonic Leak Detectors
Ultrasonic leak detectors find leaks by sensing high-frequency sounds. These sounds come from air or fluid escaping through small cracks or faulty seals. The tool converts these sounds into audio signals you can hear. It helps locate leaks even in noisy environments. Early leak detection prevents bigger hydraulic system failures.
Thermal Imaging
Thermal imaging cameras show heat patterns in hydraulic valves. Hot spots often indicate friction, blockage, or electrical issues. The camera creates a color map of temperature differences. It helps spot problems before they cause valve failure. Thermal imaging is non-contact, making it safe and fast to use.
Electronic Diagnostic Systems
Electronic diagnostic systems connect to hydraulic valves to check their performance. They measure pressure, flow, and valve position digitally. The system shows real-time data and error codes. This makes troubleshooting precise and straightforward. It reduces downtime and helps maintain system efficiency.
Safety Precautions
Safety is the top priority during hydraulic directional control valve troubleshooting. These valves operate under high pressure. Any mistake can cause serious injury. Taking the right safety steps protects you and others nearby.
Understanding and following safety precautions reduces risks. It helps maintain a safe work environment. Always prepare before starting any troubleshooting work.
Lockout Procedures
Always lock out the power source before working on hydraulic valves. This stops the machine from starting unexpectedly. Use lockout devices and tags to secure controls. Confirm that power is off by testing the system. Never bypass lockout steps to save time.
Pressure Release Methods
Hydraulic systems hold high pressure even after shutdown. Release pressure carefully before opening valves or lines. Use pressure relief valves or bleed points. Follow manufacturer instructions for safe pressure release. Avoid sudden pressure drops to prevent accidents.
Personal Protective Equipment
Wear proper personal protective equipment (PPE) during troubleshooting. Safety glasses protect your eyes from fluid sprays. Gloves shield your hands from hot or sharp parts. Steel-toed boots guard your feet from heavy objects. Use PPE every time for safe work.
Frequently Asked Questions
What Causes A Hydraulic Directional Control Valve To Stick?
A valve can stick due to dirt or debris blocking its movement. Worn seals or corrosion inside the valve also cause sticking.
How Do I Know If The Valve Spool Is Damaged?
Signs include slow or erratic movement and unusual noises. Leaks around the valve body may also indicate spool damage.
Why Is My Hydraulic Valve Not Shifting Properly?
Improper shifting can result from low hydraulic fluid or contamination. Faulty solenoids and damaged springs also affect valve shifting.
Can Air In The Hydraulic System Affect Valve Performance?
Yes, air causes spongy or inconsistent valve operation. It reduces system pressure and can lead to valve malfunction.
How Often Should I Inspect And Maintain Directional Control Valves?
Inspect valves every 3 to 6 months, depending on usage. Regular cleaning and lubrication help prevent common problems.
What Tools Are Needed For Hydraulic Directional Control Valve Troubleshooting?
Basic tools include a pressure gauge, multimeter, and cleaning supplies. A service manual helps identify specific valve parts and functions.
Conclusion
Troubleshooting hydraulic directional control valves can save time and money. Start by checking basic issues like leaks or blockages. Clean or replace parts that show wear or damage. Regular maintenance helps avoid common problems. Understanding valve operation makes diagnosing faults easier.
Keep tools and manuals handy during repairs. Taking small steps prevents bigger system failures. Stay patient and methodical throughout the process. This approach keeps your hydraulic system running smoothly and efficiently.