
You can resolve most issues with your machine by performing Sewing Machine Tension Troubleshooting to re-balance the upper and lower thread interaction. The most common cause for uneven stitches is a threading error where the top thread hasn’t fully seated between the tension discs. If stitches look loose on the bottom, the top thread is likely out of place; if loose on top, the bobbin is usually the culprit. Checking these two areas solves most problems without professional help.
Sewing Machine Tension Troubleshooting
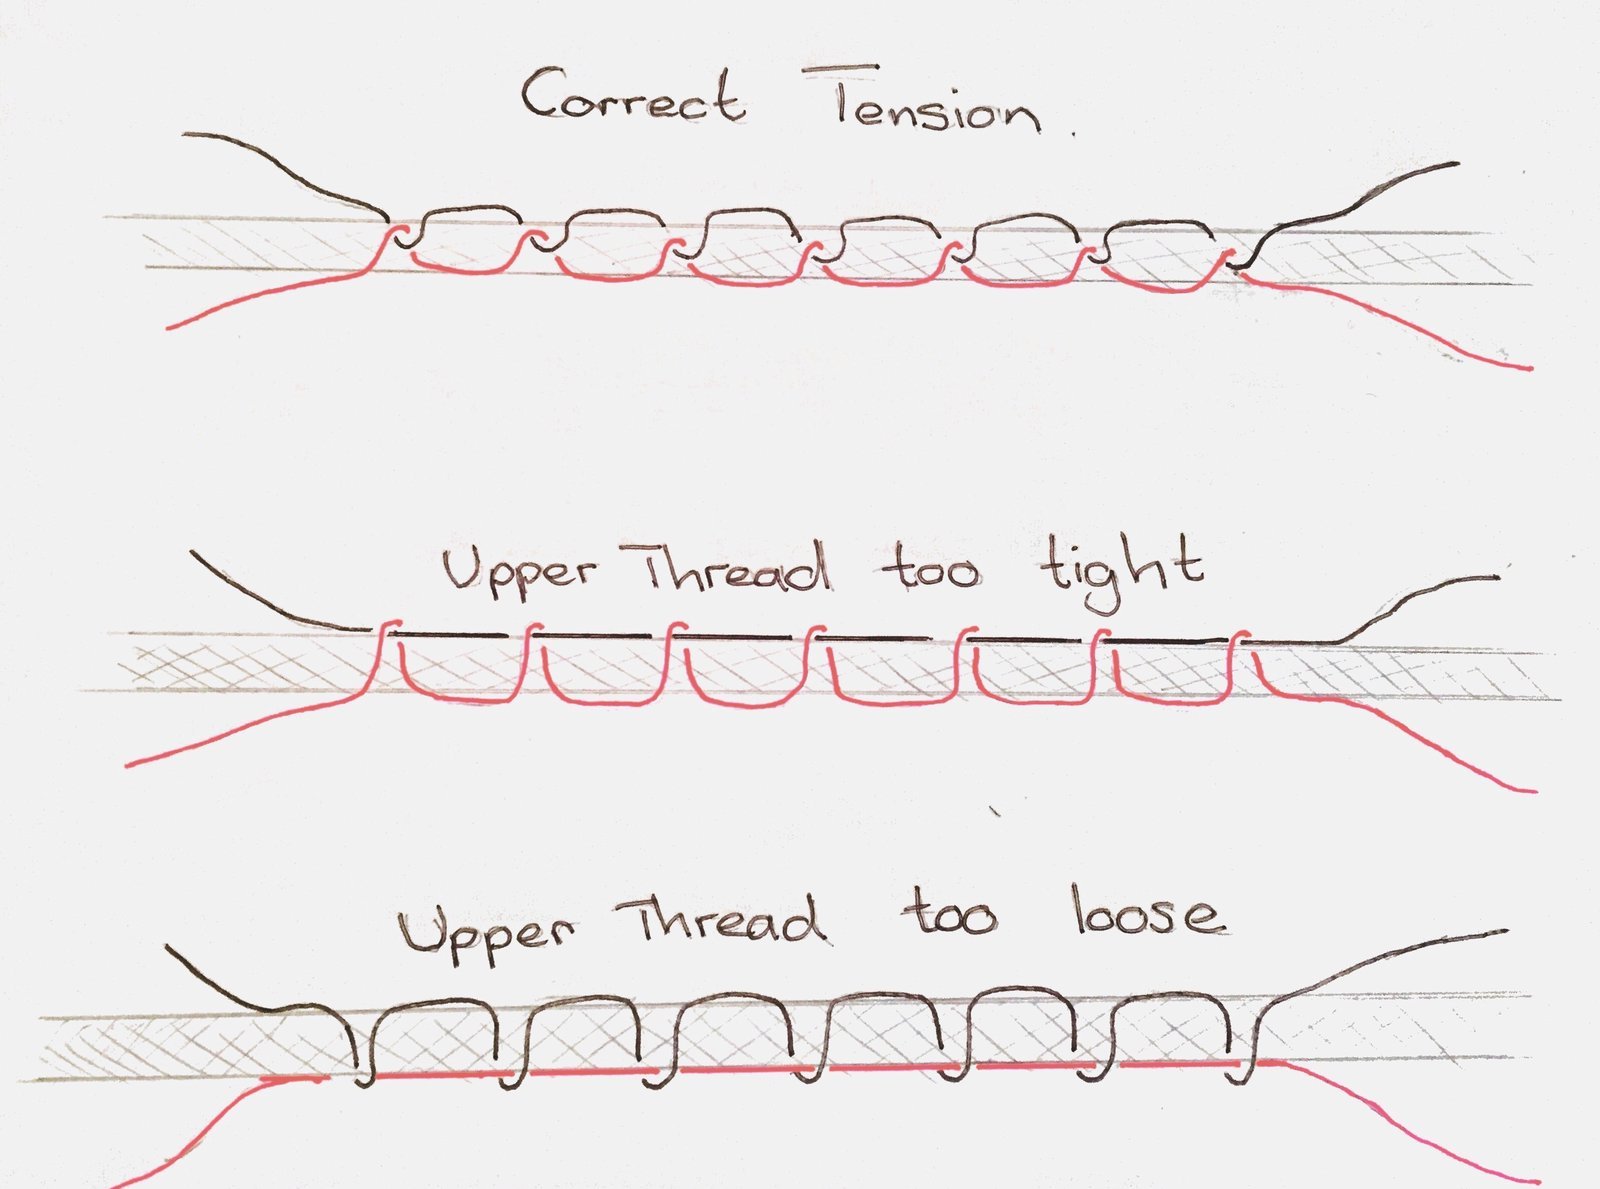
Stitch tension relies on a delicate tug-of-war between the needle thread and the bobbin thread. When this balance is perfect, the two threads lock together exactly in the middle of your fabric layers. If one side is stronger, it pulls the other thread to the surface, creating loops or flat, uneven lines.
The most frequent reason for this imbalance is improper threading. If you don’t raise the presser foot before threading the top of the machine, the tension discs remain closed. The thread sits on top of the discs rather than between them, meaning it faces no resistance. The machine then pulls the bobbin thread up too far because there’s no top tension to hold it back.
Another major cause is a dirty or damaged bobbin area. Over time, lint and small pieces of thread accumulate in the bobbin case. This debris creates friction, causing the bobbin thread to drag or catch as it exits the case. This extra drag makes the bottom thread appear tighter than it actually is.
Finally, your thread choice matters. Different fabrics and thread weights require different tension settings. If you use a heavy-duty thread in the needle but a standard weight in the bobbin, the machine will struggle to keep the stitch centered. Most modern machines are calibrated for a specific range of thread weights; if you exceed the manufacturer’s recommended range, the internal tension mechanism can’t compensate for the difference in thickness. Always use the same weight of thread in both the top and the bobbin unless your project specifically requires a decorative contrast.
Re-thread the entire machine
This fix is for anyone experiencing skipped stitches, loops on the underside of the fabric, or thread that pulls out easily. It’s the first step because it costs nothing and solves the most common user mistake.
Start by turning the power off. Remove your current spool of thread and take the bobbin out of the case. Raise your presser foot to the “up” position. This is the most important step because it opens the tension discs. With the foot up, thread the machine again from the spool to the needle, making sure the thread clicks firmly into the tension discs. If you don’t feel that slight resistance as you pull the thread through the discs, it isn’t seated correctly.
Next, wind a fresh bobbin. Don’t pull on the thread as it winds; let the machine do the work. Insert the bobbin into the case according to your manual’s diagram. Some machines require the thread to run clockwise, while others require counter-clockwise. Check the small metal tension spring on the side of the bobbin case. If the thread doesn’t pass under this spring, the bobbin tension will be zero, and you’ll see a bird’s nest of thread on the bottom of your fabric.
Once threaded, pull both the top and bobbin threads to the back of the machine. Hold them firmly as you take your first two stitches by hand using the handwheel. If the threads move freely without tangling, you have successfully re-threaded the machine. If the threads still bunch up, the problem is likely deeper than a simple threading error. This fix isn’t for machines with broken parts or bent needles; if you have replaced the needle and re-threaded twice with no change, stop and check for mechanical damage.
Adjust the tension dial
This fix is for when the machine is threaded perfectly but the stitches still appear slightly off-balance. Use this when you have changed your fabric weight or are using a thicker thread than usual.
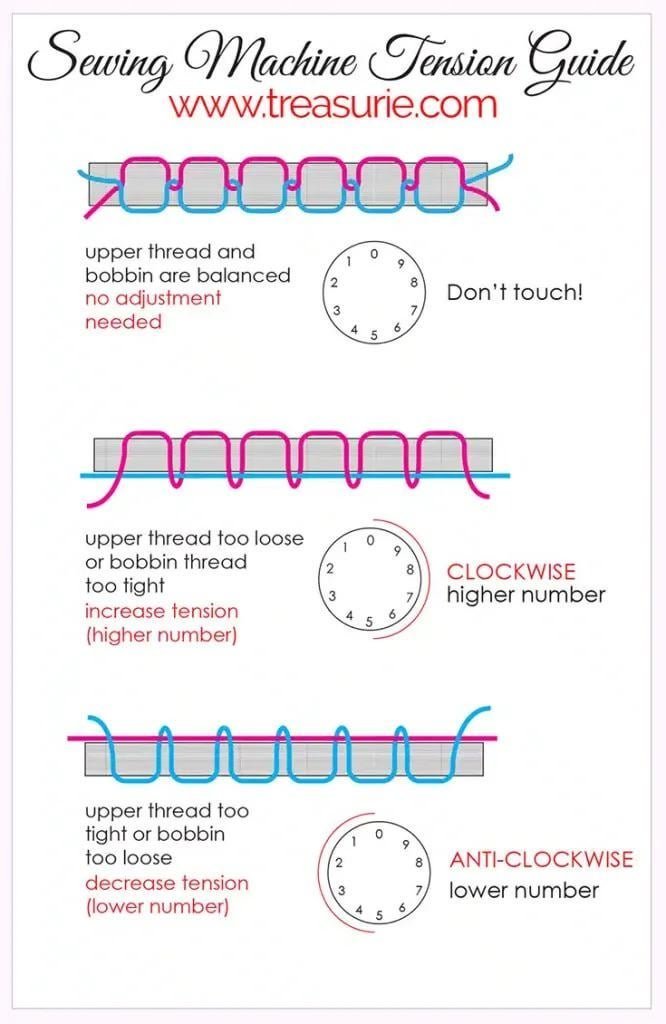
Most machines have a numbered dial on the front or side. The standard setting is usually marked with a dot or a bold number, often between 3 and 5. If your stitches show loops on the bottom, your top tension is too loose. Turn the dial to a higher number to tighten the top thread. If you see loops on the top, your top tension is too tight; turn the dial to a lower number to loosen it.
Always adjust the dial one small increment at a time. A common mistake is turning the dial too far, which makes the problem worse. After each adjustment, sew a test seam on a scrap piece of the same fabric you’re using for your project. If you’re using two layers of denim, test on two layers of denim, not a single layer of thin cotton. The thickness of the fabric changes how the thread pulls.
This fix isn’t for machines that make a grinding noise or have a needle that hits the needle plate. If the needle hits the plate, you have a timing issue that requires a professional repair technician. Don’t force the dial if it feels stuck; some machines have a lock or a specific release for the tension mechanism. If you’re uncertain about the dial’s range, check the manual to see if your machine has an “auto” setting. If your model features an automatic tension setting, use it as your baseline before making manual adjustments.
Clean the bobbin area
This fix is for when you hear an unusual clicking sound or feel resistance when pulling the thread through the machine. It’s worth the effort when you have been sewing for several hours or using fabrics that shed, like flannel or fleece.
Turn off the machine and unplug it from the wall. Remove the needle plate and the bobbin case. You’ll likely see a thick layer of lint around the feed dogs and inside the bobbin race. Use a small, soft brush—often included with your machine—to gently sweep the lint away. Never use canned air, as it can blow lint deeper into the machine’s internal sensors or motor.
Check the bobbin case for any nicks or scratches. If the metal is rough, it will catch the thread and ruin your tension. If you see deep scratches, you must replace the bobbin case. This is an inexpensive part, but you must ensure you buy the exact model specified for your machine. Using a “universal” case often leads to more tension problems.
Once clean, put a tiny drop of sewing machine oil in the race only if your manual specifically instructs you to do so. Many modern machines are “self-lubricating” and should never be oiled by the user. If you use oil where it isn’t needed, you risk staining your fabric and clogging the internal gears. After cleaning, reassemble the parts and test the tension on a scrap piece. This fix isn’t for internal motor issues or electronic display errors. If the machine still doesn’t sew correctly after cleaning, you have reached the limit of what a home user should attempt.
What not to do
- Don’t pull on the fabric as you sew. This forces the needle to bend and disrupts the stitch formation, which makes the tension look uneven even if your machine is set correctly.
- Don’t use a bent or dull needle. A needle that’s even slightly damaged will skip stitches and cause the thread to snap, regardless of what you do with your tension dial.
- Don’t adjust the bobbin case screw unless you have to. This screw is factory-set and is very difficult to reset; most users make the tension much worse by trying to “fix” it manually.
- Don’t use low-quality or old thread. Old thread becomes brittle and uneven, which causes it to snag in the tension discs and create inconsistent loops.
How to stop it happening again
Consistent maintenance prevents tension issues from becoming a daily struggle. Follow this table to keep your stitches balanced for every project.
| If you’re doing this | Do this instead | Why |
|---|---|---|
| Leaving the foot down | Raise the presser foot | This opens the discs to let thread seat |
| Using old thread | Use fresh, quality thread | Old thread breaks and creates dust |
| Ignoring lint buildup | Clean the bobbin area | Lint causes drag on the bobbin thread |
| Changing fabric weight | Adjust the tension dial | Thicker fabric needs higher tension |
| Forcing the needle | Use the correct needle size | The wrong size skips stitches |
Frequently asked questions
Why is my sewing machine thread bunching on the bottom?
Tangled thread almost always means the top thread isn’t threaded correctly. When the thread misses the tension discs, it provides no resistance, causing the bobbin to pull it into a mess. Ensure the thread sits deep between the discs with the presser foot raised.
Can I adjust the bobbin tension myself?
No, you should avoid adjusting the bobbin tension screw unless absolutely necessary. This screw is factory-set for optimal performance and is difficult to recalibrate once moved. If your bottom tension is off, clean the case and ensure you’re using the manufacturer-recommended bobbin style.
How long does a sewing machine tension mechanism last?
The tension mechanism usually lasts for the entire life of the machine, provided you keep it clean and use it correctly. It’s a mechanical system of springs and discs that doesn’t wear out like a belt or a motor. If your tension fails, it’s usually because of debris, a bent needle, or a threading error, not because the parts have reached the end of their lifespan.
Is it safe to use oil in my sewing machine?
It’s safe only if your manual explicitly says to do so for your specific model. Many modern machines have sealed bearings and don’t require any oiling from the user. Using oil on a machine that doesn’t need it will attract dust, create a thick sludge, and eventually cause the internal parts to seize up. Always check your user guide before applying any lubricant.
What happens if I use the wrong size needle?
Using the wrong size needle causes skipped stitches and uneven tension because the thread can’t move through the fabric smoothly. A needle too small for the thread will shred it, while one too large for the fabric leaves visible holes. Always match your needle size to your fabric weight and thread thickness.
Final Thoughts
If your stitches still aren’t looking quite right, don’t get discouraged. Sometimes a fresh needle or a quick cleaning of the bobbin case is all it takes to get things running smoothly again. Keep a small notebook of your settings for different fabrics, and you’ll be sewing with confidence in no time.
Related guides
- Brother Sewing Machine Troubleshooting: Fix Common Errors Fast in 2026
- Brother Sewing Machine Troubleshooting: Fix Common Errors Fast