
For Yamaha 48 Volt Charger Troubleshooting, first check the wall outlet fuse and the cart’s receptacle connection if no light appears. Most power issues stem from simple electrical interruptions rather than hardware failure. Ensuring a secure connection to a grounded outlet often restores the charging cycle immediately.
Yamaha 48 Volt Charger Troubleshooting
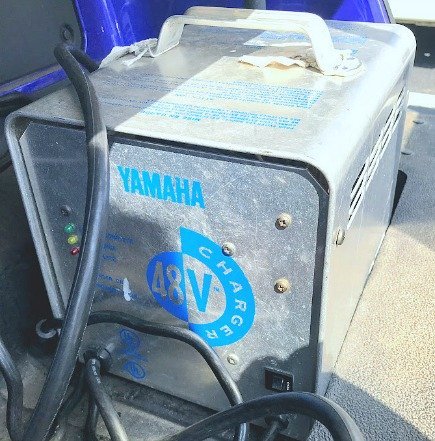
The most frequent reason for a charger failing to start is a lack of continuity between the power source and the battery pack. Because these chargers use a computer-controlled relay to detect battery voltage before sending current, any disruption in the connection prevents the unit from “seeing” the batteries. If the charger doesn’t detect the minimum voltage threshold, it remains in standby mode because it can’t safely initiate the charging cycle.
Another common cause involves the accumulation of dirt, oxidation, or corrosion inside the cart’s charging receptacle. Over time, the metal pins inside the port can become coated in road grime or oxidized from moisture. This creates high resistance, which tricks the charger into thinking the batteries are disconnected or faulty. If your cart is stored in a humid environment, this oxidation happens faster than in dry, climate-controlled spaces.
Finally, the internal safety circuitry of the charger may be triggered by a voltage imbalance. If one battery in your 48-volt pack has dropped below a critical level, the charger’s logic board may refuse to engage as a safety precaution. This is common if the cart has sat idle for several months. The Yamaha Golf-Car Company owner manuals provide specific guidance on the storage requirements for your model, as leaving batteries in a discharged state for long periods can lead to permanent capacity loss. Always verify your specific charger model label, as some units have different safety thresholds for “wake-up” voltage compared to others.
Check the power flow
If your charger is silent, the first step is to isolate the power source. Start by verifying that the wall outlet is providing electricity. Plug a lamp or a small tool into the same outlet to ensure the breaker hasn’t tripped. If the outlet works, inspect the charger’s AC plug for any signs of heat damage, such as melted plastic or blackened metal prongs. If the plug looks good, move to the DC side of the connection.
Ensure the plug that goes into your golf cart is pushed in firmly. A common mistake is assuming the charger is “on” just because the cord is touching the port. You should feel a positive “click” or firm resistance when the plug is seated correctly. If the charger still doesn’t hum or display a light, gently wiggle the plug while watching the status indicator. If the light flickers, the issue is likely the receptacle pins inside the cart.
If you’re using an extension cord, stop immediately. These chargers draw significant current, and a thin household extension cord will cause a voltage drop, which prevents the charger from reaching its operating state. If you must use one, it should be a heavy-duty cord with a gauge rating of 10 or 12. If the charger is plugged directly into a wall outlet and still shows no life, the internal fuse or the logic board has likely reached the end of its service life. This is a limit that varies by model — check the label on the back of your unit for the specific fuse rating.
Clean the connection points
When the charger is receiving power but the batteries aren’t taking a charge, the culprit is often dirty contact points. You can safely clean the exterior of the charger plug and the opening of the golf cart receptacle using a dry, non-conductive brush. Never use metal tools, such as screwdrivers or knives, to scrape the inside of the port. Using metal tools inside the receptacle can cause a short circuit or damage the delicate pins, which are expensive to replace.
If you see visible green or white crust on the pins, this is oxidation or mineral buildup. You can lightly wipe the outer surfaces with a clean, dry cloth. If the corrosion is deep inside the pins, don’t attempt to reach it yourself. This is a point where you should contact a professional golf cart technician. They have the specialized tools to clean or replace the receptacle without damaging the wiring harness.
If you have two different golf carts, try swapping the charger to the other cart. This simple trade-off helps you determine if the problem is the charger itself or the receptacle on your specific cart. If the charger works on the second cart, your first cart has a faulty receptacle or a bad battery connection. If the charger fails on both carts, the charger is the faulty component.
When to seek help
Sometimes, the internal components of the charger fail due to age or power surges. If you have confirmed that your outlet works, the plug is clean, and the connection is tight, but the charger remains dead, you have hit an honest limit. At this stage, the problem is likely an internal relay or a blown internal fuse.
Because modern 48-volt chargers contain capacitors that store electricity even when unplugged, you must never open the charger housing. A capacitor can hold a lethal charge long after the unit is disconnected from the wall. If you attempt to open the case, you risk a severe electric shock. If your troubleshooting steps haven’t resolved the issue, take the unit to a certified service center.
Professional repair is worth the cost if the charger is a high-end, intelligent model designed for your specific battery type. If you’re using an older, basic model, a technician may suggest replacing the unit entirely. This is often the better choice if the cost of labor and parts approaches the price of a new, modern charger. If you’re unsure about the state of your batteries, ask the technician to perform a load test on the battery pack while the charger is in the shop.
What not to do
- Never use a metal object to scrape the charging pins. This can cause a short circuit that ruins the charger’s logic board or causes a dangerous spark.
- Don’t spray liquid cleaners into the charge port. Moisture can cause internal corrosion or electrical shorts that are difficult to fix and may void your warranty.
- Never try to bypass the safety interlock switch. While it might seem like a quick fix to get the cart moving, this removes a vital safety feature that prevents the cart from driving away while plugged in.
- Don’t leave the charger plugged into a tripped outlet. If the breaker keeps tripping, it may indicate an overloaded circuit or a fault in the charger that requires professional inspection.
- Avoid using a household power strip or surge protector. These aren’t designed for the high-amperage draw of a 48-volt charger and will likely melt or fail during the charging cycle.
How to stop it happening again
Consistency is the best way to prevent future charging issues. By following a regular maintenance schedule, you can keep the connection points clear and the battery pack healthy.
| If you’re doing this | Do this instead | Why |
|---|---|---|
| Leaving the cart for months | Plug it into a smart charger | Prevents deep discharge damage |
| Using thin extension cords | Connect directly to the wall | Avoids voltage drops and heat |
| Ignoring dust in the port | Clean with a dry, soft brush | Ensures a solid electrical path |
| Forcing the plug into place | Align pins and push gently | Prevents bending or breaking pins |
| Ignoring warning lights | Check battery water levels | Stops premature battery failure |
Frequently asked questions
Can I leave my Yamaha golf cart plugged in all the time?
Yes, most modern Yamaha chargers automatically shut off or switch to maintenance mode once batteries are fully charged. This prevents overcharging and keeps batteries topped off during inactivity. Always check your specific manual to confirm your model includes this automatic feature.
Why does my charger make a loud clicking sound?
The clicking sound is the internal relay engaging and disengaging as the charger communicates with the battery pack. This is a normal part of the operation for many 48-volt units. If the clicking is constant or accompanied by a buzzing sound that doesn’t stop, it suggests a fault in the relay or the logic board. In this case, stop using the charger and have it inspected by a professional technician.
How long does a 48-volt golf cart take to charge?
A full charge typically takes between 8 and 12 hours depending on how deeply the batteries were discharged. If your batteries were nearly empty, it might take the full 12 hours for the charger to complete the balancing cycle. If the charger takes significantly longer than this, it may be a sign that your batteries are aging and losing their capacity to hold a charge.
Is it safe to use an aftermarket charger?
No, it isn’t recommended unless the charger is specifically labeled as compatible with your Yamaha system. Using an incorrect charger can cause the batteries to overheat, which risks a fire or permanent damage to the battery cells. Always use a charger that matches the voltage and amperage specifications listed on your golf cart’s original manual.
What happens if I charge my cart with the wrong voltage?
Charging a 48-volt system with a 36-volt charger will result in an incomplete charge, while using a higher voltage charger will likely cause the batteries to boil and fail. The charger’s internal computer will usually detect the voltage mismatch and refuse to start, but trying to force it can cause serious electrical damage. Always verify the charger output matches your battery pack voltage before plugging it in.
Final Thoughts
If these basic checks don’t bring your battery back to life, it’s time to consult a local service technician. They’ll have the professional tools to safely test your internal components. Don’t worry if you can’t fix it yourself; getting an expert’s opinion is often the smartest way to protect your investment.
Related guides