Is your Chamberlain garage door opener showing a blinking light and leaving you wondering what it means? You’re not alone.
That flashing light is your opener’s way of telling you something needs attention. Ignoring it could lead to bigger problems or even leave you stuck outside your garage. But don’t worry—this guide will help you quickly understand what those blinking lights mean and how to fix them.
Keep reading to get your garage door working smoothly again without hassle.

Credit: www.youtube.com
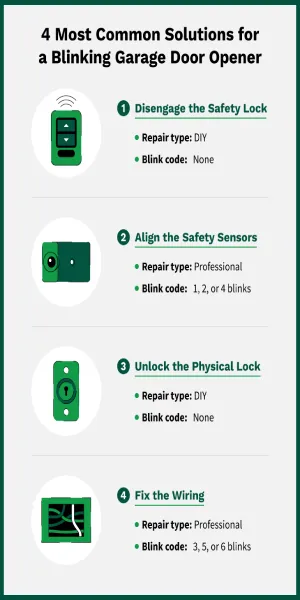
Common Causes Of Blinking Light
The blinking light on a Chamberlain garage door opener signals an issue. This light helps you identify problems quickly. Knowing the common causes saves time and effort. It guides you to fix the problem safely and effectively.
Power Supply Issues
The garage door opener needs a steady power supply. Loose plugs or a tripped breaker can cause the light to blink. Power outages or surges may also interrupt the opener’s function. Check the outlet and the circuit breaker first. Ensure the opener is getting the correct voltage.
Remote Control Problems
The blinking light can mean remote control issues. Dead or weak batteries often cause this problem. The remote may also be out of range or need reprogramming. Pressing multiple buttons at once can confuse the opener. Replace batteries or reset the remote to fix this.
Safety Sensor Obstructions
Safety sensors monitor the garage door’s path. Dirt, spider webs, or objects blocking the sensors cause the light to blink. Sensors must align perfectly to work. Clean the sensors gently and remove any obstacles. Make sure nothing blocks the sensor beams.
Wiring And Connection Faults
Damaged or loose wires affect the opener’s signals. Check the wiring near the motor and sensors for wear. Corroded or disconnected wires cause blinking lights. Tighten loose connections and replace damaged wires carefully. Proper wiring ensures smooth garage door operation.
Credit: www.precisiondoor.net
Resetting The Garage Door Opener
Resetting the Chamberlain garage door opener often solves blinking light issues. This process clears minor glitches and restores normal function. Two common reset methods include power cycling and factory reset. Both are easy to perform and need no special tools. Follow the steps carefully to reset your opener safely.
Power Cycle Method
Unplug the garage door opener from the power source. Wait for 30 seconds to 1 minute. Plug it back in and wait for the lights to stabilize. This simple reset can fix temporary errors causing blinking lights. Test the opener after power cycling to see if the problem is solved.
Factory Reset Steps
Locate the “Learn” button on the opener unit. Press and hold the button for about 6 seconds until the LED turns off. Release the button to complete the reset. This step clears all programmed remotes and settings. Reprogram your remotes and keypad after the factory reset. This reset fixes deeper system errors causing blinking lights.
Fixing Safety Sensor Errors
Fixing safety sensor errors is key to solving blinking light issues on your Chamberlain garage door opener. These sensors stop the door from closing if something blocks the path. Errors often cause the opener to stop working properly.
Simple checks on your safety sensors can clear up most problems. Start by cleaning the sensor lenses, then check if the sensors are lined up right. Finally, inspect the wiring to make sure everything is connected well.
Cleaning Sensor Lenses
Dirt and dust can block the sensor lenses. Use a soft cloth to wipe each lens gently. Avoid using harsh cleaners that could damage the sensors. Clean lenses help the sensors see clearly and work properly.
Realigning Sensors
Sensors must face each other directly. Check if they are tilted or out of line. Move the sensors slowly until the indicator light turns solid. Proper alignment ensures the sensors detect objects accurately.
Checking Sensor Wiring
Loose or damaged wires can cause sensor errors. Inspect the wires for cuts, frays, or loose connections. Secure any loose wires and replace damaged ones. Good wiring keeps the sensors connected to the opener.
Troubleshooting Remote Control
Troubleshooting your Chamberlain garage door opener remote control can fix blinking light issues. The remote might not work due to simple problems like dead batteries or lost programming. Checking these areas first can save time and money. Follow these steps to restore your remote’s function and clear the blinking light.
Replacing Batteries
Start by opening the remote control case. Take out the old batteries carefully. Use fresh batteries with the correct size and type. Insert them in the right direction, matching the plus and minus signs. Close the case tightly. Test the remote to see if the blinking light stops.
Reprogramming The Remote
Sometimes the remote loses its connection with the garage door opener. Reprogramming can fix this. Press the “Learn” button on the opener unit until the light blinks. Within 30 seconds, press and hold a button on the remote. Release it when the light blinks again. This means the remote is now paired.
Testing Remote Signal
Check if the remote sends a signal to the opener. Use a smartphone camera to view the remote’s infrared light. Point the remote at the camera and press any button. If you see a blinking light on the phone screen, the remote sends a signal. No light means the remote may be faulty or needs repair.
Inspecting Wiring And Connections
Inspecting the wiring and connections is a key step to fix a blinking light on a Chamberlain garage door opener. Faulty wires or loose connections can cause the opener to act strangely. Checking these parts helps you find simple problems fast. It can save time and money before calling for help.
Start by closely looking at all wires and where they connect. The opener uses power and signal wires. These must be solid and tight. Any loose or broken wire can stop the opener from working right.
Checking For Loose Wires
Look at all wire ends and terminals. The wires should be firmly attached to screws or clips. Wiggle each wire gently. No wire should move or feel loose. Loose wires cause poor contact and blinking lights. Tighten screws if needed. Use a screwdriver to secure the wires well. Make sure no wires touch each other. This can cause short circuits.
Repairing Damaged Cables
Inspect the cables for cuts, cracks, or worn spots. Damaged cables may expose wires inside. This can cause a short or break the connection. Replace any cables with visible damage. Use electrical tape only for small cracks, not big cuts. Never use the opener if cables look bad. Faulty cables are unsafe and can cause failure. Proper cables ensure smooth power flow and signal transmission.
Credit: thriftygaragedoorrepair.ca
When To Call A Professional
Knowing when to call a professional for your Chamberlain garage door opener is important. Some problems are simple to fix, but others need expert help. Calling the right person saves time and prevents damage.
Identifying Complex Issues
Some blinking light problems mean serious issues. These include motor failure, circuit board damage, or wiring faults. Troubleshooting these requires special tools and skills. If basic steps like resetting or checking batteries do not work, it might be time to call a pro. Trying to fix complex parts alone can cause more harm.
Safety Considerations
Garage door openers have strong springs and moving parts. These can cause injury if handled wrong. Electrical components inside can also be dangerous. Professionals know how to handle these safely. Avoid risks by letting experts deal with repairs. Your safety should always come first.
Frequently Asked Questions
What Does A Blinking Light On Chamberlain Opener Mean?
A blinking light usually signals a problem with the safety sensors or wiring. Check for obstacles or misaligned sensors near the door.
How To Fix Chamberlain Garage Door Opener Blinking Light?
Start by cleaning the sensor lenses and aligning them properly. Ensure all wires are secure and not damaged.
Why Is My Garage Door Opener Light Blinking Continuously?
Continuous blinking may indicate a sensor fault or a wiring issue. Inspect sensors and wiring for damage or loose connections.
Can Power Issues Cause The Opener’s Blinking Light?
Yes, power surges or low voltage can cause the light to blink. Try resetting the opener by unplugging it briefly.
Does The Blinking Light Affect Door Operation?
The blinking light often stops the door from closing for safety reasons. Fixing the sensor issue usually restores normal function.
When Should I Call A Technician For Blinking Light Problems?
Call a pro if sensor cleaning or resetting does not stop the blinking. Persistent issues may need expert diagnosis and repair.
Conclusion
A blinking light on your Chamberlain garage door opener signals an issue. Check the error codes to find the problem quickly. Simple fixes like resetting the opener or adjusting sensors often work. Keep the area clear and inspect all parts regularly.
Following these steps helps avoid bigger repairs later. Stay calm and take one step at a time. Your garage door will work smoothly again soon.