Are you having trouble with your Harley Davidson CV carburetor? If your bike isn’t running smoothly or feels sluggish, the carburetor might be the culprit.
Understanding how to troubleshoot your CV carburetor can save you time, money, and frustration. In this guide, you’ll discover simple steps to identify common issues and get your Harley back on the road quickly. Keep reading—you’re just moments away from mastering the fixes that will keep your ride powerful and reliable.
Common Carburetor Issues
Harley Davidson CV carburetors are known for smooth riding. Still, they can face common issues that affect performance. Knowing these problems helps keep your bike in top shape.
Regular checks prevent small problems from becoming big ones. This section covers common carburetor issues and what causes them.
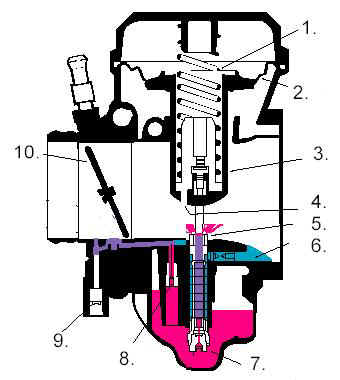
Symptoms Of A Faulty Cv Carburetor
A faulty carburetor causes rough idling and hard starts. The engine may stall or hesitate during acceleration. You might notice black smoke from the exhaust. Poor fuel economy and loss of power are common signs. Strange noises like popping or backfiring can also occur.
These symptoms show the carburetor is not mixing fuel and air correctly. Ignoring them can lead to more damage and costly repairs.
Causes Of Carburetor Problems
Dirt and debris often clog carburetor jets and passages. Old or contaminated fuel can gum up the carburetor parts. Worn gaskets and seals cause fuel leaks and air leaks. Improper adjustment of the carburetor screws affects performance. Vacuum leaks in the intake system disrupt the fuel mixture.
Regular cleaning and maintenance help prevent these issues. Proper fuel storage and using the right fuel type also make a difference.
Credit: www.nightrider.com
Tools And Safety Tips
Troubleshooting a Harley Davidson CV carburetor requires the right tools and attention to safety. Using proper tools makes the job easier and more accurate. Following safety tips protects you from injury and damage to your bike.
Essential Tools For Troubleshooting
A good set of screwdrivers is necessary for adjusting screws and removing parts. Wrenches and sockets fit bolts and nuts on the carburetor. A carburetor cleaner spray helps remove dirt and grime. A small flashlight lights up hard-to-see areas. A vacuum gauge checks for air leaks in the system. A fuel pressure gauge measures fuel flow. A multimeter tests electrical parts related to the carburetor. Keep a clean cloth or rag handy for wiping parts.
Safety Precautions
Work in a well-ventilated area to avoid inhaling fumes. Always wear safety glasses to protect your eyes. Use gloves to keep your hands clean and safe. Avoid open flames or sparks near fuel. Disconnect the motorcycle battery to prevent sparks. Keep a fire extinguisher nearby for emergencies. Handle carburetor cleaner with care, as it is toxic. Follow the manufacturer’s instructions for all tools and chemicals. Take your time and work carefully to avoid mistakes or injuries.
Diagnosing Fuel Delivery Problems
Fuel delivery problems can cause your Harley Davidson to run poorly or not start at all. Diagnosing these issues early helps avoid bigger repairs. Focus on the carburetor and fuel system for common causes. Check parts that often get clogged or stuck.
Checking Fuel Lines And Filters
Start by inspecting the fuel lines for cracks or leaks. Old or damaged lines can block fuel flow. Replace any lines that look weak or brittle. Next, check the fuel filter. Dirt and debris can clog it, limiting fuel delivery. Clean or change the filter if it appears dirty or clogged. Clear fuel lines and filters help maintain steady fuel flow to the carburetor.
Inspecting The Float And Needle Valve
The float inside the carburetor controls fuel level. If it sticks or sinks, fuel flow can stop or overflow. Remove the float and check for damage or debris. The needle valve works with the float to open and close fuel flow. Dirt or wear can cause it to stick. Clean or replace the needle valve to ensure proper fuel control. A smooth float and needle valve keep fuel delivery steady and reliable.
Adjusting The Carburetor Settings
Adjusting the carburetor settings on a Harley Davidson CV carburetor is crucial for smooth engine performance. Proper tuning ensures the engine runs efficiently and avoids stalling or rough idling. Small changes to the carburetor can make a big difference in how the motorcycle feels and responds.
Two main adjustments control the engine’s idle and fuel mixture. These must be done carefully for best results. Below are the key steps to correctly adjust your Harley Davidson CV carburetor.
Idle Speed Adjustment
Idle speed controls how fast the engine runs when the throttle is closed. Start the engine and let it warm up. Locate the idle speed screw on the carburetor. Turn the screw slowly to increase or decrease the RPM. Aim for a smooth and steady idle, typically between 900 and 1100 RPM. Avoid setting the idle too high or too low. High idle wastes fuel and low idle can cause stalling.
Mixture Screw Tuning
The mixture screw adjusts the air and fuel ratio at idle. Turn the screw gently clockwise until it lightly seats, then back it out one and a half to two turns. Slowly turn it in or out to find the smoothest idle. Listen to the engine and watch the RPM changes. The goal is a steady idle with no sputtering or hesitation. Proper tuning improves fuel efficiency and engine response.
Cleaning The Carburetor
Cleaning the carburetor is a key step in fixing Harley Davidson CV carburetor issues. Dirt and grime can block fuel flow. This causes poor engine performance and rough idling. Regular cleaning keeps your bike running smoothly and saves you from costly repairs.
Carburetors have small parts that collect fuel residue. Cleaning these parts restores proper fuel delivery. It also improves throttle response and fuel efficiency. The process requires patience and care to avoid damage.
Removing And Disassembling
Start by removing the carburetor from the engine. Disconnect the fuel line and throttle linkage carefully. Take note of how parts fit together for reassembly.
Use basic tools to loosen screws and clamps. Gently separate the carburetor body from the float bowl. Avoid forcing parts to prevent cracks or breaks.
Remove the float and needle valve with care. These parts control fuel flow and must stay intact. Place small parts in a safe container to avoid loss.
Cleaning Jets And Passages
Jets and passages are tiny and easily clogged. Use carburetor cleaner spray to dissolve gum and varnish. Spray inside all holes until clear fluid flows out.
Use compressed air to blow out stubborn debris. Make sure jets are free of blockages for correct fuel flow. Inspect all passages visually for any remaining dirt.
Soak metal parts in carburetor cleaner if heavily dirty. Avoid soaking rubber or plastic parts to prevent damage. Dry all parts completely before reassembly to prevent corrosion.
Fixing Air Leaks
Air leaks can cause your Harley Davidson CV carburetor to run poorly. These leaks let extra air enter the engine. This changes the air-to-fuel mix and causes rough idling or stalling. Fixing air leaks is important for smooth engine performance and better fuel efficiency.
Start by checking the intake manifold for cracks or loose connections. Worn gaskets and seals also cause leaks. Replacing these parts often solves the problem. Careful inspection and simple repairs keep your bike running well.
Inspecting Intake Manifold
Check the intake manifold for any cracks or damage. Look for spots where it connects to the carburetor and engine. A loose clamp or worn rubber can cause leaks. Press gently on the manifold to find soft or cracked areas. Use a flashlight to see inside hard-to-reach spots. Listen for hissing sounds when the engine runs. These sounds often show where air escapes.
Replacing Gaskets And Seals
Old gaskets and seals lose their shape and become brittle. Remove the carburetor carefully to access these parts. Compare new gaskets with the old ones to ensure the right fit. Clean surfaces before placing new gaskets or seals. Tighten bolts evenly to avoid gaps. Test the bike after reassembly to check if leaks stop. Replacing worn parts restores a tight seal and improves engine performance.
Replacing Worn Components
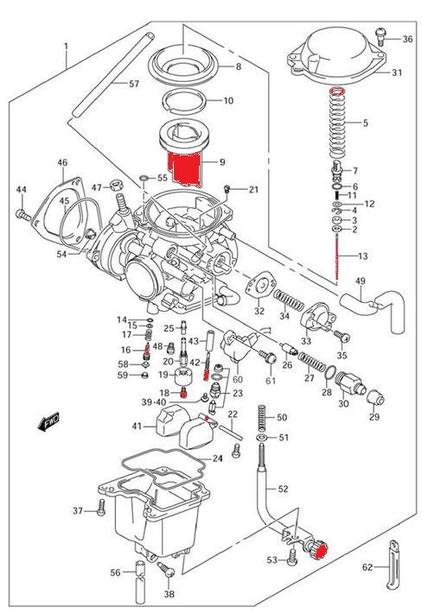
Replacing worn components in a Harley Davidson CV carburetor is key to keeping your bike running smoothly. Over time, parts inside the carburetor wear out and cause problems like poor fuel flow or engine stalling. Fixing these parts can restore performance and avoid costly repairs later.
Focus on the most common worn parts first. These include the float, needle, diaphragm, and spring. Each plays a vital role in controlling fuel delivery. Replacing or maintaining these parts is a straightforward process that can make a big difference.
Float And Needle Replacement
The float controls fuel level in the carburetor bowl. A damaged or worn float can cause flooding or fuel starvation. Inspect the float for cracks or holes. Replace it if it shows any damage.
The needle works with the float to regulate fuel flow. A worn needle may not seal properly, causing fuel leaks. Remove the needle and check its tip for wear. Swap it out if it looks worn or bent.
Use new parts designed for your Harley model. Proper float height and needle condition help maintain steady fuel flow. This keeps your engine running clean and efficient.
Diaphragm And Spring Maintenance
The diaphragm controls vacuum and throttle response. Over time, it can become brittle or torn. Check the diaphragm for cracks or holes. Replace it immediately if any damage is found.
The spring helps the diaphragm return to its position. A weak or broken spring affects throttle response and engine speed. Inspect the spring for signs of fatigue or damage. Replace it if it does not provide proper tension.
Routine inspection of the diaphragm and spring prevents poor engine performance. These parts work together to ensure smooth acceleration and consistent power.
Credit: www.6sigmajetkit.com
Testing After Repairs
After fixing your Harley Davidson CV carburetor, testing is vital. This step confirms repairs worked well. It helps spot small issues early. Proper testing leads to better engine life and smooth rides. Follow clear steps to test and adjust your bike.
Starting And Running The Engine
Start the engine carefully. Listen for any odd sounds or rough idling. The engine should start quickly and run smoothly. If it stalls or hesitates, check the carburetor again. Warm the engine up to normal temperature. Watch the engine’s response when you twist the throttle. Smooth acceleration shows good carburetor function.
Fine-tuning For Optimal Performance
Adjust the idle speed screw for steady engine idling. Turn it slowly and watch the RPM gauge. Set it to the manufacturer’s recommended RPM range. Next, adjust the air-fuel mixture screw. Turn it gently until the engine runs clean without sputtering. Test the throttle response again. Repeat these steps until the engine feels smooth and responsive. Small tweaks improve fuel efficiency and power.

Credit: www.reddit.com
Frequently Asked Questions
What Are Common Signs Of A Faulty Harley Davidson Cv Carburetor?
A faulty CV carburetor may cause poor engine performance, hard starting, or rough idling. You might also notice black smoke or fuel leaks.
How Do I Clean A Harley Davidson Cv Carburetor?
Remove the carburetor and use a carb cleaner spray on jets and passages. Avoid harsh tools to prevent damage to delicate parts.
Why Is My Harley Davidson Cv Carburetor Flooding?
Flooding often happens from a stuck float or worn needle valve. Check these parts and replace if needed to stop fuel overflow.
How Can I Adjust The Idle Speed On A Cv Carburetor?
Turn the idle screw clockwise to increase speed or counterclockwise to reduce it. Adjust slowly and test the engine response.
What Causes Hesitation Or Bogging In A Harley Davidson Cv Carburetor?
Clogged jets or dirty fuel can cause hesitation. Regular cleaning and fresh fuel help maintain smooth throttle response.
When Should I Rebuild My Harley Davidson Cv Carburetor?
Rebuild if you experience persistent performance issues or visible wear on parts. A rebuild kit can restore proper function efficiently.
Conclusion
Troubleshooting your Harley Davidson CV carburetor can save time and money. Start with simple checks like cleaning and adjusting the idle. Watch for common signs like rough idling or poor acceleration. Use the right tools and take your time. Small fixes often solve big problems.
Regular maintenance keeps your bike running smooth and strong. Stay patient and careful during each step. Your Harley will thank you with better performance. Keep learning and practicing to handle carburetor issues confidently.