
Solenoid Valve Basics
Understanding solenoid valve basics is key. It helps you fix common irrigation problems. This knowledge empowers you. You can keep your sprinklers working well. Let’s dive into how they function.
What Is A Solenoid Valve?
A solenoid valve controls water flow. It’s an essential irrigation part. It opens and closes automatically. A small electrical signal makes it work. It’s like a remote-controlled faucet.
How It Works
Electricity powers the solenoid. A coil creates a magnetic field. This field lifts a plunger. The plunger opens a diaphragm. Water then flows through the valve. When power stops, a spring closes it. This stops the water flow.
Common Valve Components
Valves have several parts. A valve body holds everything. A diaphragm seals the water path. A spring pushes the diaphragm shut. A solenoid coil activates the valve. Wires connect the solenoid to the controller. These parts work together.
Troubleshooting Symptoms
Rain Bird solenoid valve problems can be frustrating. Understanding common symptoms helps you fix them fast. This section guides you. We will look at what goes wrong. We will offer solutions.
Valve Not Opening
The valve should open. Water should flow. It is not opening. This is a common issue. Check the controller first. Is it sending power? The solenoid coil may be bad. It might be dirty. The valve itself could be stuck. Debris can cause this. Inspect the diaphragm too. A damaged one prevents opening.
Valve Not Closing
The valve stays open. Water keeps running. This is another problem. The solenoid might fail to de-energize. The controller could have issues. It may not cut power. The valve body might be damaged. A broken part can cause this. Ensure the plunger moves freely. Clean any obstructions.
Leaking Valve
Water drips from the valve. It should not be leaking. A worn-out seal is likely. Diaphragm failure causes leaks. Debris can prevent a seal. Check the valve cap and body. Cracks are a possibility. Tighten connections carefully. Replace worn parts promptly.
Low Water Pressure
Water pressure seems low. The valve might be the cause. A partially open valve restricts flow. Debris can clog the valve. This reduces water volume. The solenoid might not open fully. Inspect the filter screen. It can get plugged. Clean it thoroughly. Ensure the valve is fully open.
Electrical Issues
Electrical problems often stop your sprinklers. These issues prevent water flow. Let’s fix them. We will troubleshoot electrical faults. This keeps your lawn green. It saves you hassle. Troubleshooting is key.
Checking The Controller
Your sprinkler controller starts the valves. It sends signals. Check the controller first. Is it powered on? Are the programming settings correct? Look for error messages. A faulty controller causes many problems. Reset the controller. Try a simple test program. This checks its basic function. Ensure it is receiving power.
Wire Connections
Wires connect the controller to valves. Loose wires cause no power. Corroded wires block signals. Dig up the valve box. Inspect all wire connections. Are they secure? Are they clean? Look for any damage. Twist wires together tightly. Use waterproof wire connectors. This prevents future issues. Good connections are vital.
Faulty Solenoid Coil
The solenoid coil opens the valve. It uses electricity. A bad coil will not work. You can test the coil. Remove the wires from it. Look for cracks or burns. This indicates a failure. A damaged coil needs replacement. This is a common fix. It is relatively easy.
Testing Voltage
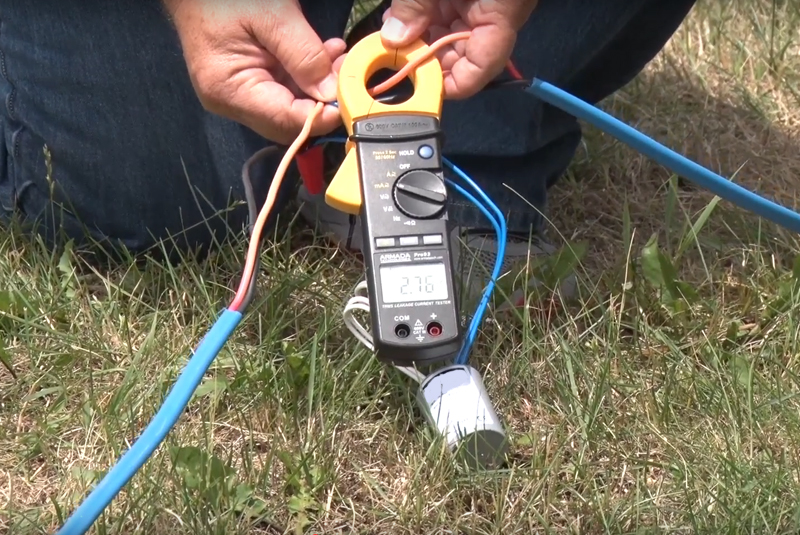
Electricity powers the solenoid. You need a multimeter. Test the voltage at the valve. Connect the meter to the wires. The controller should be on. You should see a voltage reading. Low voltage is a problem. No voltage means a break. Check the wires again. The controller might be faulty. This test pinpoints the issue.
Mechanical Problems
Mechanical problems can stop your Rain Bird solenoid valve. These issues prevent water flow. They need hands-on fixes. Let’s look at common mechanical faults.
Debris In The Valve
Dirt can get inside. Grit blocks the valve. It stops water from moving. Remove the valve cover. Clean out any debris. Rinse the parts well. This often solves the problem.
Diaphragm Issues
The diaphragm controls water. It can get worn. It might tear or crack. A faulty diaphragm leaks water. It may not open fully. Inspect the diaphragm carefully. Replace it if damaged. A new diaphragm restores function.
Stuck Plunger
A plunger moves up and down. It opens and closes the valve. Sometimes the plunger gets stuck. Mineral buildup causes this. Or debris can jam it. Gently try to free the plunger. Clean the plunger and its housing. A free plunger makes the valve work.
Cracked Valve Body
The valve body holds everything. It can crack from impact. Freezing temperatures can cause cracks. A cracked body leaks water. Water escapes from the outside. You must replace the valve. A new valve body is essential. This stops all leaks.
Water Flow And Pressure
Water flow and pressure are crucial. They tell us about valve health. Low flow signals a problem. Pressure drops also indicate issues. Troubleshooting these is key.
Clogged Filters
Filters stop debris. Debris can clog them. A clogged filter restricts water. This lowers flow and pressure. Check your filter regularly. Clean it if it’s dirty.
Pipe Leaks
Leaks waste water. They also reduce pressure. Find leaks near the valve. Look for wet spots. Repair any damaged pipes. This restores proper flow.
Zone Pressure Imbalance
Zones need balanced pressure. One zone might have less. This suggests a valve issue. The valve may not open fully. Or it might be faulty. Check valve operation. Ensure it opens completely. This balances zone pressure.
Credit: centralpros.com
Repair And Replacement
Troubleshooting a Rain Bird solenoid valve often leads to repair or replacement. Fixing minor issues can save time and money. Sometimes, a faulty valve needs a complete replacement for proper irrigation.
Sometimes, your Rain Bird solenoid valve needs a little attention. You might be able to fix it. Other times, a full replacement is the best option. This section guides you through these steps. We will help you get your irrigation system running smoothly again.Step-by-step Repair Guide
First, turn off the water supply. This is very important. Locate the solenoid valve. You will see a wire cap on top. Unscrew this cap. Inside, you will find the plunger and spring. Carefully lift out the plunger. Check the rubber diaphragm. Look for tears or damage. Clean any debris from the valve body. Rinse the plunger and spring. Reassemble the parts carefully. Make sure the diaphragm sits correctly. Screw the cap back on tightly. Turn the water back on slowly. Check for leaks.When To Replace
A valve may be beyond repair. If the diaphragm is badly torn, replace it. If the valve leaks constantly, replacement is needed. If water flows when it should not, it is time. If the valve does not open at all, replace it. Age can also be a factor. Older valves often fail.Choosing The Right Replacement
Get the exact same model. Check the valve size. Note the inlet and outlet threads. Look at the voltage. Most solenoids are 24VAC. Buy from a reputable supplier. This ensures quality parts.Installation Tips
Turn off the water supply again. Disconnect the wires from the old valve. Unscrew the old valve. Clean the valve box threads. Screw in the new valve firmly. Connect the wires to the new solenoid. Make sure they are secure. Turn the water on slowly. Test the new valve. It should operate correctly.Preventative Maintenance
Preventative maintenance is key. It keeps your Rain Bird solenoid valves working well. Simple steps save big problems. It stops unexpected failures. Your irrigation system runs smoothly. This saves time and money. It ensures your lawn stays green.
Regular Inspections
Walk your irrigation system. Look for leaks. Listen for hissing sounds. Check valve boxes. Ensure they are clear. Remove debris. This helps prevent damage. Spot issues early. Fix them fast.
Seasonal Checks
Spring starts the season. Test each valve. Make sure it opens. Confirm it closes properly. Fall prepares for winter. Drain the system. This prevents freezing. Seasonal checks are vital.
Filter Cleaning Schedule
Filters protect valves. They catch dirt. Dirty filters clog valves. Clean them often. Set a schedule. Monthly checks are good. More frequent cleaning may be needed. This ensures water flow.
Protecting From Freezing
Cold weather is a threat. Freezing water expands. It can crack valve parts. Drain your system before frost. Insulate exposed valves. Use valve box heaters. This prevents costly repairs.

Credit: www.youtube.com

Credit: www.hillsirrigation.com.au
Conclusion
Troubleshooting your Rain Bird solenoid valve is manageable. These steps help identify common problems. Check power and water flow first. Inspect the diaphragm for damage. Ensure proper wire connections. A clean valve operates best. Don’t forget regular system checks. These simple fixes save time.
Keep your irrigation system running smoothly.