Is your RV water heater switch not working when you need it most? You rely on that switch for warm showers and comfort on the road.
When it fails, it can quickly turn your trip into a hassle. But don’t worry—you’re not alone, and this problem is fixable. You’ll discover simple steps to diagnose and fix your water heater switch, so you can get back to enjoying your travels without cold water worries.
Keep reading to find out how to solve this common issue fast and easy.

Credit: www.egyptproco.com
Common Causes Of Switch Failure
The water heater switch in an RV is essential for hot water. When it stops working, it causes frustration. Understanding common causes helps fix the problem faster. This section explains the main reasons the switch may fail.
Electrical Issues
Loose wires can break the connection. Faulty fuses might stop electricity flow. A worn-out circuit breaker can also cause failure. Check wiring and power supply first. Electrical problems are often the easiest to fix.
Mechanical Wear And Tear
Switches have moving parts. Over time, these parts wear out. Constant use causes buttons to stick or break. Old switches may lose contact inside. Replacing the switch usually solves the issue.
Corrosion And Moisture Damage
Water and moisture can reach the switch. This causes rust and corrosion on contacts. Corroded switches lose electrical connection. Moisture damage is common in RVs. Keep the switch dry to avoid failure.
Safety Precautions Before Repair
Before fixing an RV water heater switch, safety comes first. This simple step protects you from electric shocks and water damage. Taking safety precautions helps avoid accidents and keeps the repair process smooth.
Follow these key safety tips to prepare for the repair.
Disconnecting Power Sources
Always turn off power before starting any repair. Unplug the RV from shore power or disconnect the battery. This stops electricity from flowing to the water heater switch. Double-check that no power is running to avoid shocks.
Using Proper Tools
Use tools designed for electrical work. Insulated screwdrivers and pliers protect you from electric shocks. Avoid makeshift tools that can slip or break. Proper tools make the repair safer and easier.
Avoiding Water Hazards
Keep the area dry before and during repairs. Water and electricity do not mix well. Check for leaks near the water heater. Dry any moisture to prevent slipping or shocks. Work in a clean, dry space to stay safe.
Quick Troubleshooting Steps
When the RV water heater switch stops working, quick checks can save time and frustration. These steps help find simple issues fast. Start with easy fixes before calling a professional. Follow these clear steps to troubleshoot your water heater switch effectively.
Checking The Circuit Breaker
Locate the circuit breaker panel in your RV. Look for any tripped breakers linked to the water heater. A tripped breaker stops power flow to the switch. Flip the breaker off and then back on to reset it. If it trips again, there may be a deeper electrical problem.
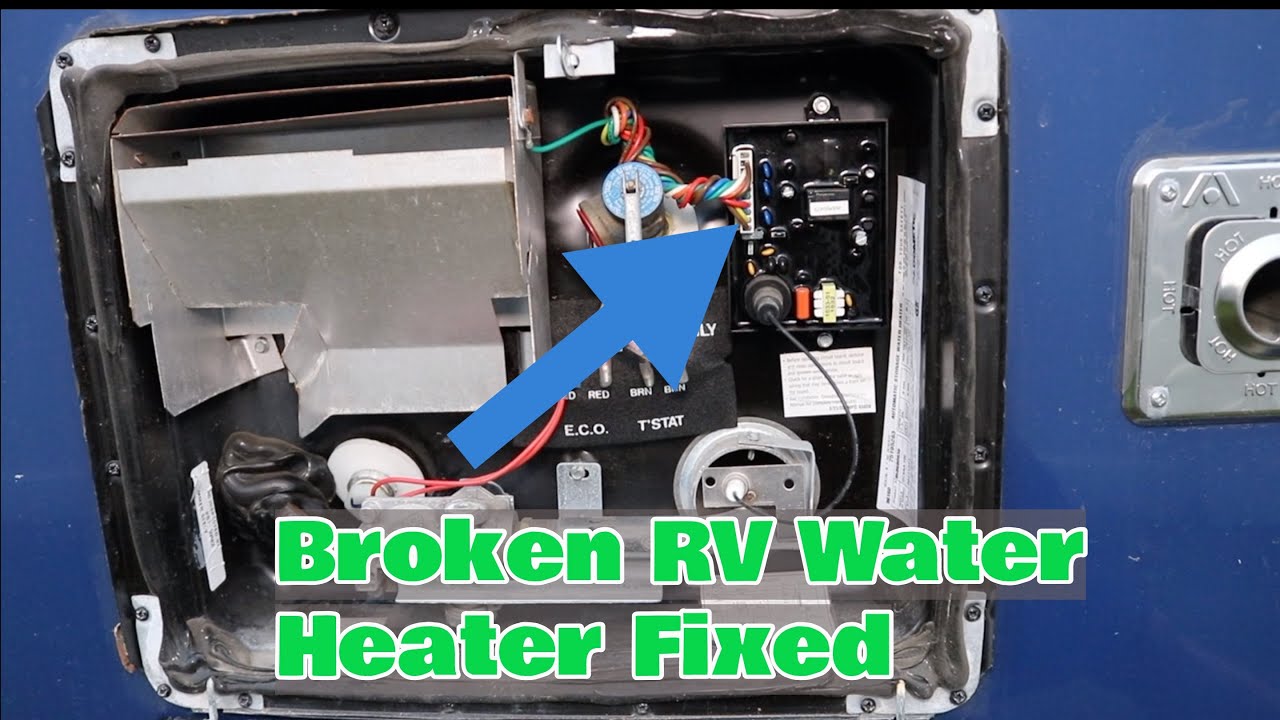
Inspecting The Switch Wiring
Turn off power to the water heater before inspecting wires. Remove the switch cover carefully. Check for loose, damaged, or corroded wires. Tighten loose connections gently. Replace wires showing heavy wear or corrosion. Proper wiring ensures the switch receives power correctly.
Testing The Switch Functionality
Use a multimeter to test the switch’s electrical flow. Set the multimeter to continuity mode. Press the switch and check for a signal. No signal means the switch is faulty. A working switch shows continuity when pressed. Replace the switch if it fails this test.

Credit: www.youtube.com
How To Replace The Water Heater Switch
Replacing the water heater switch in your RV is a simple task. It helps restore hot water quickly. Basic tools and some care are enough to complete the job.
Follow clear steps to remove the old switch, install the new one, and check if it works well. Safety is important, so always disconnect power first.
Removing The Old Switch
Start by turning off the RV power supply. This prevents electric shocks. Locate the water heater switch panel. Use a screwdriver to remove the panel cover.
Carefully pull out the old switch from the slot. Disconnect the wires by loosening the screws. Remember the wire positions to connect the new switch correctly.
Installing The New Switch
Take the new switch and connect the wires to the correct terminals. Tighten the screws firmly but do not over-tighten. Insert the new switch into the panel slot.
Secure the panel cover back with screws. Make sure the switch fits snugly and nothing is loose. This keeps the connection safe and stable.
Verifying Proper Operation
Turn on the RV power supply. Flip the new water heater switch to the “On” position. Listen for the heater starting or check for warmth after a few minutes.
If the heater works, the switch replacement is successful. If not, double-check the wiring and switch installation. Safety first—avoid forcing parts.
Preventive Maintenance Tips
Keeping your RV water heater switch working well requires simple care steps. Regular maintenance helps avoid sudden failures and costly repairs. Small actions can extend the heater’s life and keep it safe. Follow these tips to keep your water heater switch in good shape.
Regular Cleaning
Dirt and dust can block the switch’s function. Clean the switch surface gently with a dry cloth. Avoid using water or strong chemicals. Check the surrounding area for debris and remove it. Clean switches respond better and last longer.
Protecting Against Moisture
Moisture can cause the switch to short-circuit or rust. Keep the switch dry at all times. Use waterproof covers if the switch is exposed to rain or spills. Check seals and gaskets near the switch for leaks. Dry environments help maintain smooth operation.
Periodic Electrical Inspections
Loose wires or corrosion can stop the switch from working. Inspect wiring connections regularly for tightness and cleanliness. Use a multimeter to test the switch’s electrical continuity. Replace damaged wires or corroded parts immediately. Safe electrical parts prevent failures and hazards.
Credit: www.youtube.com
When To Call A Professional
Knowing when to call a professional for your RV water heater switch is important. Some problems need expert help to avoid damage or injury. Quick action can save time and money.
Complex Electrical Problems
Electrical issues can be tricky and dangerous. A professional has the right tools to find hidden faults. They know how to fix wiring and switch problems safely. Avoid trying complex repairs on your own.
Persistent Switch Malfunctions
A switch that keeps failing needs expert attention. Replacing the switch might not solve the root cause. A technician can check the entire system for hidden issues. This prevents repeated breakdowns and frustration.
Ensuring Safety Compliance
RV water heaters must meet safety rules. A professional ensures all repairs follow these standards. This protects your health and prevents accidents. Trust experts to keep your RV safe and reliable.
Frequently Asked Questions
Why Is My Rv Water Heater Switch Not Turning On?
The switch may have a loose wire, blown fuse, or faulty connection preventing power flow.
How Can I Test An Rv Water Heater Switch?
Use a multimeter to check for continuity and proper voltage at the switch terminals.
What Causes An Rv Water Heater Switch To Stop Working?
Common causes include corrosion, worn contacts, or water damage inside the switch housing.
Can A Bad Water Heater Switch Damage My Rv Water Heater?
A faulty switch can prevent operation but usually won’t cause permanent damage to the heater.
How Do I Replace A Broken Rv Water Heater Switch?
Turn off power, remove the old switch, connect the new one matching wire colors, then test.
Conclusion
Fixing your RV water heater switch can save you time and money. Start by checking the switch and wiring carefully. Clean or replace faulty parts to restore function. Regular maintenance helps avoid future problems. Don’t ignore small issues; they often lead to bigger ones.
Stay safe by turning off power before repairs. Simple steps keep your water heater working well on every trip. Keep your RV comfortable with a working water heater switch.