Are you tired of that annoying drip-drip sound coming from your shower? A leaky shower faucet with three handles isn’t just a nuisance; it can lead to higher water bills and potential water damage over time.
But here’s the good news: you don’t need to be a plumbing expert to fix it. With just a bit of guidance, you can tackle this common household issue yourself, saving time and money. Imagine the satisfaction of turning those handles without a single drop escaping.
Let’s dive into the simple steps you can take to stop that leak for good and enjoy peace of mind in your bathroom once again.
Identify The Leak Source
Pinpointing the leak source is crucial in fixing a leaky shower faucet with three handles. Check each handle for water drips and inspect connections for any visible damage or worn-out parts.
Identifying the source of a leaky shower faucet is crucial. It helps in ensuring a successful repair. A shower faucet with three handles can have multiple leak points. Knowing where the leak starts saves time and effort. Let’s explore the steps to pinpoint the leak.
Check Each Handle
Turn off the water supply to the shower. Carefully check each handle for signs of leakage. Look for water dripping or moisture around the base of the handles. Sometimes, the handle itself may not be tight. Tighten it gently using a wrench. If water still leaks, the problem might be internal. You may need to inspect the valve cartridge or washer. Replacing worn-out parts can stop the leak.
Inspect The Faucet Body
Examine the faucet body for visible cracks or damage. Water stains or mold indicate a potential leak. Feel around the faucet for any moisture. If the body shows damage, it might need replacement. A loose faucet body can also cause leaks. Ensure it is tightly secured to the wall. Check the connection between the faucet and the pipes. Loose connections often lead to leaks. Tighten these connections with a wrench. If the leak persists, further investigation may be necessary.
Gather Necessary Tools
Start by gathering essential tools like a wrench, screwdriver, and plumber’s tape. These make fixing a leaky shower faucet easier. Proper tools ensure a smoother repair process.
Fixing a leaky shower faucet with three handles might seem daunting, but with the right tools, it can be a straightforward task. Gathering the necessary tools is the first crucial step in your DIY plumbing adventure. The joy of fixing something yourself is immensely satisfying, but it’s essential to prepare properly. Imagine the frustration of getting halfway through and realizing you forgot a crucial tool. Let’s ensure you’re ready for every twist and turn (literally) of this project.
List Of Required Tools
Before you start dismantling your shower faucet, arm yourself with the following tools. Screwdriver: A flathead or Phillips screwdriver is essential for removing the handle and faceplate. Wrench: An adjustable wrench will help you loosen nuts and fittings. Plumber’s tape: This will ensure a watertight seal when reassembling parts. Additionally, you might need a seat wrench if the valve seats are worn and need replacing. Having a small bucket or towel handy is a good idea to catch any water spills. Make sure these tools are within reach to avoid unnecessary interruptions.
Safety Precautions
Safety should always be your top priority. Turn off the water supply to your shower before starting any work. This prevents unwanted leaks and keeps you dry. If you’ve ever had a surprise gush of water while fixing a faucet, you know it’s something you want to avoid. Use a flashlight if your bathroom lacks adequate lighting. This ensures you see every tiny screw or component clearly. Always wear gloves to protect your hands from sharp edges and to maintain a firm grip on tools. Have you ever tried fixing something only to realize you needed an extra pair of hands? Consider asking a friend or family member to assist. They can hand you tools, hold a flashlight, or even provide moral support. Remember, preparation and safety go hand in hand when tackling plumbing challenges.
Turn Off Water Supply
Fixing a leaky shower faucet can feel daunting, especially if you’re dealing with the complexity of three handles. But don’t worry, the first step is simple and crucial: turning off the water supply. Without this, your repair efforts might end up more like a water park ride than a plumbing triumph. So, let’s roll up our sleeves and get started.
Locate Shut-off Valve
To begin, you need to locate the shut-off valve. It’s typically found near the main water line, often in a basement or a utility area. If you’re like me, you might have spent a few minutes playing hide and seek with it. But once found, it’s usually a straightforward turn to the right to shut off the water. If you’re unsure, check under the sink or behind the shower panel. Knowing where your shut-off valve is can save you from future leaks and unwanted surprises.
Drain The Remaining Water
After you’ve shut off the water supply, there’s still some water lingering in the pipes. Drain it by turning on the faucet handles and letting the remaining water flow out. You might hear some hissing or gurgling—don’t panic, it’s normal. This step ensures that when you start working on the faucet, you won’t be greeted by a sudden splash. Have you ever tried fixing a faucet only to get soaked? This simple step can spare you from that soggy fate.
Once you’ve drained the water, you’re ready to tackle the leak head-on. Do you feel more confident knowing these steps? Fixing a leaky faucet can be an empowering experience, turning you from a wary novice into a handy homeowner. Let’s continue the journey to that satisfying end where your shower is drip-free!
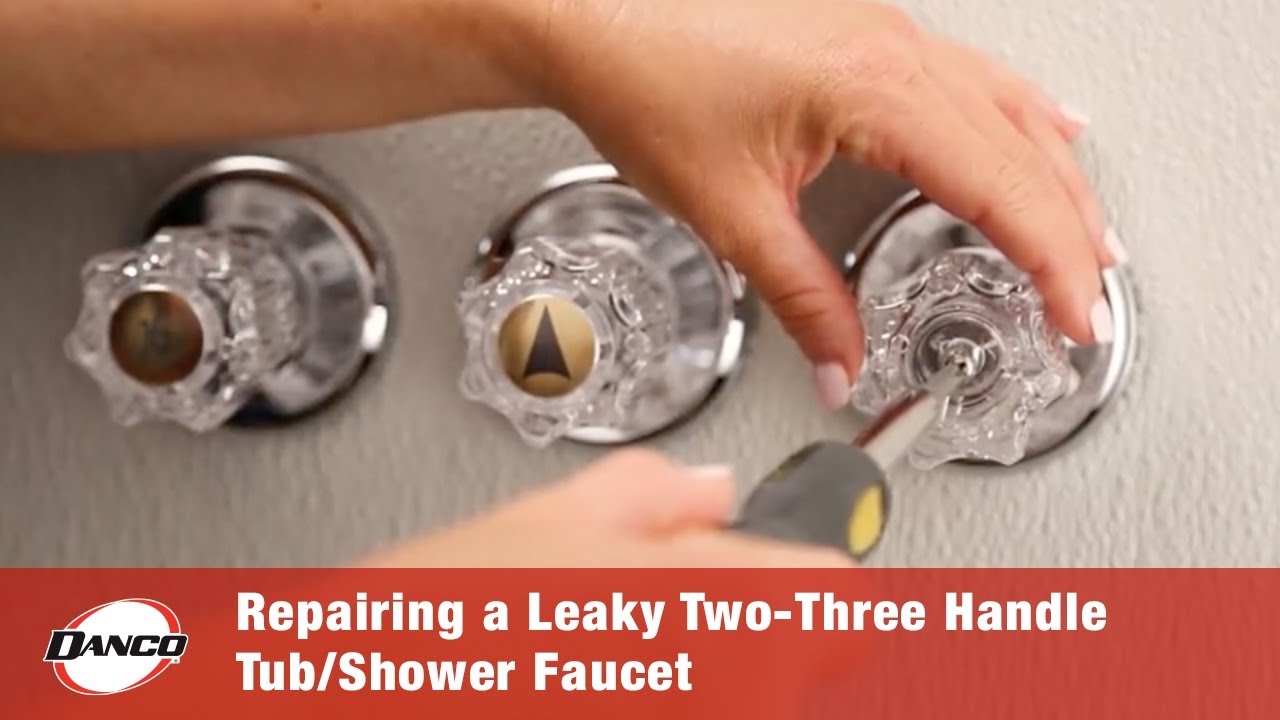
Remove Faucet Handles
Fixing a leaky shower faucet with three handles starts with handle removal. This step is crucial for accessing internal components. Proper handle removal prevents damage. Let’s explore the steps.
Unscrew Handle Screws
First, locate the screws on each handle. These screws hold the handles in place. Use a screwdriver to loosen them. Turn counterclockwise until the screws come out. Keep the screws in a safe spot. You’ll need them later.
Detach Handles Carefully
Next, gently pull the handles away. Sometimes, handles stick due to mineral buildup. If stuck, wiggle them slightly. Don’t use excessive force. A gentle approach prevents damage. If needed, use a handle puller tool. This tool helps in stubborn cases.
Access And Inspect Valve Stems
Access and inspect valve stems to locate the source of a shower faucet leak. Turn off the water supply, remove the handles, and check for worn or damaged valve stems, which may need replacement.
Accessing and inspecting the valve stems of a leaky shower faucet with three handles is crucial for a successful repair. It’s where you get to the heart of the issue, and understanding what you’re looking at can save you time and frustration. Let’s dive into the steps of accessing these valves effectively.
Remove Escutcheon Plates
Begin by removing the escutcheon plates, those shiny covers that sit snugly against the wall. Use a screwdriver to gently unscrew them, ensuring you don’t damage the surrounding tiles. Keep a small container nearby to hold screws and small parts, preventing them from disappearing into the abyss of your bathroom floor. Once the plates are off, you’ll have a clear view of the valve stems. This is your first real look at the mechanism that controls your water flow. It’s an exciting moment, one where the mystery of the leak begins to unravel.
Examine Valve Stems
With the escutcheon plates removed, take a close look at the valve stems. Are there any signs of corrosion or wear? These are often the culprits behind leaks, and catching them early can save a lot of hassle. Consider using a flashlight to get a better view, especially if your bathroom lighting is less than stellar. You might notice mineral deposits or grime buildup, which are clues pointing to why your faucet is leaking. Does your faucet leak only when you turn a specific handle? This could indicate a problem with that particular valve stem. Identifying such issues early gives you the chance to address them head-on, possibly avoiding a complete valve replacement. Remember, patience and observation are your allies here. What you find in this step will guide your next actions, whether it’s a simple cleaning or a more involved repair. What discoveries have you made that surprised you? Often, the small details hold the key to a lasting solution.
Credit: www.tiktok.com
Replace Worn Washers Or O-rings
Fixing a leaky shower faucet with three handles involves replacing worn washers or O-rings. These components help prevent water leakage by sealing the faucet. Simply remove the handles, locate the worn parts, and replace them to stop the leak.
Replacing worn washers or O-rings in a shower faucet can stop leaks. These small parts may wear out over time. When they do, they can cause water to drip or leak. Fixing this issue involves simple steps that anyone can follow. Let’s dive into the details.
Select Correct Replacement Parts
Finding the right washers or O-rings is crucial. Start by shutting off the water supply. Remove the handle and unscrew the stem. You will find the washer or O-ring at the end of the stem. Take it to a hardware store. Compare it to available options. This ensures you buy the correct size and type.
Install New Washers Or O-rings
Once you have the correct parts, installation begins. Place the new washer or O-ring onto the stem. Ensure it fits snugly. Reassemble the faucet by screwing the stem back in. Attach the handle securely. Turn the water back on. Check for leaks. If done correctly, the shower should no longer leak.
Reassemble The Faucet
Reassembling the faucet is crucial. It ensures leak-free operation and a smooth finish. After replacing the necessary parts, reassembly is the final step. This process involves careful attachment of valve stems, handles, and plates. Each part must fit securely. This prevents future leaks and ensures proper function.
Reattach Valve Stems
Begin by placing the valve stems back into their positions. Ensure each stem fits snugly into its respective seat. Tighten the stems using a wrench. This prevents any unwanted movement. Proper placement is vital for a secure seal. Check alignment before proceeding further.
Secure Handles And Plates
Next, attach the handles to the valve stems. Position the handles correctly. Use screws to secure them firmly. Tight screws prevent wobbling. Once handles are in place, move to the plates. Align each plate over the faucet base. Tighten screws to secure the plates. This gives a neat finish to your shower faucet.
Test The Repair
Fixing a leaky shower faucet with three handles involves simple steps like turning off water, removing handles, and replacing worn washers. This straightforward task can save water and prevent further damage.
Testing your repair is like the final exam for your DIY skills. After all your hard work fixing a leaky shower faucet with three handles, ensuring everything is watertight is crucial. You’ve invested time and effort, and now it’s time to see if your dedication pays off.
Turn On Water Supply
First, head back to the main water valve and turn the water supply back on. This moment can be exciting and nerve-wracking. If your repair was successful, you should hear the water flowing without any hissing or spurting from unwanted places. Be ready with a towel or a small bucket, just in case something goes awry. Being prepared means you can quickly address any unexpected drips or leaks.
Check For Leaks
Carefully inspect the area around the faucet handles and spout. Look for any signs of water escaping from places it shouldn’t. A few drops might not seem like a big deal, but even small leaks can lead to bigger problems over time. Feel the connections with your fingers. Sometimes, a leak is better felt than seen. If everything is dry and snug, congratulations! You’ve done an excellent job. But if you find a leak, don’t worry. Retrace your steps to ensure everything is tightened correctly. Sometimes, a small tweak is all it takes to achieve a perfect seal. Have you ever thought about how a small misstep could affect your repair job? Share your experiences or questions in the comments below!
Tips For Long-term Maintenance
Maintaining your shower faucet ensures it lasts longer and works well. Regular checks and good habits help prevent leaks and other issues. By following these simple tips, you can keep your faucet in top shape.
Regular Inspection
Check your shower faucet every month. Look for leaks or rust. Turn the handles to ensure they work smoothly. Tighten any loose screws with a screwdriver. Replace worn-out washers to prevent drips. Regular inspections help catch problems early.
Preventive Measures
Keep the faucet clean to avoid buildup. Use a soft cloth and mild cleaner. Avoid harsh chemicals. They can damage the faucet’s finish. Install a water softener if you have hard water. This reduces mineral deposits. Lubricate the faucet’s moving parts yearly. Use a silicone-based lubricant for best results.
Credit: www.youtube.com

Credit: www.renos4prosandjoes.com
Frequently Asked Questions
How Do I Identify A Leaky Shower Faucet?
Check for water drips or stains near the handles. Listen for water sounds when the shower is off.
What Tools Do I Need To Fix It?
You need a wrench, screwdriver, and replacement washers or cartridges. These tools help disassemble and repair the faucet.
Can I Fix It Without Calling A Plumber?
Yes, you can. Follow simple steps to replace washers or cartridges. Save money by doing it yourself.
Why Does A Shower Faucet Leak?
Old washers or worn cartridges cause leaks. Mineral buildup can also affect seals, leading to dripping.
How Long Does It Take To Fix?
It takes about 30-60 minutes. This includes disassembly, replacement, and reassembly of the faucet handles.
Conclusion
Fixing a leaky shower faucet with three handles is simple. Start by identifying the source of the leak. Replace any worn-out washers or seals. Ensure all parts are tight and secure. Turn the water back on and test for leaks.
You should now have a drip-free faucet. Regular maintenance helps prevent future leaks. Save money and water by fixing leaks promptly. If unsure, consult a professional plumber. Enjoy a leak-free shower, knowing you fixed it yourself. Keep these tips handy for future repairs.
Happy plumbing!