Are you ready to transform your kitchen with a sleek, modern touch? Installing an undermount kitchen sink can be the perfect upgrade.
Unlike traditional sinks, undermount sinks sit beneath the countertop, offering a seamless look and maximizing space. Imagine the satisfaction of a countertop free from clutter, with a smooth, uninterrupted surface that not only enhances your kitchen’s aesthetic but also makes cleaning a breeze.
But how do you get started on this upgrade without calling in a costly professional? The good news is, with the right guidance, you can install an undermount kitchen sink yourself. In this guide, you’ll discover simple, step-by-step instructions that make the process straightforward and stress-free. You’ll gain the confidence to tackle this project head-on, saving money and enjoying the satisfaction of a job well done. Let’s dive into the installation process and unlock the secret to transforming your kitchen into a space that’s both functional and beautiful.
Choosing The Right Sink
Installing an undermount kitchen sink can transform the look and functionality of your kitchen. But before you can enjoy the sleek finish and easy cleaning it offers, you need to choose the right sink. This choice is crucial not just for aesthetic appeal but also for ensuring it fits your needs and lifestyle. Let’s dive into the key aspects you should consider to make the best decision.
Material Considerations
Start by thinking about what material will best suit your kitchen’s environment and your usage habits. Stainless steel is a popular choice due to its durability and resistance to stains and rust. It’s perfect if you have a busy kitchen where spills and splashes are common.
If you prefer a more classic look, consider porcelain or cast iron. These materials offer timeless elegance but require more care to avoid chips and scratches. Think about how much time you’re willing to spend on maintenance.
Do you love the idea of a luxurious finish? Granite composite could be your answer. It’s robust, scratch-resistant, and available in various colors. However, it’s heavier, so ensure your cabinet can support it.
Size And Style Selection
The size of your sink affects your workflow in the kitchen. Consider the size of your kitchen and the available counter space. A larger sink might be ideal for a big family, allowing you to wash large pots and pans easily.
For smaller kitchens, a compact sink could be more practical, freeing up counter space for meal prep. Measure your available space carefully before making a decision.
Choosing a style is where your personal taste shines. Do you prefer a single basin for uninterrupted space or a double basin for multitasking? Think about how you use your sink daily. Opt for a style that complements your kitchen design while meeting your functional needs.
Remember, the sink should not just look good but also enhance your kitchen activities. How often do you find yourself struggling with space when washing dishes or preparing food? A well-chosen sink can make these tasks much easier.
By considering both material and style, you can pick a sink that seamlessly fits into your kitchen and lifestyle. What’s the one feature you cannot compromise on when choosing a kitchen sink?

Credit: www.youtube.com
Gathering Necessary Tools And Materials
Gather essential tools like a drill, screwdriver, and measuring tape for installing an undermount kitchen sink. Gather materials such as silicone sealant, mounting clips, and a jigsaw for precise cutting. Proper preparation ensures a smooth installation process.
Installing an undermount kitchen sink can feel like an overwhelming task. However, with the right preparation, it becomes manageable and even satisfying. Before you start, gathering all the necessary tools and materials is crucial for a smooth installation process. Imagine standing at your kitchen counter, ready to start, only to realize you’re missing a crucial tool. Let’s make sure that doesn’t happen.
Essential Tools
First, let’s talk about the essential tools. You will need a drill with a drill bit suitable for your countertop material. A jigsaw can be handy for making precise cuts. If you’ve ever tried to cut a countertop without the right blade, you know how frustrating it can be.
A measuring tape is another must-have. Accurate measurements ensure a snug fit for your sink. You’ll also need a caulking gun for sealing and a set of screwdrivers for securing brackets. Don’t forget safety gear like gloves and goggles. Protecting yourself is as important as the installation itself.
Required Materials
Now, onto the materials. Start with a sink installation kit; it often includes brackets and clips needed for securing the sink. Have a tube of waterproof sealant ready. This prevents water from seeping under the sink, an issue that can lead to damage over time.
Consider the type of plumbing connections you will need. Flexible connectors are often easier to work with in tight spaces. If you’ve experienced the struggle of rigid pipes, you’ll appreciate the flexibility.
Finally, have a clean cloth to wipe away excess sealant and a bucket for any water that might spill during the process. These little extras can save you time and frustration.
Preparing well with the right tools and materials not only makes the task easier but also boosts your confidence. Are you ready to dive into your sink installation project? With everything in place, you’ll be one step closer to a functional and stylish kitchen upgrade.
Preparing The Countertop
Begin by ensuring the countertop is clean and dry for proper installation. Measure and mark the sink’s position accurately. Prepare the edges smoothly to avoid gaps or leaks.
Before you get started on installing an undermount kitchen sink, preparing the countertop is a crucial step. A well-prepared countertop ensures your sink fits perfectly and functions efficiently. This preparation phase might seem daunting, but with the right approach, it’s straightforward. Are you ready to transform your kitchen into a functional masterpiece?
Measuring And Marking
Begin by measuring the sink and the countertop space where it will be installed. Use a tape measure to get the width and depth of your sink. Take note of these dimensions and add an extra inch for ease of installation.
Next, grab a pencil and mark these measurements on the underside of your countertop. Ensure your marks are precise. Remember, it’s better to mark twice and cut once. A little extra time spent on marking can save a lot of hassle later.
Consider your kitchen layout. Is your sink centered under a window, or is it in a corner? These factors affect your measurements and markings. Make sure your measurements align with any existing fixtures or cabinetry.
Cutting The Countertop
Once your measurements are in place, it’s time to cut. Use a jigsaw or a circular saw, depending on your countertop material. If you’re new to this, practice on a piece of scrap wood first.
Safety is paramount. Wear safety goggles and work gloves. Secure the countertop to prevent movement while cutting. This not only ensures a clean cut but also keeps you safe.
Cut slowly and steadily along your marked lines. A rushed job can lead to mistakes. Picture the satisfaction of a perfectly cut countertop—a testament to your careful preparation.
Does cutting your countertop make you nervous? It’s natural. But remember, with careful preparation and the right tools, you’re setting up for success. Now, take a step back and admire your handiwork. You’re one step closer to a stunning kitchen.

Credit: housebythepreserve.com
Installing The Sink Mounting Hardware
Installing the sink mounting hardware is a crucial step when fitting an undermount kitchen sink. This process determines the stability and durability of your sink over time. If you’re tackling this task yourself, understanding the specifics of positioning and securing the mounting clips is essential. Let’s dive into how you can successfully install the sink mounting hardware, ensuring a seamless integration with your kitchen countertop.
Positioning The Mounting Clips
Begin by examining the underside of your countertop. You need to identify the spots where the mounting clips will be attached. It’s like planning a puzzle; each piece must fit perfectly.
The mounting clips should be evenly distributed around the perimeter of the sink. This ensures balanced support. Visualize the placement and make light markings if necessary. These markings will guide you during the actual installation.
Imagine this scenario: You’re halfway through the installation, and a clip doesn’t fit the spot you’ve chosen. That’s why planning is crucial. Wouldn’t it be easier to adjust your markings now than to redo the entire setup later?
Securing The Clips
Once you’re confident about the positioning, it’s time to secure the clips. Use a drill to create pilot holes for the screws. This step is vital for preventing the countertop material from cracking.
Carefully screw the mounting clips into place, ensuring they are tight enough to hold the sink but not overly tightened. An overtightened clip can damage the countertop, leading to costly repairs. Picture the disappointment of completing your sink installation only to find a crack!
After securing the clips, gently test the stability by pressing down on the sink. Does it feel solid and unmoving? If yes, then you’ve done a great job securing those clips.
Have you thought about what might happen if you rush through this stage? A loose clip can lead to a wobbly sink, disrupting your daily kitchen activities. Take your time and ensure each clip is properly secured.
Installing an undermount kitchen sink might seem daunting, but focusing on the details can make all the difference. Do you feel more confident about tackling this task on your own?
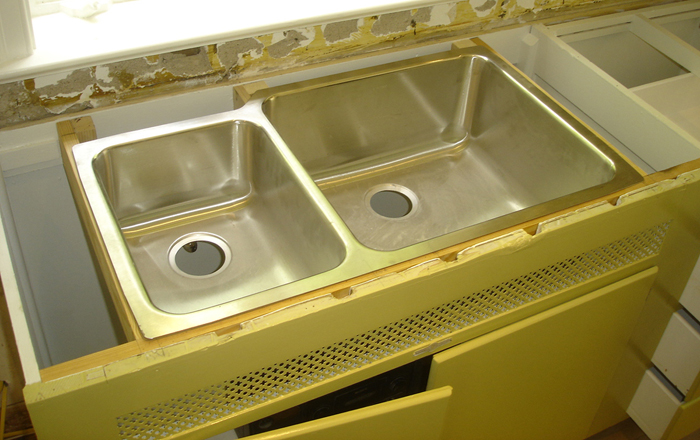
Positioning The Sink
Positioning the sink is a crucial step in installing an undermount kitchen sink. Proper alignment ensures functionality and aesthetic appeal. A well-positioned sink blends seamlessly with the countertop.
Aligning The Sink
Start by measuring the countertop opening. Make sure it matches the sink dimensions. Place the sink upside down on the countertop. Align it centrally with the cut-out. Use a tape measure for precision. Check that the sink’s edges are parallel to the countertop edges.
Mark the sink’s position with a pencil. This ensures it doesn’t move during installation. Recheck measurements to avoid future problems. Proper alignment prevents leaks and uneven edges.
Applying Adhesive
Choose the right adhesive for your sink material. Many prefer silicone sealant for its durability. Apply adhesive evenly around the sink’s rim. Make sure there are no gaps. This step is vital for a watertight seal.
Carefully lower the sink into the marked position. Press it firmly to secure the adhesive bond. Wipe away any excess adhesive immediately. Let the adhesive cure as per the manufacturer’s instructions.
Proper adhesive application ensures stability and a clean finish. It prevents water seepage and maintains the sink’s position.
Securing The Sink
Installing an undermount kitchen sink requires careful attention to detail. Securing the sink properly ensures long-lasting use and prevents leaks. This step involves attaching and stabilizing the sink under the countertop.
Fastening The Mounting Clips
Start by placing the sink into the cabinet opening. Ensure it is centered and aligned with the countertop cutout. Use a pencil to mark the positions for the mounting clips.
Attach the clips to the underside of the countertop. They should be evenly spaced around the sink’s perimeter. Use a screwdriver to fasten each clip securely. Ensure they are tight enough to hold the sink but not overly tight.
Checking For Stability
Once the mounting clips are in place, check the sink’s stability. Gently press down on the sink to ensure it does not shift. If it moves, tighten the clips a bit more.
Verify the sink is level with the countertop. Use a spirit level to confirm it is even on all sides. Adjust the clips if necessary to achieve a balanced position.
Sealing The Edges
Sealing the edges of an undermount kitchen sink is crucial. It prevents water seepage and keeps your kitchen clean. Proper sealing ensures the sink stays in place. It also prolongs the life of your countertop. Follow these simple steps for a perfect seal.
Applying Silicone Sealant
Start with a clean and dry surface. Any residue can cause leaks. Choose a high-quality silicone sealant. It should be waterproof and mold-resistant. Cut the nozzle of the sealant tube. Aim for a small, even bead. Apply the sealant around the sink’s edge. Ensure a continuous line with no gaps. This keeps water from seeping underneath.
Smoothing The Seal
Use a wet finger or a sealant tool. Smooth the silicone gently. This ensures a tight, even seal. Remove any excess sealant. Wipe it away with a damp cloth. Check for any gaps or bubbles. Fill them with more sealant if needed. Allow the sealant to cure fully. Follow the manufacturer’s instructions for drying times. This step ensures durability and a clean finish.
Connecting Plumbing Fixtures
Installing an undermount kitchen sink involves securing it beneath the countertop. Ensure the sink fits precisely in the cutout. Tighten clamps evenly to prevent leaks and achieve a seamless finish.
Connecting plumbing fixtures is a crucial step when installing an undermount kitchen sink. It’s the moment where all your hard work starts to take form, transforming your sink from a mere fixture to a fully functional part of your kitchen. This phase can seem daunting, but with a bit of patience and a clear understanding of each component, you can handle it like a pro. Imagine the satisfaction of turning on the tap and watching the water flow smoothly into your new sink. Ready to connect those pipes and bring your kitchen vision to life?
Attaching The Drain
Start by placing the drain fitting into the sink’s drain hole. Ensure it sits flush and even against the sink.
Apply a bead of plumber’s putty around the underside of the drain flange. Press the flange down firmly into the sink drain opening.
Underneath the sink, secure the drain fitting using a rubber gasket and a metal washer, tightening the nut to hold everything in place. Remember to remove any excess putty that squeezes out.
If you’ve ever felt the frustration of leaks, you’ll know why this step is essential. Proper sealing prevents water from escaping, ensuring a dry cabinet area below.
Connecting Water Supply
Begin by turning off the water supply to avoid any unexpected sprays. Use a wrench to disconnect the old water supply lines from the shut-off valves if present.
Attach the new water supply lines to the faucet’s tailpieces, ensuring they are securely tightened.
Connect the other end of the supply lines to the shut-off valves. Make sure they’re snug but don’t overtighten, which can damage the threads.
Have you ever turned on a faucet only to realize there’s no water flow? Double-checking your connections here can prevent that scenario.
Once everything is connected, turn the water supply back on and check for leaks. Adjust as needed to ensure a tight seal.
Completing this step not only brings you closer to a fully operational sink but also provides a sense of accomplishment. You’ve done more than just install a sink; you’ve empowered yourself with new skills. How satisfying is that?
Testing For Leaks
Checking for leaks ensures your undermount kitchen sink installation is secure. Look beneath the sink for any water drips. Use a flashlight to spot hidden leaks in corners or seams.
Testing for leaks is a crucial step in installing an undermount kitchen sink. Ensuring there are no leaks avoids future water damage. This process checks the integrity of your installation. Follow these steps to make sure your sink functions perfectly.
Running Water Tests
Begin by turning on the faucet. Let the water run steadily for a few minutes. Watch for any signs of water pooling beneath the sink. This helps identify immediate leaks. Adjust the water temperature from cold to hot. This change may reveal hidden issues. Listen for unusual sounds, like dripping water. These sounds can indicate a problem.
Inspecting For Drips
Carefully inspect all connection points under the sink. Focus on the drain and pipe joints. Use a flashlight for better visibility. Look for small beads of water forming. These beads signal a potential leak. Also, check the sealant around the sink edges. Ensure it is intact and properly applied. If drips are found, tighten connections or reapply sealant. Make sure the entire area is dry before finishing.
Credit: concretecountertopinstitute.com
Frequently Asked Questions
Can I Install An Undermount Sink Myself?
Installing an undermount sink yourself is possible. Ensure you have the right tools and skills. Follow manufacturer instructions closely. Proper alignment and sealing are crucial for avoiding leaks. If unsure, consult a professional to avoid potential issues.
How Do You Fasten An Undermount Kitchen Sink?
To fasten an undermount kitchen sink, apply silicone sealant around the sink’s edge. Position the sink under the countertop. Secure it with mounting clips and brackets. Tighten the clips evenly to ensure stability. Let the sealant cure as per manufacturer’s instructions for a strong bond.
Are Undermount Sinks Just Glued In?
Undermount sinks are not just glued in. They require a combination of adhesive and mechanical support. Clips or brackets are often used alongside sealants to ensure stability and prevent leaks. Proper installation is crucial for durability and functionality.
What Can I Use To Hold My Undermount Sink?
Use brackets, clips, or epoxy to securely hold your undermount sink. Ensure proper support and alignment.
How Do I Prepare The Countertop For Installation?
Ensure the countertop is clean and dry. Mark the sink’s outline using a template. Verify measurements before cutting.
Conclusion
Installing an undermount kitchen sink is simple with clear steps. Start by gathering all your tools. Measure the sink cutout accurately. Prepare the countertop surface. Secure the sink firmly underneath. Apply the silicone sealant evenly. Let it dry completely. Check for leaks after installation.
Enjoy your new sink’s sleek look and added space. Remember to maintain it regularly. A clean sink lasts longer. This project enhances your kitchen’s functionality and style. Anyone can do it with patience and care. Get ready to enjoy your improved kitchen workspace.