Have you ever faced a slow-draining kitchen sink or the dreaded leaking pipe? The solution might be simpler than you think.
Knowing how to install a kitchen sink drain pipe can save you time, money, and frustration. Imagine the satisfaction of tackling this task yourself, and the peace of mind that comes with knowing it’s done right. With the right guidance, you can transform a bothersome chore into a manageable DIY project.
Dive into this article to discover a step-by-step process that will empower you to fix or install your kitchen sink drain pipe effortlessly. Let’s get started on making your kitchen functional and worry-free!
Tools And Materials Needed
Installing a kitchen sink drain pipe is a straightforward task. Having the right tools and materials ensures a smooth installation. This guide lists essential items for the job. Proper preparation saves time and effort.
Tools Required
A few basic tools will help you complete the installation effectively. You will need an adjustable wrench. It tightens nuts and fittings securely. A pipe wrench is also helpful. It grips pipes firmly during adjustments. A hacksaw cuts pipes to desired lengths. Ensure the blade is sharp for clean cuts. Use pliers for added grip and control. A tape measure is vital for accurate measurements. Mark the cuts precisely with a pencil. This prevents mistakes and ensures a perfect fit.
Materials Needed
Gather the necessary materials before starting. You need PVC pipes. They form the main structure of the drain. Choose the correct diameter for your sink. PVC fittings connect the pipes securely. Teflon tape prevents leaks at connections. Plumber’s putty seals gaps effectively. It ensures watertight joints. Purchase a drain assembly kit. It contains essential components for the drain system. Follow the instructions for proper assembly.
Safety Gear
Safety is crucial during installation. Wear protective gloves for hand safety. They provide a good grip on tools. Use safety goggles to protect your eyes. They shield from debris and dust. Ensure the work area is well-lit. A flashlight helps in dim spaces. Work slowly and carefully. Avoid rushing to prevent accidents.
Credit: www.signaturehardware.com
Preparation Steps
Begin by gathering essential tools and materials, such as a wrench, plumber’s putty, and PVC pipes. Clear the workspace under the sink to ensure easy access. Carefully follow the manufacturer’s instructions for assembling and securing the drain pipe components.
Installing a kitchen sink drain pipe might seem daunting at first, but with the right preparation steps, you can tackle it like a pro. Before diving into the actual installation, getting ready is crucial for a smooth process. Let’s explore how you can set the stage for success with some essential preparation steps.
Clear The Area
Start by clearing the area under your sink. Remove any cleaning supplies, trash bins, or other items that might obstruct your workspace. You’ll need plenty of room to maneuver, so it’s important to create a clutter-free zone. Imagine trying to work on a puzzle with pieces scattered everywhere; it’s much easier when you have a clean table!
Gather Necessary Tools
Before getting your hands dirty, make sure you have the right tools at your disposal. You’ll need a wrench, plumber’s tape, and a bucket to catch any water. A flashlight can also be handy if your under-sink area isn’t well-lit. Having everything ready beforehand saves you from those annoying trips to the garage mid-project.
Turn Off Water Supply
Don’t forget to turn off the water supply. Locate the valves under the sink and turn them clockwise to stop the flow of water. This step is crucial to prevent any unintended waterworks that could turn your kitchen into a mini swimming pool. Have you ever tried fixing something only to create a bigger mess? Avoid that scenario by taking this simple yet vital step.
Preparing well can transform a potentially stressful task into a manageable one. What’s the most challenging part of prepping for a home project that you’ve faced? Addressing these steps with care sets a solid foundation for the installation process.
Remove The Old Drain Pipe
Begin by carefully removing the old drain pipe. Ensure all connections are loosened before detaching it from the sink. This step paves the way for installing a new kitchen sink drain pipe efficiently.
Removing the old drain pipe from your kitchen sink might seem like a daunting task, but with the right guidance, it can be a straightforward process. The key is to take it step by step and pay attention to details. Whether you’re updating your kitchen or fixing a stubborn leak, this guide will help you get started with confidence. You’ll soon see that even a small task like this can make a big difference in your kitchen’s functionality.
Detach Drain Pipe
Start by placing a bucket under the sink to catch any water that might spill. Use a wrench or pliers to loosen the nuts on the slip joints of the pipe. If they’re stuck, a bit of penetrating oil can help ease them loose.
Once loosened, carefully remove the nuts and pull the pipe away from the sink. You might find yourself wondering why you didn’t replace that old pipe sooner. It’s often surprising how much grime and gunk can accumulate over time.
Make sure to keep track of all the nuts and washers you remove. You don’t want to be scrambling for replacements when you’re putting in the new pipe. Have you ever lost a crucial part halfway through a project? It’s not fun.
Clean The Area
With the old pipe out of the way, it’s time to clean the space thoroughly. This isn’t just about aesthetics; a clean area ensures a better seal when you install the new pipe. Use a cloth or sponge with warm soapy water to scrub away any residue or grime.
Check the sink’s drain opening for any debris or buildup. This is a good time to remove any lingering odors that might have been coming from your drain. How many times have you plugged your nose while washing dishes, thinking it was the food? It could have been your drain all along.
Once everything is clean and dry, you’ll have a fresh slate to work with. This preparation sets the stage for an efficient installation of your new drain pipe. It’s the little details that can make or break a DIY project. Take pride in these small victories and your kitchen will thank you for it.
Install The New Drain Pipe
Installing a new kitchen sink drain pipe can seem daunting. But with clear steps, it’s manageable. This section guides you through installing a new drain pipe. Follow each step for a smooth installation process.
Attach The Drain Flange
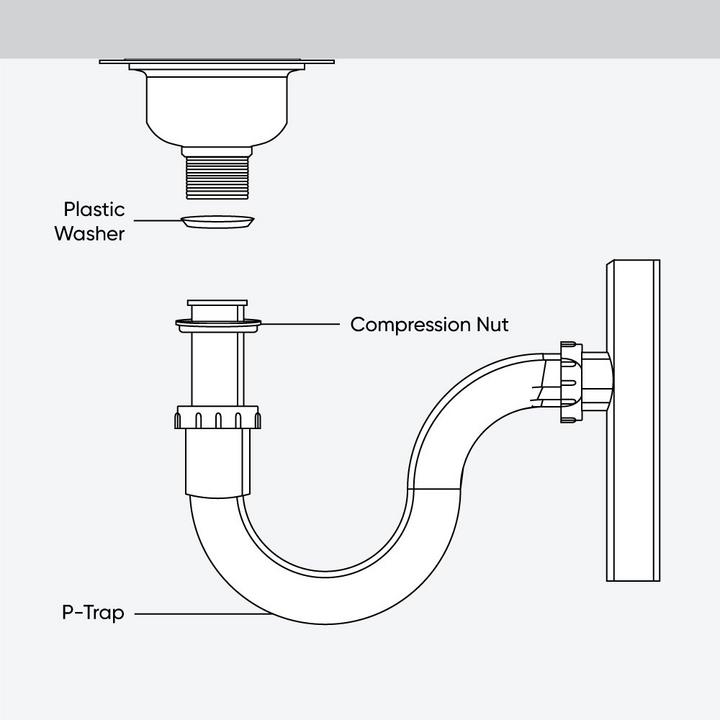
The drain flange is crucial for a proper seal. Position it over the sink drain hole. Apply plumber’s putty around the flange edge. This prevents leaks. Press the flange firmly into the sink hole. Secure it with the provided gasket and nut underneath the sink. Tighten the nut with a wrench. Ensure a snug fit.
Connect The Tailpiece
The tailpiece connects the flange to the rest of the pipe. Attach it to the bottom of the flange. Use a slip nut to secure it. Tighten the slip nut with your hands. Ensure it fits tightly. Check for leaks around the connection. Adjust if necessary.
Fit The P-trap
The P-trap prevents sewer gases from entering the kitchen. Align the trap below the tailpiece. Connect the trap to the tailpiece using a slip nut. Attach the other end to the waste line. Tighten the slip nuts by hand. Make sure all parts align properly. Check for any leaks. Tighten connections as needed. Ensure a smooth water flow.
Secure And Seal Connections
Secure kitchen sink drain connections easily for a leak-free experience. Begin by aligning the pipe with the sink’s opening. Ensure a tight fit with plumber’s tape, sealing every joint securely to prevent leaks. Properly installed drain pipes ensure efficient water flow and add value to your kitchen space.
Installing a kitchen sink drain pipe can seem daunting, but the key to a successful installation lies in how well you secure and seal the connections. This step is crucial in preventing leaks and ensuring a long-lasting, trouble-free kitchen sink experience. Without proper sealing, even the most meticulously installed drains can lead to water damage and other costly repairs.
Tighten Connections
Start by aligning the drain pipe with the sink’s tailpiece. Use your hand to screw on the slip nut, ensuring it’s snug but not overly tight. Over-tightening can crack plastic components, leading to leaks.
Next, use a wrench to give it an additional quarter turn. This ensures the connection is secure without risking damage. Have you ever noticed a small leak and wondered if it was due to a loose connection? This step helps prevent such issues.
Apply Plumber’s Putty
Plumber’s putty is your best friend for sealing connections. Roll a small ball of putty into a rope shape, then wrap it around the underside of the drain flange. Press the flange into the sink opening firmly.
Wipe away any excess putty that squeezes out with a clean cloth. This ensures a neat finish and prevents any putty from entering the plumbing. Have you ever skipped this step, only to regret it later when water seeped through? Applying putty is a simple yet vital task.
Remember, a well-sealed connection is the backbone of a leak-free kitchen. Take a few extra minutes to secure and seal properly, and enjoy the peace of mind that comes with a job well done.
Check For Leaks
Inspect the connections for drips after installing the kitchen sink drain pipe. Tighten loose fittings to prevent water leaks. Ensure all seals are secure for optimal function.
Checking for leaks is a crucial step in installing a kitchen sink drain pipe. You wouldn’t want a small drip to evolve into a bigger problem. Ensuring there are no leaks saves you time, money, and potential water damage. Taking a few extra minutes to inspect your work will give you peace of mind.
Turn On Water Supply
After you’ve installed your kitchen sink drain pipe, it’s time to turn on the water supply. Use the shut-off valves under your sink to gradually allow water to flow. This step will help you test the integrity of your installation.
Observe the flow of water as it runs through the pipes. You should not see any drips or hear any unusual sounds.
Keep in mind that sometimes a leak may not be immediately visible. Let the water run for a minute or two to be certain.
Inspect For Drips
Begin by inspecting the connections where the pipes join. This is often where leaks can occur.
Feel around the joints for any dampness. Even a tiny drop can indicate a loose connection.
If you find a leak, don’t panic. Tighten the connections slightly with a wrench and check again.
Sometimes, you might need to redo a section. It’s better to address issues now rather than deal with water damage later.
Have you ever noticed how satisfying it is when everything works perfectly the first time? Achieving that satisfaction takes a bit of patience and attention to detail.
In your experience, have you ever found that small adjustments make a big difference? Share your thoughts or tips in the comments!
Clean Up And Final Touches
Ensure a clean workspace and finalize connections for your kitchen sink drain pipe installation. Wipe surfaces and check for leaks. Adjust fittings for secure attachment and smooth water flow.
After successfully installing your kitchen sink drain pipe, it’s essential to focus on the clean-up and final touches. This ensures that everything not only looks good but also functions perfectly. Paying attention to these details will make your installation experience smooth and satisfying.
Clear Tools And Debris
Once your installation is complete, take a moment to clear away all tools and debris. This might seem trivial, but a tidy workspace prevents accidents and makes future tasks easier.
Start by gathering your tools and returning them to their designated spots. This will save you time searching for them later.
Next, dispose of any leftover materials, such as excess pipe or packaging. This not only keeps your kitchen clean but also makes room for future projects.
Think about the time you saved by organizing your tools and workspace. Isn’t it worth the few extra minutes?
Test The Drain
Before you celebrate a job well done, test the drain to ensure it’s working correctly. This step is crucial to catch any leaks or issues before they become bigger problems.
Turn on the faucet and let the water run for a few minutes. Observe the drain closely, checking for any leaks or slow drainage.
If you spot a leak, it might be due to a loose connection. Tighten any fittings if necessary and retest.
Ensure the water drains efficiently and smoothly. A well-functioning drain is not only about avoiding leaks but also about ensuring quick and easy drainage.
Don’t skip this step. It’s your confirmation that the installation was successful and your effort paid off.
:max_bytes(150000):strip_icc()/how-to-install-a-sink-drain-2718789_05_connect_5068-39adb74c4c4b4632b038eb34041fd198.jpg)
Credit: www.thespruce.com
Frequently Asked Questions
Should I Use Plumbers Putty Or Silicone On Sink Drain?
Use plumber’s putty for sink drains; it’s flexible and seals effectively. Silicone is better for waterproof areas.
Do You Need To Glue A Sink Drain Pipe?
Sink drain pipes usually don’t need glue. Use slip-joint connections or rubber gaskets for secure sealing. Gluing can prevent easy maintenance and create leaks. Ensure all parts fit tightly to avoid water seepage. Regularly inspect connections to maintain functionality and prevent plumbing issues.
What Is The Code For Kitchen Sink Drain Pipe?
The kitchen sink drain pipe code is typically referred to by the International Plumbing Code (IPC) or local plumbing regulations. Generally, a kitchen sink drain should be at least 1. 5 inches in diameter. Always consult local codes for specific requirements.
How To Attach Drainage Pipe To Sink?
Attach the drainage pipe to the sink by aligning the pipe with the sink drain. Secure using a slip nut and washer. Tighten connections to prevent leaks. Ensure the pipe slopes downward for efficient drainage. Test for leaks by running water.
Adjust as needed for a snug fit.
How Do I Remove The Old Drain Pipe?
Start by loosening the nuts. Then, gently pull the pipe out. Dispose of it properly.
Conclusion
Installing a kitchen sink drain pipe doesn’t have to be hard. With the right tools, you can do it yourself. Follow each step carefully. Check for leaks after installation. Tighten any loose connections. Make sure everything fits well. Patience is key during this process.
Keep your workspace organized. This helps prevent mistakes. Enjoy your new sink setup. Regular maintenance keeps it working smoothly. No need for frequent repairs. You save time and effort. A properly installed drain pipe lasts long. Happy plumbing!