Are you tired of dealing with a leaky or outdated bathtub faucet? Replacing a two-handle faucet can seem daunting at first, but with a little guidance, you can transform your bathroom without calling in a professional.
Imagine the satisfaction of turning off the water and knowing you fixed it yourself. Whether you’re looking to update the style of your bathroom or simply stop that pesky drip, learning how to replace a two-handle bathtub faucet can save you time and money.
This guide will walk you through each step, ensuring you have the confidence to tackle the task with ease. Ready to dive in and make your bathroom feel brand new? Let’s get started!
Credit: www.homedepot.com
Tools And Materials Needed
Replacing a two-handle bathtub faucet can be a satisfying task. Understanding the tools and materials needed is crucial. This ensures the project runs smoothly and efficiently. With the right equipment, the process becomes straightforward and manageable.
Tools Required For The Job
Gathering the correct tools simplifies the task. A wrench is essential for loosening nuts. A screwdriver assists in removing screws. You might need pliers for gripping and turning. Teflon tape is useful for sealing threads. A bucket helps catch water spills. Safety goggles protect your eyes during the process.
Materials Needed
Ensure you have all the necessary materials. Purchase a new two-handle faucet. Teflon tape prevents leaks. You need a towel for wiping spills. A cloth can clean the surfaces. Make sure to have a bucket handy to collect water. Replacement washers might be required if old ones are worn.
Optional Tools And Materials
Some optional items may enhance the process. A pipe wrench offers extra leverage. A flashlight helps illuminate dark spaces. Silicone caulk might be useful for sealing gaps. An adjustable wrench can fit various nut sizes. A basin wrench reaches tight spaces easily. Having these tools can make the job simpler.
Shutting Off Water Supply
Turning off the water supply is crucial before replacing a two-handle bathtub faucet. It prevents water spills and ensures safety during installation.
Replacing a two-handle bathtub faucet may seem daunting, but with the right steps, it’s a manageable task. One critical step is shutting off the water supply. It’s like the foundation of a house; if you skip it, everything else could collapse. A dripping tap or water gushing unexpectedly can turn a simple DIY project into a soggy mess. So, let’s ensure you get this step right.
Understanding Your Water Supply
Before you start, locate the main water supply valve. It’s often found in basements, utility rooms, or near the water meter. Knowing where this is can save you from scrambling in a crisis.
Turning Off The Water Supply
First, twist the valve clockwise to shut off the water. A firm but gentle turn usually does the trick. No need for brute force; just ensure it’s fully closed to prevent leaks.
Testing The Water Shutoff
Once the valve is closed, turn on the bathtub faucet. This should confirm the water is indeed off if no water flows out. It’s better to discover any issues now rather than mid-replacement.
Dealing With Stubborn Valves
Some valves may resist due to rust or age. If yours won’t budge, try a little lubrication. Penetrating oil can work wonders, and patience is key here.
What If There’s No Dedicated Valve?
In some homes, individual shutoff valves for tubs aren’t installed. This might mean shutting off the main house supply. It’s a bit inconvenient but necessary for a smooth faucet replacement.
Remember, understanding and controlling your water supply isn’t just about turning a valve. It’s about ensuring your DIY project goes off without a hitch. Have you ever discovered a valve that wouldn’t close? Sometimes, a small oversight can lead to a big splash!
Removing Old Faucet Handles
Removing old faucet handles is a key step in replacing a two-handle bathtub faucet. Gently unscrew the handles to access the underlying components. Carefully handle each part to avoid damage during the process.
Replacing a two-handle bathtub faucet might seem daunting, but removing the old faucet handles is a straightforward task. With a few tools and some patience, you can breathe new life into your bathroom. Whether you’re tackling this project to upgrade the look or fix a pesky leak, removing those old handles is your first step. Imagine the satisfaction of doing it yourself, not only saving money but also gaining a bit of handy know-how.
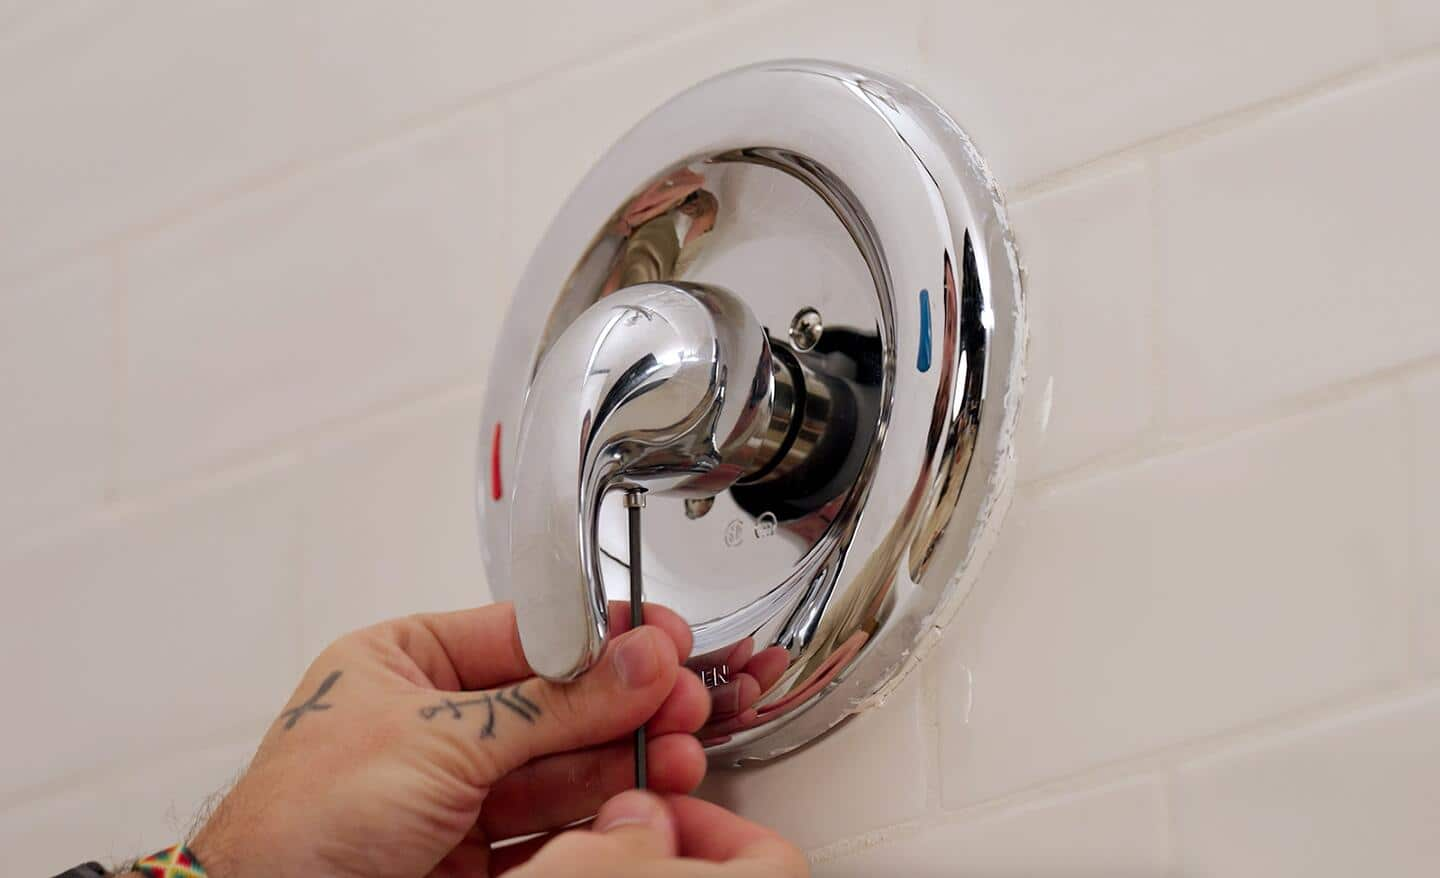
Unscrewing Handle Screws
Start by locating the screws that secure the handles to the faucet.
These screws are usually hidden under decorative caps or covers. Use a flathead screwdriver to gently pry off the cap, exposing the screw beneath.
Ensure you have a small Phillips or flathead screwdriver to loosen these screws. Turn them counterclockwise until they come off completely.
Detaching Handles
With the screws removed, it’s time to detach the handles.
Firmly grasp the handle and pull it away from the faucet stem. It may require a bit of force if it’s been in place for a long time.
If the handle resists, try wiggling it gently to loosen any mineral build-up or corrosion holding it in place.
Replacing a faucet can lead to unexpected surprises, like discovering hidden grime or rust. Have you ever wondered how much wear your bathroom fixtures endure over the years? Removing these handles gives you a glimpse into their hidden world.
Feel empowered by each step you complete, knowing you’re transforming your space one task at a time.
Credit: www.familyhandyman.com
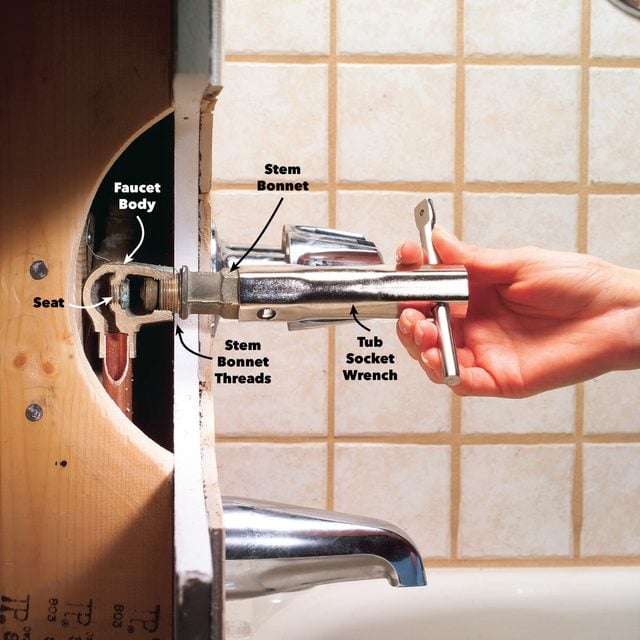
Detaching The Faucet Stem
Removing the faucet stem is a crucial step in replacing a two-handle bathtub faucet. Start by turning off the water supply. Then, use a wrench to carefully loosen and detach the stem, ensuring no damage to surrounding pipes.
Detaching the faucet stem is a crucial step when replacing your two-handle bathtub faucet. It’s where you start to see the inner workings of your plumbing, and with a little patience, it can be straightforward. Whether you’re a seasoned DIYer or tackling this for the first time, understanding this part of the process is key to success.
Using A Wrench For Removal
First things first, grab your trusty wrench. It’s your best friend in this task. Make sure it fits snugly on the stem to avoid slipping.
Turn the wrench counterclockwise to loosen the stem. If it’s stuck, you might need a bit more elbow grease, but be careful not to damage it.
Always remember, patience pays off. It’s tempting to rush, but a slow, steady approach can prevent mishaps.
Inspecting For Damage
Once the stem is detached, take a moment to inspect it closely. Look for signs of wear and tear such as cracks or corrosion.
This is your chance to catch potential issues before they become major problems. A damaged stem can lead to leaks, and nobody wants that.
By catching these issues early, you save time and money in the long run. Have you ever found damage that surprised you?
Don’t be shy about asking for help if you’re unsure. Sometimes a fresh pair of eyes can spot things you’ve missed.
Now that you know the steps, you’re well on your way to mastering faucet replacement. What other home improvement tasks have you tackled recently?
Preparing For New Installation
Replacing a two-handle bathtub faucet starts with gathering the necessary tools and turning off the water supply. Remove the old faucet by unscrewing handles and spout, ensuring to clean the area thoroughly. Install the new faucet, aligning it properly, and tighten all connections securely.
Preparing for a new installation is a critical step when replacing a two-handle bathtub faucet. It ensures everything fits perfectly and functions smoothly. Taking the time to prepare can save you from headaches and costly mistakes down the line. Here’s how you can get started on the right foot.
Cleaning The Faucet Area
Start by turning off the water supply to prevent any accidental flooding. Once that’s done, remove the old faucet carefully.
You might notice gunk or mineral deposits around the area. Use a mild cleaner or a vinegar solution to scrub it all away.
A clean surface ensures a tight seal for your new faucet, preventing leaks.
Ensuring Proper Fit
Before purchasing a new faucet, measure the distance between the two handles. This is crucial for finding a compatible replacement.
Take note of the size of the holes in your bathtub. Some faucets require specific hole sizes, and this can vary.
Double-check that your new faucet matches these specifications. It might seem tedious, but getting this right means your installation will be seamless.
Have you ever installed something that didn’t fit quite right? It can be frustrating. Avoid this by paying attention to these details.
Preparing for installation might feel like a chore, but it’s the foundation of a successful faucet replacement. Wouldn’t you rather spend a few extra minutes now than deal with a leaky faucet later?
Installing New Faucet Handles
Replacing a two-handle bathtub faucet involves removing the old handles and installing new ones. Start by turning off the water supply. Then, unscrew and remove the existing handles to fit the new ones securely. This simple update can enhance your bathroom’s look and function.
Replacing the handles on your bathtub faucet can be a rewarding DIY task, giving your bathroom a fresh look without a complete overhaul. You don’t need to be a plumbing expert to install new faucet handles, but you do need a bit of patience and the right tools. This process doesn’t just improve functionality—it also allows you to express your personal style. Ever find yourself admiring the sleek designs at a friend’s house? Now’s your chance to shine!
Aligning New Handles
Proper alignment is crucial for smooth operation. Start by examining the orientation of your old handles before removal. This will be your guide for placing the new ones.
Ensure that the handles align with the valve stems—this avoids leaks and ensures the handles turn properly. You’ll notice a groove on the stem that matches a notch inside the handle. Align these elements carefully.
Feel free to adjust slightly for a comfortable grip. If you’ve ever struggled with hard-to-turn handles, now’s the time to fix that. Does it feel intuitive and easy to use? That’s the goal!
Securing Handle Screws
Once aligned, it’s time to secure the handles with screws. Use the screws provided with your new handles, as they are specifically designed for their fit.
Tighten the screws evenly to prevent wobbling. A loose handle can lead to wear over time and might cause water to leak. Ever experienced that annoying drip? Properly secured screws can help avoid it.
Check the tightness by gently turning the handles. They should feel firm yet easy to rotate. If you find them stiff, you might need to adjust the screws slightly. Are they secure and comfortable? That’s the finishing touch!
Attaching The New Faucet Stem
Begin by ensuring the water supply is turned off before removing the old faucet stem. Carefully attach the new stem, securing it snugly to prevent leaks. Test the handles to ensure smooth operation and proper alignment with the faucet body.
Attaching the new faucet stem is a crucial step in replacing a two-handle bathtub faucet. This task demands careful attention to detail. It ensures a secure fit and prevents leaks, making your bathroom experience trouble-free. Let’s delve into the process to make sure your new faucet works perfectly.
Positioning The Stem
Start by identifying the correct orientation for the new stem. It should align perfectly with the valve inside the wall. Hold the stem and gently insert it into the opening. Ensure it sits flush against the wall. This prevents any gaps that might lead to leaks. Double-check the alignment by rotating the stem slightly. It should move smoothly without resistance. Proper positioning lays the groundwork for a secure installation.
Tightening With A Wrench
Once positioned, it’s time to tighten the stem with a wrench. Select a wrench that fits snugly around the stem’s base. This avoids damage and provides better control. Apply steady pressure while turning the wrench clockwise. Tighten until the stem is firmly secured, but avoid over-tightening. Excess force can damage the stem or its threads. Check for stability by gently tugging at the stem. It should remain immovable if tightened correctly.
Testing The New Faucet
Turn off the water supply before starting the faucet replacement. Remove the old handles and faucet carefully. Ensure the new faucet is secured tightly to prevent leaks. Test the faucet to check the water flow and temperature. Adjust if necessary for a perfect fit.
Testing the new faucet is a crucial step. It ensures everything works properly. After installation, verify the new setup. This prevents future issues and ensures a smooth operation.
Turning On Water Supply
Turn on the water supply slowly. This prevents a sudden surge. Open both the hot and cold valves. Allow the water to flow fully. Listen for unusual sounds. These can indicate a problem. Let the water run for a few minutes. This helps clear any air in the lines.
Checking For Leaks
Look for drips around the faucet. Also, check under the sink. Use a dry cloth to feel for moisture. Tighten connections if you find leaks. Make sure all parts are secure. Repeat the process if necessary. A leak-free faucet saves water and money.
Troubleshooting Common Issues
Replacing a two-handle bathtub faucet can bring challenges. Even with careful installation, problems may arise. Common issues include leaks and loose handles. Knowing how to troubleshoot these can save you time and stress. Let’s explore some solutions.
Addressing Leaks
Leaks are a frequent issue with bathtub faucets. They can waste water and increase bills. First, check if the washers are worn out. Replacing them often stops leaks. Ensure the faucet’s valve seats are clean. Debris and corrosion can cause leaks too. If leaks persist, consider replacing the valve entirely.
Adjusting Handle Tightness
Loose handles can be frustrating. They may affect water flow control. To fix this, remove the decorative cap on the handle. Tighten the screw inside with a screwdriver. This should secure the handle. If the handle remains loose, inspect for worn parts. Replacing them can often solve the issue.

Credit: www.youtube.com
Maintenance Tips
Replacing a two-handle bathtub faucet involves turning off the water supply and removing the old fixture. Use a wrench to loosen nuts, install the new faucet, and secure it tightly. Test for leaks by turning the water back on, ensuring a smooth flow from the newly installed fixture.
Maintaining your bathtub faucet ensures it works well for years. Regular upkeep prevents damage and costly repairs. Here, we share simple maintenance tips. They keep your faucet in top condition.
Regular Cleaning
Clean your faucet weekly to prevent buildup. Use mild soap and warm water. Gently scrub with a soft cloth. Avoid harsh chemicals that cause damage. Rinse thoroughly to remove soap residue. Dry with a clean towel to prevent spots.
Checking For Wear And Tear
Inspect your faucet monthly for signs of wear. Look for rust, leaks, or loose handles. Address issues quickly to avoid bigger problems. Tighten loose parts with a wrench. Replace worn washers to stop leaks. Regular checks ensure your faucet functions smoothly.
Frequently Asked Questions
How To Fix A Bathtub Faucet With Two Handles?
Turn off the water supply. Remove faucet handles using a screwdriver. Replace worn washers or cartridges. Reassemble handles, ensuring a tight fit. Turn water back on and test for leaks.
Can I Replace A Bathtub Faucet Myself?
Yes, you can replace a bathtub faucet yourself. Ensure you have the right tools and follow instructions carefully. Turn off the water supply before starting. If unsure, consult a professional for guidance. Replacing a faucet can enhance bathroom functionality and aesthetics.
Always prioritize safety during the process.
How Do You Replace A Double Handle Faucet Cartridge?
Turn off water supply. Remove handles and decorative caps. Unscrew retaining nuts. Pull out old cartridges. Insert new cartridges. Reassemble faucet.
How Do You Change A Two-handle Shower Faucet To A Single Handle?
To change a two-handle shower faucet to a single handle, remove the old faucet. Install a compatible single-handle valve. Connect plumbing lines securely. Ensure proper alignment and seal to prevent leaks. Finish by attaching the new handle and testing for functionality.
How Do I Remove A Two Handle Bathtub Faucet?
Turn off water supply first. Then, unscrew handles and remove the faucet body with a wrench.
Conclusion
Replacing a two-handle bathtub faucet is easier than you think. With basic tools, you can complete this task. Save money and learn a useful skill. Follow each step carefully for the best results. Ensure all connections are tight to prevent leaks.
A new faucet can refresh your bathroom’s look. Take your time and be patient. You’ll enjoy a sense of accomplishment once done. Clean up after finishing the project. Now, your bathtub is ready for use. Enjoy your new faucet’s style and function.