Are you looking to elevate the elegance of your kitchen or bathroom with a sleek undermount sink? Installing an undermount sink to granite can transform the look of your space, giving it a modern and seamless finish.
You might think that this task requires professional assistance, but with the right guidance, you can accomplish it yourself, saving time and money. Imagine the satisfaction you’ll feel every time you admire your handiwork! You’ll discover step-by-step instructions that make the installation process straightforward, even if you’re not a seasoned DIY enthusiast.
We’ll break down the tools you need, the techniques to ensure a snug fit, and tips to avoid common pitfalls. Curious to learn how you can master this home improvement project with ease? Keep reading to uncover all the secrets to a flawless installation.
Credit: www.crowleysgranite.com
Tools And Materials Needed
Installing an undermount sink in a granite countertop requires specific tools and materials. Proper preparation ensures a seamless installation process. This guide breaks down what you need to get started.
Tools Required For Installation
Gather essential tools to simplify the installation. A drill with a diamond drill bit is necessary for creating holes. A screwdriver set helps in securing brackets and fasteners. Use a silicone gun for applying sealant around the sink. A level ensures the sink sits evenly.
Essential Materials Needed
Choose a high-quality undermount sink for durability. Purchase a reliable silicone sealant for waterproofing. Get sink clips or mounting brackets for secure attachment. Opt for a jigsaw if adjustments are required. Have a soft cloth ready to clean excess sealant.
Safety Equipment
Wear safety goggles to protect your eyes while drilling. Use gloves to safeguard your hands during installation. Keep a dust mask handy for protection from granite dust. Safety first ensures a smooth and accident-free process.
Preparing The Granite Surface
Start by ensuring the granite surface is clean and dry. Measure and mark where the sink will fit. Then, carefully cut the granite following the markings to create a precise opening.
Preparing the granite surface is an essential step when installing an undermount sink. This process ensures a snug fit and a secure attachment, preventing future leaks or damage. Before diving into this task, consider this: a well-prepared surface is the foundation of a successful installation. Let’s explore how to get your granite ready for this.
Cleaning The Area
Start by clearing the workspace. Remove any debris, dust, or old sealant from the granite surface. Use a gentle cleaner and a soft cloth to wipe down the area thoroughly.
Avoid harsh chemicals that might damage the stone. A simple mixture of mild soap and warm water does the trick. Ensure that every corner and edge is spotless.
Once cleaned, let the surface dry completely. Moisture can interfere with the adhesive’s effectiveness. Remember, a clean surface ensures a strong bond.
Ensuring Proper Measurements
Accurate measurements are crucial to align the sink perfectly. Use a tape measure to determine the dimensions of the sink and the cutout on the granite.
Double-check these measurements. It’s easy to overlook small details, but they can lead to significant issues during installation. Measure twice to avoid mistakes.
Mark the outline of the sink on the granite with a pencil. This guide helps you visualize the placement and make necessary adjustments. Have you ever realized how a tiny miscalculation can cause a big problem?
By preparing the granite surface carefully, you set the stage for a successful undermount sink installation. Each step, from cleaning to measuring, plays a role in achieving a seamless finish.
Selecting The Right Adhesive
Choosing the right adhesive ensures a secure undermount sink installation on granite surfaces. Consider epoxy or silicone-based adhesives for strong bonding. Proper selection prevents future issues and maintains the kitchen’s aesthetics.
Installing an undermount sink to granite might seem daunting, but selecting the right adhesive can make the process a breeze. The adhesive plays a crucial role in ensuring your sink stays firmly attached without any risk of falling off. Choosing the right type is essential for a secure, durable installation that can withstand daily use.
###
Types Of Adhesive
Several adhesives can be used for attaching an undermount sink to granite. Epoxy adhesive is a popular choice due to its strength and durability. It forms a strong bond that can support the weight of the sink. Silicone adhesive is another option, often used for its flexibility and water resistance. Polyurethane glue is also available, known for its high strength, but it’s less commonly used for sinks.
###
Choosing The Best Option
When selecting the best adhesive, consider factors like strength, ease of use, and drying time. Epoxy is excellent for a strong, permanent bond, but it can be tricky to apply and requires precise mixing. Silicone is more forgiving, allowing for adjustments during installation. It’s especially useful if you anticipate needing to make adjustments after the initial setup.
Think about your comfort level with DIY projects. If you’re new to this, you might prefer silicone for its ease of use. However, if you’re experienced and confident, epoxy might be the way to go for its robustness. Which adhesive do you think would suit your needs best?
Positioning The Sink
Positioning the sink is crucial for a perfect fit. An undermount sink requires precision. It enhances the look of your granite countertop. Proper placement ensures stability and functionality. Follow these steps for accurate positioning.
Aligning With The Cutout
Place the sink beneath the granite countertop. Align it with the cutout precisely. The edges should match the cutout shape. Use clamps to hold the sink in place. This prevents movement during installation.
Double-check the alignment. Ensure it fits snugly within the cutout. This prevents gaps between the sink and countertop. A perfect fit enhances the overall appearance.
Checking For Level
Ensure the sink is level before securing it. Use a spirit level to check its position. Adjust if necessary to achieve balance. An unlevel sink causes drainage issues. It may affect the look of your kitchen.
Make small adjustments to keep the sink balanced. Recheck with the spirit level until satisfied. A level sink ensures proper function and aesthetics.
Securing The Sink
Installing an undermount sink to granite requires precise measuring and careful drilling. Secure the sink with strong adhesive and brackets. Ensure a tight seal to prevent leaks and maintain durability.
Securing the sink to your granite countertop is a crucial step that ensures both durability and functionality. A properly secured sink prevents leaks, wobbling, and potential damage to your beautiful granite surface. While it might seem intimidating, securing an undermount sink is manageable with some careful planning and attention to detail. Let’s break it down into two key areas: applying adhesive and installing support brackets.
Applying Adhesive
Begin by cleaning the underside of the granite and the sink rim. Any dust or debris can affect the adhesive’s grip. Use a mild cleaner and a soft cloth to ensure a pristine surface.
Next, apply a bead of silicone adhesive around the rim of the sink. Choose a high-quality silicone designed for kitchen and bath use. This adhesive not only secures the sink but also creates a watertight seal.
Press the sink firmly against the granite, ensuring it aligns perfectly with the cutout. A little wiggle helps distribute the adhesive evenly. Have you ever considered how important patience is in DIY tasks? Here, it’s vital. Allow the adhesive to cure according to the manufacturer’s instructions. This might take a few hours, so plan your work accordingly.
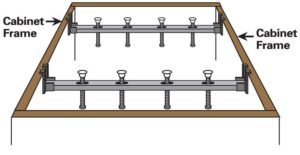
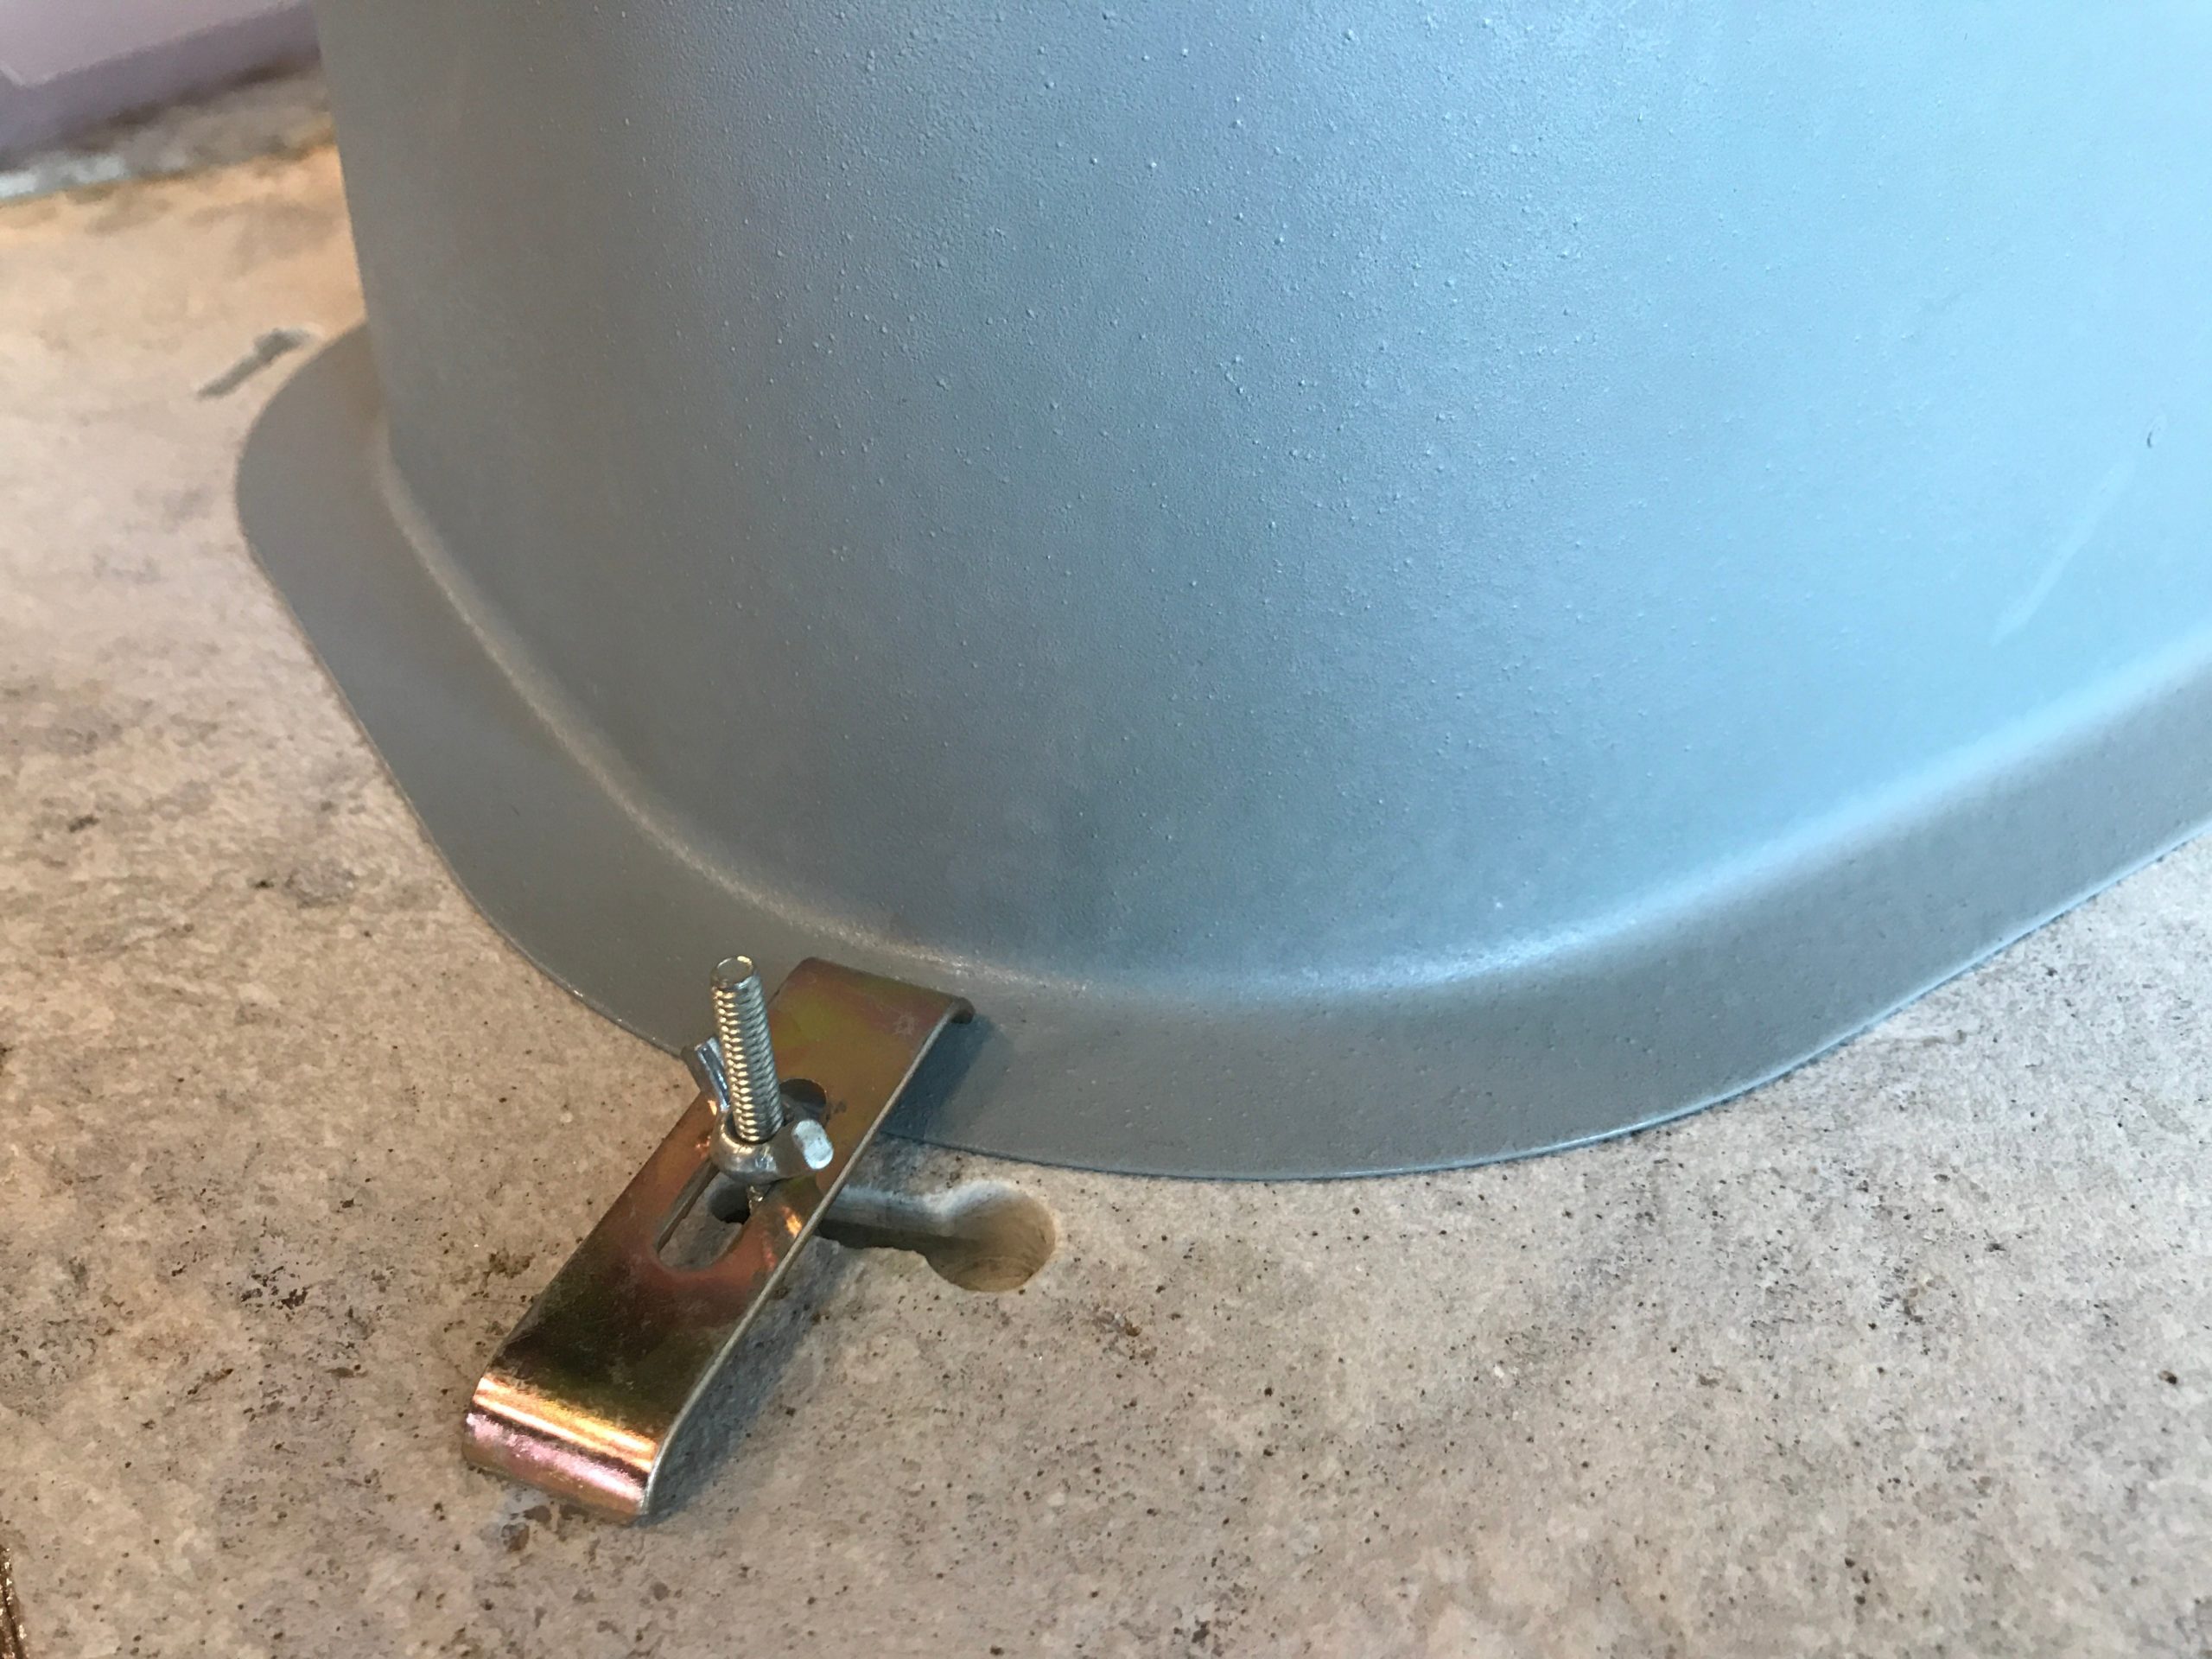
Installing Support Brackets
While the adhesive cures, it’s time to install support brackets. These brackets are essential, as they take the weight off the adhesive, especially when your sink is full.
Measure and mark where the brackets will be placed. It’s usually best to have them evenly spaced around the sink. Drill pilot holes into the underside of the countertop, being cautious not to penetrate the granite surface.
Attach the brackets using screws, ensuring they’re snug but not overtightened. A common mistake is to over-tighten, which can stress the granite. Have you ever felt the satisfaction of a well-supported structure? That’s what these brackets provide. They give peace of mind, knowing your sink is securely in place.
Finally, check the alignment of the sink once more. It should sit flush with the countertop, with no visible gaps. This meticulous attention to detail pays off, leaving you with a seamless and sturdy installation.
Have you tried securing an undermount sink before? What challenges did you face, and how did you overcome them? Your experiences can help others in their DIY journey.

Credit: www.youtube.com
Sealing The Edges
Secure the sink by sealing edges with silicone for a clean finish. Ensure a snug fit to prevent water damage. This step is crucial for durability and aesthetics of an undermount sink installation in granite countertops.
Sealing the edges of your undermount sink is a crucial step in ensuring the durability and functionality of your kitchen setup. It’s not just about keeping water out; it’s about maintaining the aesthetic appeal of your granite countertop. When I installed my sink, I learned that a perfect seal can make the difference between a seamless kitchen experience and constant maintenance headaches. You want to prevent moisture from seeping into the granite, which can cause stains or damage over time.
Using Silicone Sealant
Silicone sealant is your best friend when sealing the edges of your undermount sink. It’s flexible and waterproof, making it ideal for kitchen environments.
Start by applying a generous amount of silicone sealant around the edges where the sink meets the granite. A steady hand is key. I once made the mistake of rushing through this step, resulting in gaps that led to water leakage. Take your time to ensure an even application.
After applying the sealant, smooth it out with a caulking tool or your finger. This ensures that the sealant adheres properly and fills all gaps.
Ensuring A Watertight Seal
Achieving a watertight seal is crucial for preventing leaks and potential damage to your granite. A common mistake is not allowing the sealant to cure properly. Make sure you let it set for at least 24 hours before using the sink. This patience pays off in the long run.
Check for any missed spots. Run a small amount of water around the edges to test for leaks. If you notice any, add more sealant to those areas.
Remember, a watertight seal doesn’t just protect your granite; it safeguards your entire kitchen setup. Imagine being able to wash dishes without worrying about water damage. Isn’t that worth the extra effort?
By focusing on these steps, you ensure that your undermount sink and granite countertop remain a beautiful, functional part of your kitchen for years to come.
Testing For Stability
Ensuring your undermount sink is stable is crucial. Stability prevents leaks and damage. The process involves checking for any movement. Making adjustments as needed. Let’s explore how to test for stability effectively.
Checking For Movement
Start by gently pressing on the sink edges. This checks for any give. If the sink moves, it’s not secure. Movement can lead to water damage. Use a flashlight to inspect the seal. Look for gaps or cracks. These indicate poor installation.
Making Adjustments
If movement is detected, adjustments are necessary. Tighten the mounting clips under the sink. Ensure they’re securely fastened. Use a wrench for better grip. Recheck the edges for movement. Ensure there’s no more shifting. If gaps remain, reapply sealant. Allow it to cure completely. Proper adjustments ensure a snug fit.
Maintaining Your Undermount Sink
Installing an undermount sink to granite involves precise measurements and careful sealing. Secure the sink with brackets for stability. Ensure proper alignment to prevent leaks and enhance kitchen aesthetics.
Maintaining your undermount sink is crucial for its longevity and appearance. Regular care ensures it remains functional and beautiful. It prevents common issues that might arise with daily use. Here’s how you can effectively maintain your undermount sink.
Regular Cleaning Tips
Clean your undermount sink daily with mild soap and water. This prevents buildup of stains and bacteria. Use a soft cloth to avoid scratches on the surface. After washing dishes, rinse the sink thoroughly. This helps to clear away soap residue and food particles. For stubborn stains, use a mixture of baking soda and water. Gently scrub the affected area with a soft sponge. Avoid harsh chemicals which can damage the sink’s finish. Regular cleaning keeps your sink looking brand new.
Addressing Common Issues
Leaks are a common issue with undermount sinks. Check the sealant around the edges regularly. If you notice any gaps, reseal to prevent water damage. Loose sinks can also occur over time. Tighten the mounting clips underneath the countertop. This ensures your sink remains securely in place. If you experience drainage problems, check for clogs in the pipes. Use a plunger or a plumbing snake for clearing blockages. Regular maintenance prevents major plumbing issues. Always address problems as soon as they appear.
Credit: crowleysgranite.com
Frequently Asked Questions
How Do You Secure An Undermount Sink To A Granite Countertop?
Secure an undermount sink to a granite countertop using epoxy adhesive and mounting clips. Clean the area first. Apply epoxy to the sink rim. Position the sink and hold it with clips. Allow the adhesive to cure completely. Check for proper alignment and ensure a watertight seal.
Can You Install An Undermount Sink After Granite Is Installed?
Yes, you can install an undermount sink after granite installation. It requires professional help to ensure proper fit and sealing. The granite must be carefully cut and polished to accommodate the sink. Secure the sink with strong adhesives and support brackets for stability.
What Is The Best Adhesive For Undermount Sink To Granite?
The best adhesive for attaching an undermount sink to granite is a high-quality silicone sealant. This sealant provides a strong, waterproof bond and flexibility. Ensure the area is clean and dry before application for optimal adhesion.
Can You Replace An Undermount Sink Without Damaging The Granite?
Yes, it’s possible to replace an undermount sink without damaging granite. Carefully detach the old sink, ensuring no harm to the stone. Consult a professional for precise installation. Proper sealing and support are crucial to prevent damage during replacement. Always verify compatibility between the new sink and existing countertop.
How Do I Prepare Granite For An Undermount Sink?
Clean the surface. Ensure it’s dry and free of debris. Check for any cracks.
Conclusion
Installing an undermount sink to granite is straightforward with the right steps. Secure the sink and apply sealant carefully. Double-check alignment before tightening clips. Remember, patience is key. Take your time to ensure a snug fit. Test for leaks after installation.
If unsure, seek professional help. A well-installed sink enhances kitchen aesthetics. Enjoy your newly transformed space. Now, your sink is ready for use. It’s perfect for everyday kitchen tasks. With proper care, it will last for years. Share your experience with friends.
Happy installing!