Are you tired of that constant drip coming from your bathroom faucet? It might be time to change the cartridge.
This simple fix can save you money on your water bill and prevent further damage. But where do you start? You might feel a bit daunted by the thought of tackling plumbing issues, but changing a cartridge is easier than you think.
In this guide, you’ll discover step-by-step instructions that simplify the process, ensuring you won’t need to call a plumber. With just a few tools and a little patience, you can restore your faucet’s smooth operation in no time. Keep reading to learn how you can transform this task into a satisfying DIY success.
Tools Needed
Essential tools for changing a bathroom faucet cartridge include a screwdriver, adjustable wrench, and pliers. A flashlight can help illuminate tight spaces, ensuring precision. Keep a towel handy to catch any water spills.
Changing the cartridge in your bathroom faucet might sound daunting, but with the right tools, it becomes a straightforward task that you can tackle yourself. The tools you use will make all the difference in ensuring the process is smooth and hassle-free. Imagine the satisfaction of fixing your faucet without having to call in a professional. Let’s dive into the specific tools you’ll need to get the job done efficiently. ###Basic Tools You Need
First and foremost, a Phillips screwdriver is essential. It’s used to remove the screws holding the faucet handle in place. This is often the first step in accessing the cartridge. You might already have one in your toolbox, making it an easy start. A flathead screwdriver is also crucial. This tool helps to gently pry parts of the faucet apart without damaging them. Have you ever used a flathead screwdriver to open a paint can lid? Similar technique here, but for your faucet. ###Specialized Tools For Precision
Adjustable wrench is a hero in the DIY world. It allows you to loosen and tighten nuts of various sizes, ensuring that everything is securely fastened once you’ve replaced the cartridge. A handy tip: wrap the jaws in a cloth to prevent scratching your faucet. Allen wrench set might be needed, especially if your faucet handles are secured with hex screws. These wrenches come in various sizes, so having a set guarantees you’re prepared for any kind of screw. ###Tools To Ensure Cleanliness
Use a cloth or towel to cover the sink drain. This prevents small parts from falling into the drain, saving you from the frustration of fishing them out later. It’s a simple step but often overlooked. A bucket or bowl is useful to catch any residual water when you disconnect the faucet components. This keeps your workspace tidy and minimizes cleanup time. ###Safety Tools
Safety goggles protect your eyes from any debris or splashback. It might seem overkill for such a simple task, but safety first is always a good rule to follow. A pair of rubber gloves ensures your hands stay dry and clean. They also provide a better grip on wet surfaces, preventing slips that could lead to damage. Now that you know the tools needed, what’s stopping you from tackling your faucet repair? Could having the right tools boost your confidence to try other home repairs?Shutting Off Water Supply
Changing the cartridge in your bathroom faucet can fix leaks. The first step in this process is shutting off the water supply. This essential step ensures no water flow while you work. It prevents water mess and potential damage. Follow these steps for a smooth experience.
Locate The Shut-off Valves
Begin by finding the shut-off valves under the sink. They are usually located close to the wall. These valves control water flow to the faucet. Identify both hot and cold water valves.
Turn Off The Valves
Turn the valve handles clockwise to shut them off. This action stops water from reaching the faucet. Ensure both valves are tightly closed. Double-check to prevent any water leakage.
Test The Faucet
Open the faucet to test if water flow has stopped. If water still drips, recheck the valves. Make sure they are fully turned off. This step confirms the water supply is truly off.
Release Remaining Water Pressure
Let any remaining water drain from the faucet. This helps release pressure in the pipes. It ensures a safe and dry work area. Wait until no more water drips from the tap.
Safety Precautions
Ensure the sink area is dry before proceeding. Use a towel to wipe any water. This prevents slipping or water damage. Safety is always a priority.
Removing Faucet Handle
To change the cartridge in a bathroom faucet, first remove the faucet handle. Loosen the screw beneath or behind the handle. Then, gently lift the handle off. This exposes the cartridge, making it easy to replace.
When you need to change a cartridge in your bathroom faucet, removing the faucet handle is often the first hurdle. It might seem daunting, especially if you’ve never attempted it before. However, with the right steps, it can be straightforward and even enjoyable. Think of it as a little project that enhances your DIY skills. Remember the last time you successfully fixed something on your own? That sense of accomplishment is just a few steps away. Let’s dive into the process of removing your faucet handle.Gather Your Tools
First, ensure you have the necessary tools. A Phillips or flathead screwdriver is usually essential. Sometimes, an Allen wrench might be needed depending on your faucet model. Keep these tools within reach to avoid unnecessary delays. Having the right tool at hand can make the process smooth and efficient.Turn Off The Water Supply
Before starting, turn off the water supply. Look for the valve under your sink and turn it clockwise to stop water flow. This prevents any accidental water spills during the process. Plus, it gives you peace of mind knowing you won’t be caught off guard by a sudden splash.Locate The Handle’s Set Screw
Check the faucet handle for a set screw. It’s typically found under a decorative cap or cover. Carefully pry off the cap with a small flathead screwdriver if needed. Once exposed, you’ll see the set screw holding the handle in place.Remove The Set Screw
Use the appropriate screwdriver or Allen wrench to loosen the set screw. Turn it counterclockwise until it’s loose enough. Don’t let it fall into the sink or drain. A simple tip is to place a cloth in the sink to catch any falling screws.Detach The Handle
With the set screw removed, gently pull the handle away from the faucet. If it’s stuck, a little wiggle can help loosen it. Over time, mineral deposits can cause the handle to stick. In such cases, a gentle tug often does the trick.Inspect The Handle And Set Screw
Inspect both the handle and set screw for any wear or damage. This is also a good time to clean any buildup. Consider this step your opportunity to ensure everything is in good shape before proceeding. A clean handle makes reinstallation smoother. As you venture through these steps, what insights do you gain? Are there any unexpected challenges or discoveries? Share your experiences and learnings as you tackle this DIY project. Successfully removing the faucet handle paves the way for the next steps in changing your bathroom faucet cartridge. Enjoy the satisfaction of progressing through each stage with confidence.:max_bytes(150000):strip_icc()/repair-a-two-handle-cartridge-faucet-1824887-06-41a97373b2104f8188ec7bbd5c97fbb1.jpg)
Credit: www.thespruce.com
Unscrewing Retaining Nut
Changing the cartridge in your bathroom faucet can seem daunting. It involves several steps, but one crucial part is unscrewing the retaining nut. This step is essential to access the cartridge and replace it properly. Knowing how to handle this task can make the process smoother and prevent potential damage.
Step 1: Gather Your Tools
Before you begin, ensure you have the right tools. A wrench or pliers will help you unscrew the nut effectively. These tools are usually necessary for loosening tight fittings.
Step 2: Turn Off Water Supply
Always turn off the water supply before unscrewing any parts. This prevents water leaks and keeps your work area dry.
Step 3: Locate The Retaining Nut
The retaining nut secures the cartridge in place. It’s usually found beneath the faucet handle. Removing the handle may reveal the nut clearly.
Step 4: Use Wrench To Loosen Nut
Position your wrench around the nut. Turn the wrench counterclockwise to loosen it. Apply steady pressure to avoid slipping or damaging the nut.
Step 5: Remove The Nut Carefully
Once loosened, remove the nut by hand. Keep the nut in a safe place for later use. This ensures easy reassembly after replacing the cartridge.
Step 6: Inspect For Damage
Examine the removed nut for any signs of wear or damage. A damaged nut may need replacement to ensure a secure fit.
Step 7: Prepare For Cartridge Removal
With the nut removed, the cartridge is now accessible. You can proceed to remove the cartridge and replace it as needed.
Extracting Old Cartridge
Swapping an old cartridge in a bathroom faucet involves a few simple steps. Turn off the water supply and remove the handle. Pull out the old cartridge carefully, ensuring no parts are left behind.
Changing the cartridge in your bathroom faucet might seem like a daunting task, but it’s easier than you think. Extracting the old cartridge is a crucial step in this process. Getting it right ensures your faucet functions smoothly, preventing leaks and drips. Have you ever wondered why your faucet isn’t performing as it should? The culprit might just be an old, worn-out cartridge. Let’s dive into how you can extract it effortlessly.Gather Your Tools
Before you start, make sure you have everything you need. A screwdriver, an adjustable wrench, and a pair of pliers will be your best friends in this task. Having a towel handy can help you catch any drips or small parts that might fall.Turn Off Water Supply
First things first: stop the water flow. Locate the shut-off valves under the sink and turn them clockwise. This prevents water from gushing out when you remove the cartridge.Remove Faucet Handle
Once the water is off, it’s time to take off the faucet handle. Unscrew any visible screws using your screwdriver. If your faucet has a cap, gently pry it open to reveal the screw beneath.Detach The Retaining Nut
After removing the handle, you’ll see a retaining nut holding the cartridge in place. Use your adjustable wrench to loosen and remove it. Keep this nut in a safe place; you’ll need it later.Extract The Cartridge
Here’s where the real work begins. Grip the top of the cartridge with your pliers and gently pull it out. Sometimes, it might be a bit stuck, so a slight wiggle can help. Be patient and don’t force it.Inspect The Cartridge
Once you’ve extracted the old cartridge, take a moment to inspect it. Is it clogged with debris or showing signs of wear? Understanding its condition can help you decide whether it’s time for a replacement.Prepare For The New Cartridge
Now that the old cartridge is out, you’re ready to fit in a new one. Clean the area to ensure a snug fit for the replacement. A clean surface makes a big difference in preventing leaks. Changing a faucet cartridge can feel empowering. Have you considered how much money you save by doing it yourself? With these steps, you’re not just fixing a faucet—you’re honing your DIY skills. Ready to try it out?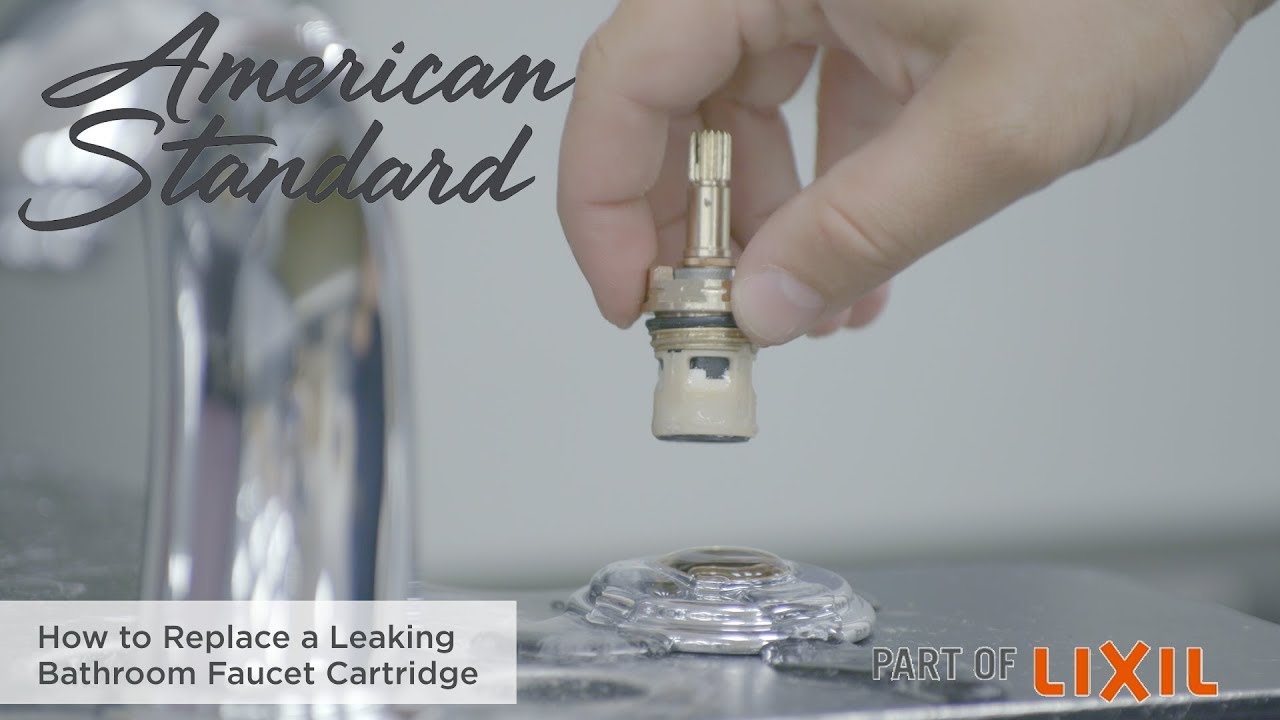
Credit: www.youtube.com
Installing New Cartridge
Changing a bathroom faucet cartridge can seem daunting. With the right guidance, it’s quite simple. This section will guide you through installing a new cartridge. Follow these steps for a successful installation.
Step 1: Choose The Right Replacement Cartridge
Ensure you have the correct cartridge for your faucet. Check the model and brand. Visit a local hardware store with the old cartridge. Compare it with available options. This ensures an accurate fit.
Step 2: Prepare The Faucet Area
Clear the sink area of any items. Have a towel or cloth ready to catch water. This prevents mess and protects surfaces. Ensure you have the necessary tools within reach.
Step 3: Insert The New Cartridge
Carefully place the new cartridge into the faucet. Align it with the slots or grooves. Press it down firmly but gently. Ensure it sits flush with the faucet body.
Step 4: Secure The Cartridge
Reattach the nut or retaining clip. Use a wrench if needed. Ensure it is tight but not overly so. This prevents leaks and ensures smooth operation.
Step 5: Reassemble The Faucet
Replace any removed handles or decorative covers. Ensure they fit snugly. Tighten any screws that were removed. Check that everything is secure and in place.
Step 6: Turn On Water Supply
Slowly turn the water supply back on. Check for any leaks around the faucet. If leaks occur, tighten connections. Ensure water flows smoothly from the faucet.
Step 7: Test The Faucet
Turn the faucet on and off several times. Ensure smooth operation and no leaks. Adjust any loose fittings if necessary. Your faucet should now work perfectly with the new cartridge.
Reassembling Faucet
Replacing the cartridge in your bathroom faucet involves a few straightforward steps. Start by turning off the water supply and removing the faucet handle. Carefully extract the old cartridge and insert the new one, ensuring a snug fit.
Reassembling your bathroom faucet after changing the cartridge can feel like piecing together a puzzle. But with a methodical approach, it’s a straightforward task. Once you have the new cartridge in place, it’s time to put everything back together and ensure your faucet works smoothly. ###1. Align The Cartridge Properly
Ensure the cartridge is seated correctly in its housing. This step is crucial for preventing leaks and ensuring smooth operation. Double-check that the notches on the cartridge align perfectly with the corresponding slots in the faucet. ###2. Reattach The Retaining Clip
The retaining clip holds the cartridge in place. Carefully slide it back into position, making sure it’s secure. This small piece is essential for keeping the cartridge from shifting during use. ###3. Reinstall The Faucet Handle
Place the handle back onto the stem of the cartridge. Secure it with the screw you removed earlier. Tighten the screw firmly, but be cautious not to over-tighten, which could damage the handle. ###4. Test The Faucet
Turn on the water supply and test the faucet. Check for leaks around the base and ensure the water flow is as expected. If the water pressure is consistent and there’s no dripping, you’ve done a great job. ###5. Troubleshoot If Necessary
If you notice any issues, such as leaks or irregular water flow, don’t panic. Retrace your steps to ensure everything is assembled correctly. Sometimes, a small adjustment is all that’s needed to resolve the issue. ###6. Clean Up Your Workspace
Put away your tools and discard any old parts. A clean workspace not only gives you a sense of accomplishment but also ensures you’re ready for your next DIY project. Reassembling the faucet isn’t just about following steps; it’s about ensuring the longevity and functionality of your bathroom fixture. Have you ever found a surprise part left over after reassembly? It’s a gentle reminder to stay organized and attentive during the process.Testing For Leaks
After replacing the cartridge in your bathroom faucet, testing for leaks is crucial. This step ensures that the installation is successful and the faucet functions properly. It can save you from potential water damage and costly repairs. Follow these steps to test for leaks effectively.
Turn On The Water Supply
Begin by turning on the water supply. Ensure the valve is fully open. This allows water to flow freely through the faucet. Check that both hot and cold water flow smoothly. If not, there might be an installation issue.
Inspect The Faucet Base
Look closely at the base of the faucet. Check for any signs of water pooling. If you see water, tighten the faucet connections. Sometimes, a small adjustment can stop leaks.
Check Under The Sink
Don’t forget to check under the sink. Look for drips or moisture around the pipes. Even a small drip can indicate a problem. Dry the area and watch for any new moisture.
Monitor Water Pressure
Pay attention to water pressure. If it’s too low, there could be a blockage. High pressure might suggest a loose connection. Adjust the valves as needed to maintain steady pressure.
Listen For Unusual Sounds
Listen for any strange sounds. Gurgling or hissing can signal a leak. These noises often mean air is trapped in the pipes. Bleed the system to remove air pockets.
Recheck After A Few Hours
Recheck the faucet after a few hours. Some leaks appear over time. A quick re-inspection can prevent future issues. Keep a watchful eye for any changes.
Maintenance Tips
Changing the cartridge in a bathroom faucet requires simple steps. First, turn off the water supply. Remove the handle using a screwdriver. Take out the old cartridge and insert the new one. Reassemble the handle and turn on the water.
Regular maintenance can prevent leaks and ensure smooth operation.
Changing the cartridge in your bathroom faucet is an essential task that can extend the life of your plumbing fixtures. By incorporating regular maintenance into your routine, you ensure smooth operation and prevent leaks. Let’s dive into some practical maintenance tips that will keep your faucet functioning efficiently.1. Regularly Inspect For Leaks
You might be surprised at how often leaks go unnoticed. Take a moment each month to check under your sink and around the faucet for any signs of moisture or dripping. Catching leaks early can save you from costly repairs down the line.2. Clean Mineral Build-up
Hard water can leave mineral deposits on your faucet and inside the cartridge, leading to reduced water flow. Use a mixture of vinegar and water to gently scrub away these deposits. This simple cleaning routine can maintain the smooth operation of your faucet.3. Lubricate Moving Parts
Over time, the moving parts of your faucet can become stiff. Applying a silicon-based lubricant can keep these parts moving freely. Remember, a little lubricant goes a long way, so use it sparingly.4. Replace Washers And O-rings
Have you ever noticed a persistent drip? It might be time to replace the washers and O-rings. These small components wear out over time and can cause leaks. Keep a few spare ones handy and change them as needed to ensure a tight seal.5. Keep An Eye On Water Pressure
Sudden changes in water pressure can indicate issues with your cartridge or plumbing. If you notice a drop, it might be time to clean or replace the cartridge. Regular checks can prevent larger plumbing issues from developing.6. Document Maintenance Schedule
It might sound tedious, but keeping a simple log of maintenance activities can be incredibly useful. Document the date and what was done each time you maintain your faucet. This record helps you track the performance and identify when to replace parts.7. Know When To Seek Professional Help
Some issues might be beyond your DIY skills, and that’s perfectly okay. If your faucet continues to leak despite your best efforts, it might be time to call in a professional. Knowing when to seek help can prevent further damage and ensure your plumbing is in top shape. By integrating these tips into your routine, you can keep your bathroom faucet running smoothly for years. What maintenance habits do you practice to keep your home running efficiently? Share your thoughts and experiences in the comments below!
Credit: diy.stackexchange.com
Frequently Asked Questions
How Do You Change The Cartridge In A Bathroom Faucet?
Turn off the water supply. Remove the faucet handle using a screwdriver. Extract the old cartridge with pliers. Insert the new cartridge and ensure it’s aligned properly. Reattach the handle and secure it with the screw. Turn on the water supply to check for leaks.
Can You Replace A Faucet Cartridge Without Turning Off Water?
You must turn off the water before replacing a faucet cartridge. This prevents leaks and water damage. Locate the shut-off valve under the sink or turn off the main water supply. Always check for leaks after installing the new cartridge to ensure proper installation.
How To Know If A Faucet Cartridge Needs To Be Replaced?
Check for leaks around the faucet handle. Listen for unusual sounds when operating the faucet. Observe inconsistent water flow or temperature. Identify difficulty in turning the handle or the presence of drips. Replace the cartridge if these issues persist to ensure optimal faucet performance.
How To Fix A Leaking Faucet Cartridge?
Turn off the water supply. Remove the faucet handle. Extract the cartridge using pliers. Inspect for damage. Replace with a new cartridge if necessary. Reassemble the faucet, ensuring all parts are tightened properly. Test by turning the water back on.
How Do I Identify My Faucet Cartridge Type?
Check the brand and model. Use the manufacturer’s website or manual for cartridge identification.
Conclusion
Changing a bathroom faucet cartridge is easier than it seems. With the right tools, you can finish the task quickly. Follow the steps carefully. Double-check connections to avoid leaks. A new cartridge means smoother water flow. It also prevents annoying drips.
Regular maintenance keeps your faucet working well. Save money by fixing it yourself. No need for a plumber if you know the basics. Enjoy a functional bathroom without stress. Feel proud of your DIY skills. Your faucet is ready for daily use.
Keep this guide handy for future reference.