A dripping kitchen faucet can be more than just a minor annoyance. It can lead to increased water bills and even cause damage if left unchecked.
If you’ve noticed your two-handled kitchen faucet leaking and you’ve been putting off fixing it, don’t worry—you’re not alone. Many homeowners face this issue and wonder if they can tackle the repair themselves. The good news is, you can! With a little guidance, fixing a leaky kitchen faucet with two handles is well within your reach.
Imagine the satisfaction of solving this problem on your own, saving money, and preventing further issues. This article is designed to guide you through the simple steps to get your faucet back in working order. By the end, you’ll have the confidence and knowledge to fix that leak yourself. Ready to stop the drip and regain control of your kitchen? Let’s dive into the process and make your faucet as good as new.
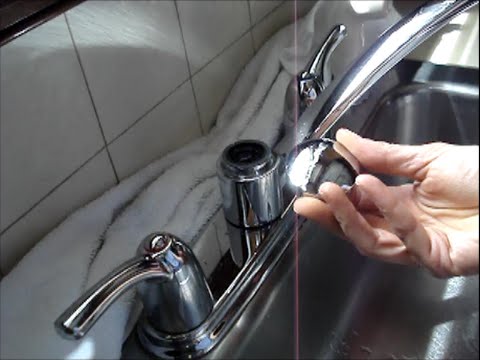
Credit: www.youtube.com
Identifying The Problem
Spotting a leak in a two-handle kitchen faucet involves checking for dripping water or moisture around the handles. Examine the connections where the faucet meets the sink and observe any persistent water flow. Identifying these signs helps pinpoint the exact source of the problem.
Identifying the problem is the first step in fixing a leaky kitchen faucet with two handles. A leaky faucet can waste water and increase your bills. Knowing what to look for helps you address the issue effectively.Signs Of A Leaky Faucet
Drips from the spout are the most obvious sign. You might also notice water pooling around the base. Listen for sounds of dripping water when the faucet is off. A higher water bill can be another clue. Check under the sink for water stains or puddles.Common Causes Of Leaks
Worn-out washers can cause leaks. Over time, they lose their shape and effectiveness. Loose or damaged O-rings are another common issue. These small parts keep the faucet sealed tight. Corrosion inside the faucet can also lead to leaks. Mineral deposits build up and weaken the faucet parts. Faulty valve seats often lead to leaks. The valve seat connects the faucet to the spout. If it wears out, water leaks through.Gathering Necessary Tools
Gather essential tools like a wrench, screwdriver, and plumber’s tape before fixing a leaky kitchen faucet with two handles. Having these items ready ensures a smoother repair process, preventing any unnecessary delays.
Gathering the right tools is a critical step when you’re about to fix a leaky kitchen faucet with two handles. This preparation ensures a smoother repair process and can save you multiple trips to the toolbox. Imagine reaching halfway through your repair only to realize you’re missing a crucial tool—that can be frustrating, right? Preparing ahead not only saves time but also makes the repair less stressful. ###Essential Tools List
Before you start, make sure you have all the essential tools at your disposal. Here’s a handy list to guide you: – Adjustable Wrench: This tool helps in loosening and tightening nuts without needing multiple wrenches of different sizes. – Screwdrivers: Both Phillips and flat-head screwdrivers are necessary for removing screws of various types. – Plumber’s Tape: Useful for preventing leaks at the joints and ensuring a tight fit. – Replacement Parts: Have the correct size washers and O-rings based on your faucet model. – Bucket or Bowl: To catch any water that might spill when you’re working on the faucet. Think of this list as your personal toolkit checklist. Have you ever started a DIY project and realized you didn’t have everything you need? It’s those little things that make a big difference. ###Safety Precautions
Safety should never be an afterthought, even in seemingly simple tasks like fixing a faucet. Here are some precautions to keep in mind: – Turn Off Water Supply: Always start by turning off the water supply to avoid unexpected sprays or leaks. – Clear the Work Area: Ensure the kitchen sink area is clear of dishes or other items that might obstruct your work. – Use Gloves: Protect your hands from sharp edges and grime by wearing work gloves. Isn’t it interesting how a simple pair of gloves can save you from nicks and cuts? Safety is about those small steps that prevent big problems. Taking these precautions and gathering the right tools is like setting the stage for success. Are you ready to dive into fixing that leak with confidence? Make sure your toolkit is complete and your safety measures are in place, and you’ll be well on your way.Shutting Off Water Supply
Fixing a leaky kitchen faucet with two handles may seem daunting. But, the first essential step is shutting off the water supply. This prevents water from spilling everywhere during repairs. By doing this, you ensure a smooth and dry fix.
Locating The Shut-off Valves
Begin by finding the shut-off valves under the sink. Most kitchens have these valves below the sink cabinet. Look for two small knobs, one for hot and one for cold water. Turn them clockwise to stop the water flow.
Draining Excess Water
After shutting off the valves, open the faucet handles. This allows any trapped water to drain out. Keep a small bucket or towel handy to catch drips. This step ensures no surprise spills later on.
Disassembling The Faucet
Disassemble the faucet to fix a leaky kitchen faucet with two handles. Turn off water supply first. Then, remove faucet handle screws to access inner parts. Carefully inspect and replace worn washers or seals. Reassemble everything securely to stop the leak.
Disassembling a leaky kitchen faucet with two handles requires patience and precision. It’s the first step in fixing the leak efficiently. Before starting, gather necessary tools like screwdrivers and pliers. Turn off the water supply. This prevents any accidental flooding. Understanding the faucet’s parts aids in a smooth process. Follow each step carefully to ensure a successful repair.Removing Faucet Handles
Begin by removing the faucet handles. Locate the screws securing each handle. These are usually hidden under decorative caps. Pry off the cap gently using a flathead screwdriver. Once the cap is off, unscrew the handle carefully. Use a Phillips screwdriver for this task. Pull the handle away from the faucet body. Repeat the process for the other handle. Keep all screws and parts safe. You will need them later for reassembly.Accessing The Valve
With the handles removed, access the valve. The valve controls water flow. It is crucial in stopping leaks. Use an adjustable wrench to loosen the valve nut. Turn counterclockwise to remove it. Carefully take out the valve from the faucet. Inspect it for wear or damage. Clean any debris around the valve area. Check the O-rings and washers for signs of wear. Replace them if necessary. Properly functioning valves ensure a leak-free faucet.Inspecting And Replacing Washers
Fixing a leaky kitchen faucet can save water and reduce bills. One common cause is worn-out washers. In faucets with two handles, these washers are crucial. They create a seal to stop water flow when handles are off. Over time, washers can wear down. Inspecting and replacing them might solve the leak issue.
Checking Washer Condition
First, turn off the water supply. Twist the faucet handles to drain any remaining water. Use a screwdriver to remove the handle. This exposes the valve stem. Use a wrench to detach the valve stem and access the washer. Examine the washer closely. Look for cracks, wear, or damage.
If the washer is damaged, it needs replacement. A worn washer won’t seal properly. This causes leaks. If the washer is intact, the problem might lie elsewhere. Always check the washer size before buying a new one. It must match the old washer precisely.
Installing New Washers
Purchase a new washer matching your old one. Installation is simple. Place the new washer onto the valve stem. Ensure it fits snugly. Tighten the washer in place with a screw. Reattach the valve stem into the faucet body.
Reinstall the faucet handle. Turn on the water supply. Test the faucet by turning the handles. Check for leaks. If the water flow stops when the handle is off, the job is done. Replacing washers can often solve leaks effectively. It’s a simple task, saving money on plumber fees.
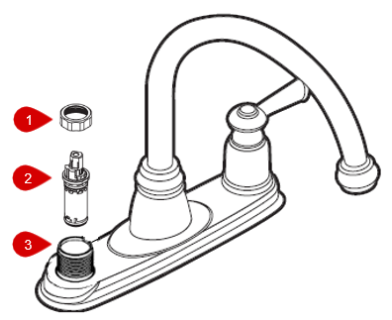
Credit: solutions.moen.com
Reassembling The Faucet
Fixing a leaky kitchen faucet with two handles involves careful reassembly. Start by securing the handles and ensuring the seals are tight. Double-check connections to prevent future drips and maintain efficiency.
Reassembling a leaky kitchen faucet with two handles is like completing a puzzle. You’ve identified the problem, replaced the faulty parts, and now it’s time to put everything back together. This step is crucial to ensure your faucet works perfectly and leaks become a thing of the past. Do you remember the satisfaction of seeing a task through to completion? That’s exactly what you’re about to experience. Let’s dive into the essential steps of reassembling your faucet.Reattaching Handles
Start by carefully placing the handles back onto their respective stems. It’s important to align them correctly to avoid any future leaks or operational issues. Tighten the screws that hold the handles in place using a screwdriver. Remember, handle screws need to be snug but not overly tight. You might think that the tighter the better, but overtightening can actually damage the faucet. Take a moment to ensure the handles turn smoothly. If they’re stiff, it could indicate misalignment. Adjust as necessary to guarantee ease of use.Ensuring Proper Fit
Once the handles are reattached, you need to check for proper fit. This step ensures everything is aligned and functioning as it should. Turn the water supply back on and observe for any signs of leakage. If you notice any leaks, double-check the tightness of the screws and alignment of the handles. It might be tempting to skip this check, but it’s crucial for long-term functionality. Ask yourself: Are the handles aligned with each other? A misaligned handle can cause uneven water flow and additional wear over time. Adjust and secure until everything fits perfectly. Completing the reassembly of your faucet is more than just a task; it’s an achievement. You’ve taken control of a household problem and fixed it with your own hands. Now, enjoy the satisfaction of a perfectly functioning kitchen faucet, and remember, you’ve got the skills to tackle other DIY projects too.Testing For Leaks
Discovering a leaky kitchen faucet can be frustrating. Start by checking for drips from the handles. Tightening screws or replacing washers often solves the problem, ensuring a drip-free kitchen experience.
Testing for leaks is a crucial step when fixing a leaky kitchen faucet with two handles. Once you’ve put everything back together, you need to ensure that your efforts weren’t in vain. You don’t want to discover a puddle on your kitchen counter later. Let’s go through the steps to check for leaks effectively, ensuring your kitchen faucet is operating smoothly and efficiently.Turning Water Supply On
Before you begin, make sure everything is tightened and in place. Turn on the water supply valves under your sink slowly. This gradual approach helps in preventing any sudden water pressure that might dislodge your newly installed components. Pay attention to any unusual sounds or movements as you turn the water back on. If you hear a hiss or notice any wobble, it might indicate an issue. Adjust accordingly and ensure everything feels secure.Checking For Drips
Once the water supply is back on, it’s time to check for any drips. Carefully observe the faucet handles and the spout. Is there any water escaping? A dry paper towel placed underneath can help you detect even the slightest drips. Inspect both handles and the base of the faucet. Sometimes, leaks are sneaky and can appear a few minutes after turning the water back on. Be patient and give it a few moments. If you spot any leaks, tighten the connections slightly. If that doesn’t solve the issue, you might need to revisit the internal components. Remember, patience and precision are your best allies here. When was the last time you checked your kitchen faucet for leaks? Taking a few moments today could save you a bigger headache tomorrow.:max_bytes(150000):strip_icc()/repair-a-two-handle-cartridge-faucet-1824887_04_oldcartridge_4913-642676650a0e45a9af3253683eecf94d.jpg)
Credit: www.thespruce.com
Maintaining Your Faucet
Fixing a leaky kitchen faucet with two handles involves simple steps. First, turn off the water supply. Next, remove the handles and inspect for worn-out washers or O-rings. Replacing these parts often solves the problem, restoring your faucet’s function. Regular maintenance can prevent future leaks and ensure longevity.
Maintaining Your Faucet Keeping your kitchen faucet in top shape ensures it remains a helpful tool rather than a source of frustration. A leaky faucet isn’t just an annoyance; it can lead to higher water bills and potential water damage. Regular maintenance can extend the life of your faucet and save you from unexpected repair costs. Here are some practical tips to keep your faucet working smoothly.Regular Inspection Tips
Set a monthly reminder to check your faucet. Look for any signs of drips or leaks around the handles and spout. Feel the water flow and check for any decrease in water pressure, which could indicate a clog. Gently move the faucet handles and observe if they wobble or feel loose. Tighten any loose parts to prevent leaks. Use a flashlight to inspect under the sink for any hidden leaks that might not be immediately visible.Preventative Measures
Consider installing a water softener if you live in an area with hard water. Hard water can lead to mineral buildup, affecting your faucet’s performance. Regularly clean your faucet’s aerator by unscrewing it and soaking it in vinegar to remove sediment and debris. This simple step can improve water flow and prevent clogs. Replace worn-out washers and gaskets as soon as you notice any wear and tear. These small, inexpensive parts can prevent leaks and extend the life of your faucet. Keep a small toolkit handy under your sink for quick fixes. Having the right tools nearby makes it easier to address minor issues before they become major problems. Are you willing to spend a few minutes each month to protect your faucet and your wallet? A little maintenance goes a long way.Frequently Asked Questions
How To Fix A Leaky Faucet Double Handle?
Turn off the water supply. Remove handles and unscrew the nuts. Replace worn washers or seals. Reassemble the faucet and test for leaks.
What Is A Faucet With Two Handles Called?
A faucet with two handles is called a double-handle or dual-handle faucet. It allows separate control of hot and cold water. These faucets are common in kitchens and bathrooms, providing precise temperature adjustments.
How Do I Get My Kitchen Faucet To Stop Dripping?
Fix a dripping kitchen faucet by replacing worn-out washers or O-rings. Turn off the water supply first. Unscrew the handle and remove the cartridge. Install new washers or O-rings, then reassemble the faucet. Test for drips.
How To Remove Cartridge From Two Handle Faucet?
Turn off the water supply. Remove faucet handles with a screwdriver. Unscrew the retaining nut and pull out the cartridge gently.
How Do I Identify A Leak In A Two-handle Faucet?
Check for water dripping from the spout or handles. Listen for hissing sounds. Examine for moisture around the base.
Conclusion
Fixing a leaky kitchen faucet is simpler than it seems. You just need some basic tools and a bit of patience. Start by turning off the water supply. Remove the handle and check the washer and O-ring. Replace any damaged parts.
Reassemble everything carefully. Test the faucet to ensure the leak is gone. Regular maintenance can prevent future issues. Save money and avoid plumber visits. Empower yourself with these easy steps. A dry, efficient kitchen is now within reach. Enjoy the satisfaction of a job well done!