Are you tired of that leaky, outdated faucet in your bathroom? Replacing your bathroom sink faucet might seem like a daunting task, but it’s simpler than you think.
Imagine the satisfaction of transforming your bathroom with a shiny new fixture, all while saving money on plumber fees. Whether you’re a DIY novice or a seasoned handyman, this guide will walk you through each step clearly and efficiently. By the end of this article, you’ll have the confidence and knowledge to tackle this home improvement project on your own.
Get ready to enhance your bathroom’s functionality and style with ease. Don’t let the fear of plumbing hold you back; your dream bathroom is just a few steps away. Let’s dive in and get your bathroom looking great!
Credit: www.homedepot.com
Tools And Materials Needed
Gather essential tools like a wrench, pliers, and a screwdriver. Have plumber’s tape and a bucket on hand. Ensure you have a new faucet and supply lines for installation.
Replacing a bathroom sink faucet might seem daunting, but with the right tools and materials, it’s a manageable task that can transform your space. Whether you’re sprucing up your bathroom for a fresh look or fixing a leaky faucet, being prepared with the essentials makes the process smoother. Before you roll up your sleeves, make sure you have everything you need on hand. This way, you can avoid unnecessary trips to the hardware store and focus on getting the job done efficiently. ###Essential Tools For The Job
Start by gathering basic tools you’ll need for this task. A wrench is crucial for loosening and tightening nuts and bolts. An adjustable wrench works well, but having a basin wrench can make reaching those hard-to-access spots easier. Have a screwdriver ready, as you’ll likely need it to remove screws securing the faucet. A pair of pliers can be handy for gripping small parts or turning stubborn nuts. ###Must-have Materials
Ensure you have plumbing tape, often called Teflon tape, to seal pipe threads. This prevents leaks and ensures a tight fit. If your new faucet doesn’t come with a gasket or O-ring, you might need to purchase these separately to avoid water leaks. Have a bucket or container nearby to catch any water that might spill when you disconnect the old faucet. This keeps your workspace tidy and prevents water damage. ###Additional Supplies To Consider
Think about having a cloth or sponge on hand to clean the area around the sink before installing the new faucet. This gives your bathroom a fresh start and ensures the new fixture fits snugly. If you’re upgrading to a faucet with a different style or finish, consider a matching drain assembly. This adds a cohesive look to your bathroom and enhances its aesthetic appeal. ###Personal Tips And Tricks
From experience, having a headlamp can be surprisingly helpful. It provides extra light when you’re working under the sink, making it easier to see what you’re doing. Also, consider laying out all tools and materials before starting. This not only keeps you organized but also reduces stress during installation. Do you have a favorite tool you always reach for during DIY projects? Share your insights! Being prepared and knowing your go-to tools can make any home improvement task more enjoyable.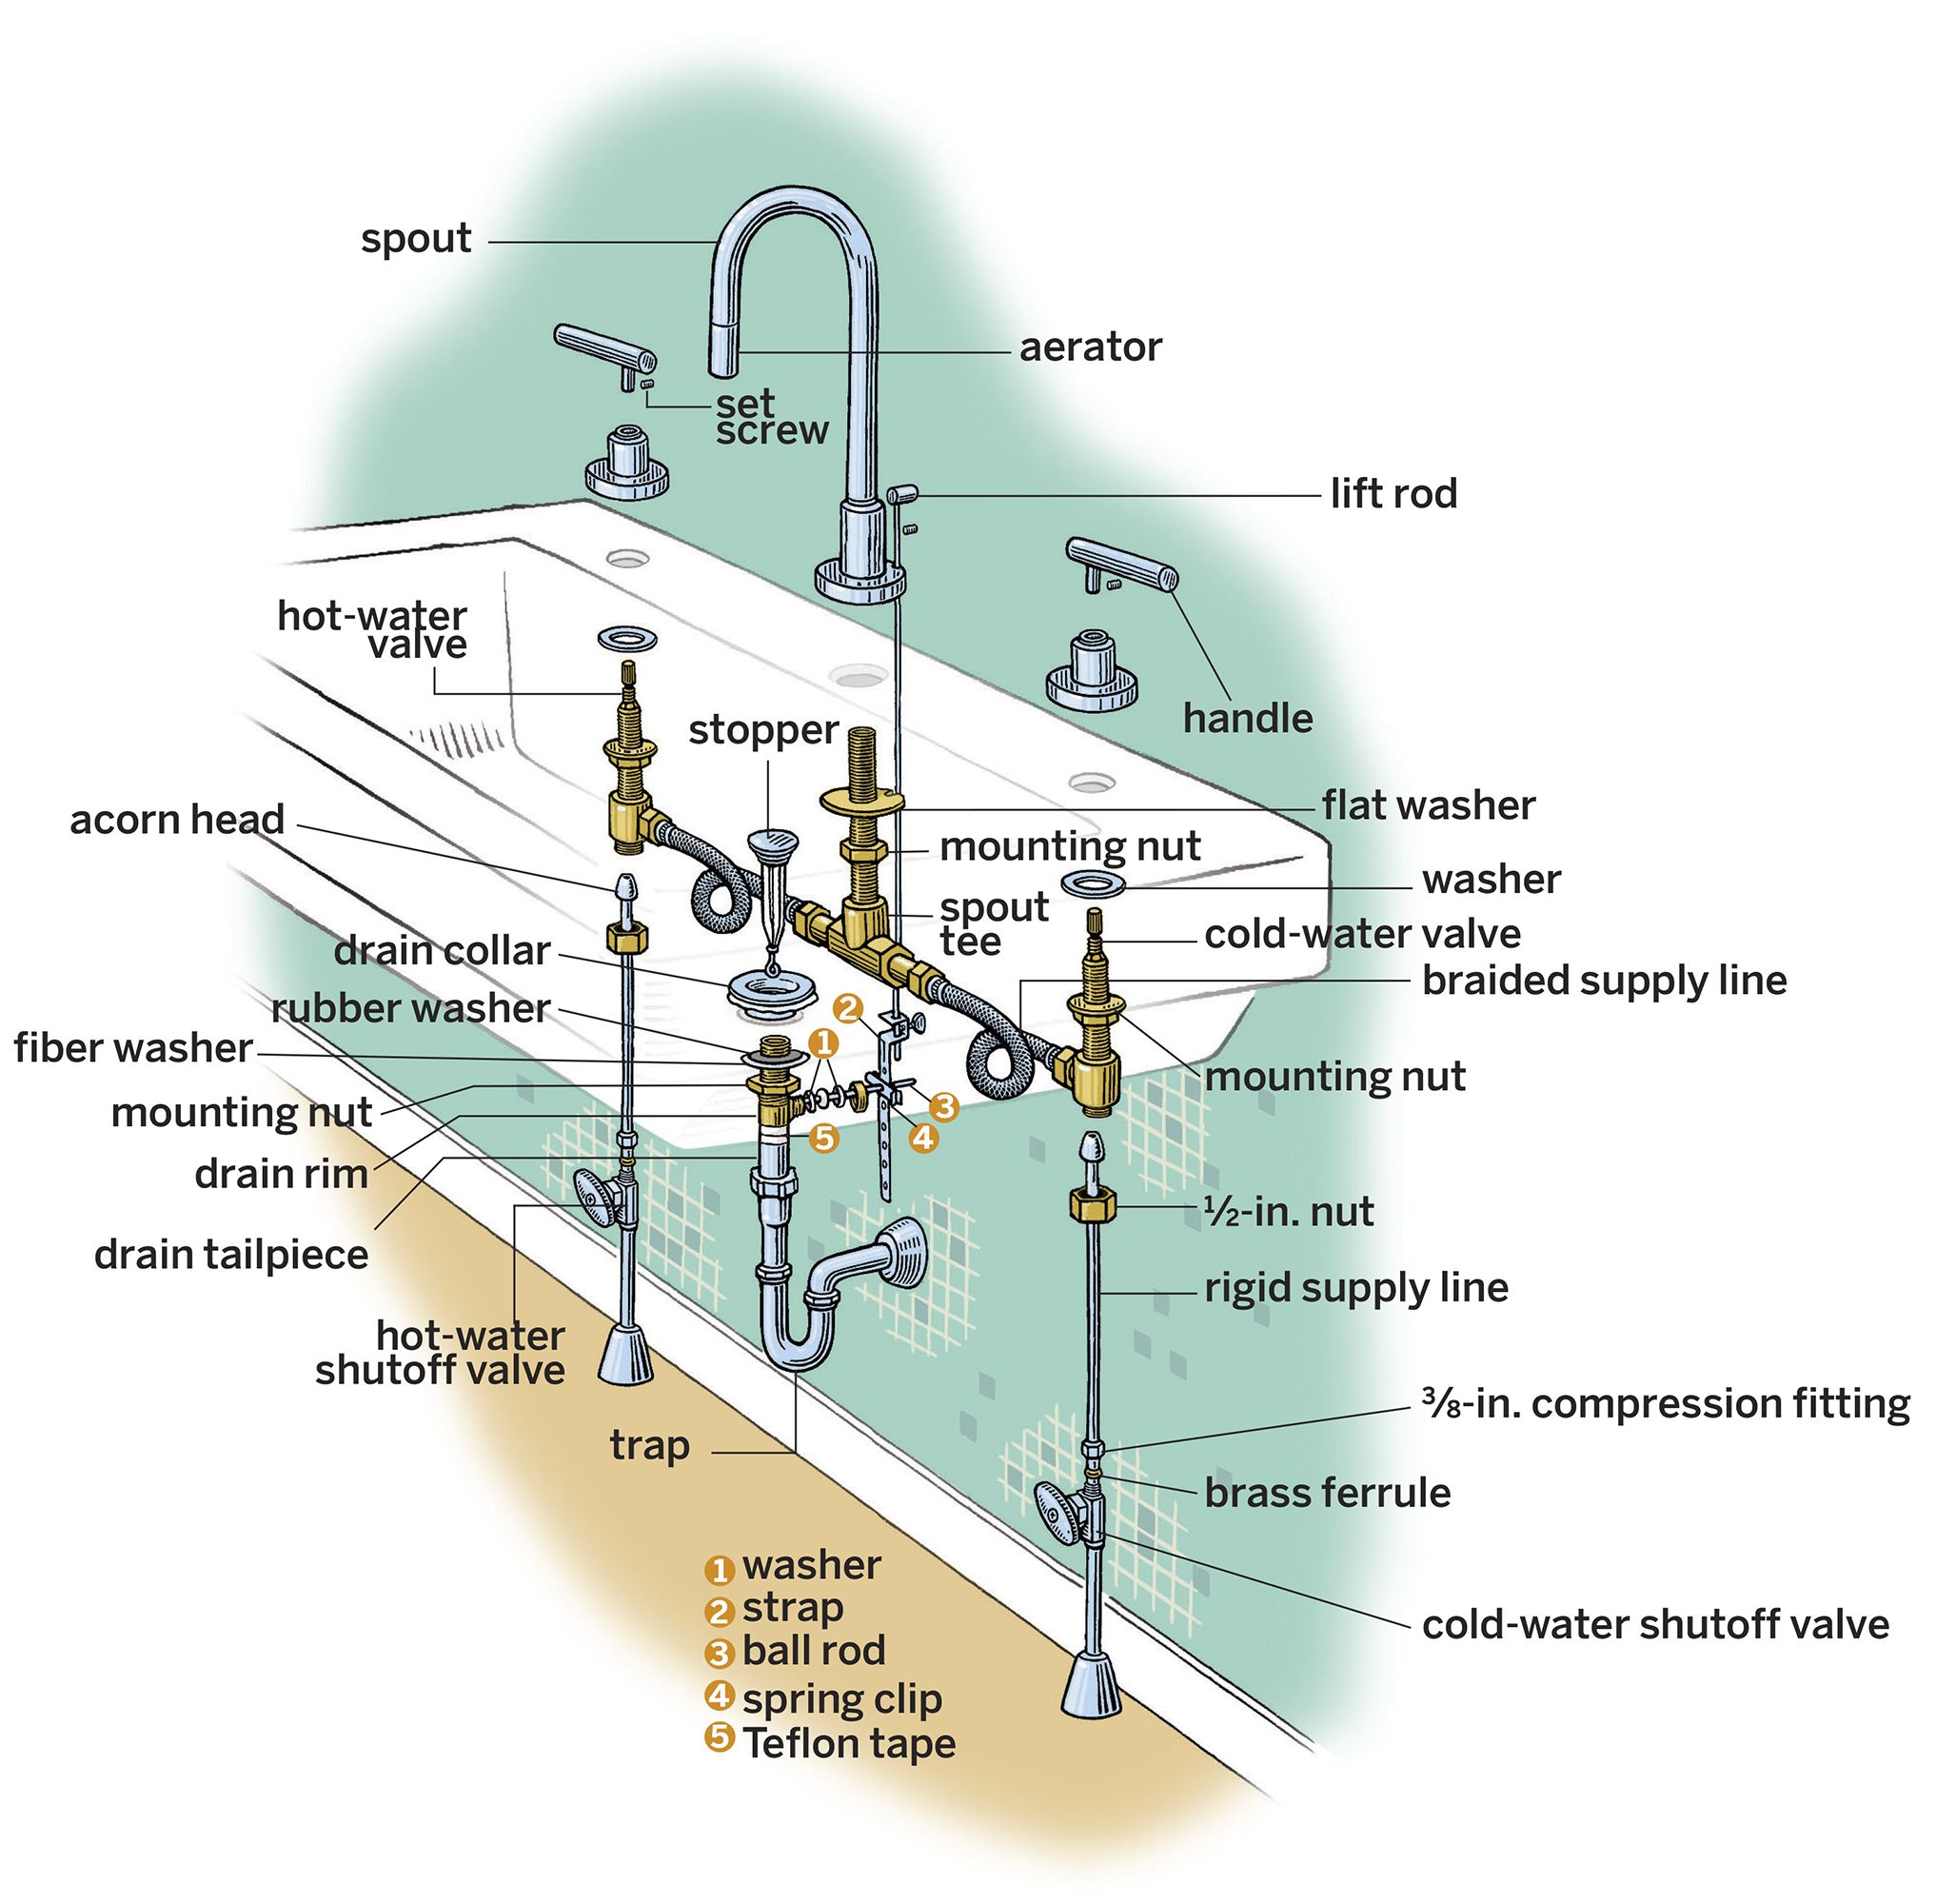
Credit: www.thisoldhouse.com
Shutting Off Water Supply
Replacing a bathroom sink faucet can seem challenging. But the process becomes easier with the right steps. The first crucial step is shutting off the water supply. This ensures a safe and mess-free faucet replacement. Without turning off the water, you risk flooding the bathroom. This step prevents water damage and keeps things tidy.
Locate The Shut-off Valves
Underneath the sink, you’ll find two shut-off valves. One for hot water, the other for cold. These valves control water flow to the faucet. Make sure to turn both valves to the right. This action stops water from flowing to the faucet. If the valves are hard to turn, use a cloth for a better grip.
Turn Off The Main Water Supply
Sometimes, the under-sink valves may not work. In this case, locate the main water valve. It’s usually near the water meter or in a basement. Turn the main valve clockwise to stop water flow. This step ensures no water reaches any faucets in the home.
Check For Leaks
After turning off the water, check for leaks. Open the faucet to release remaining water. Ensure no water drips from the pipes or faucet. If you see drips, tighten the shut-off valves further. This step confirms the water is completely off.
Prepare For The Next Steps
With the water supply off, gather your tools. You’ll need a wrench and a basin wrench. These tools help remove the old faucet. Having everything ready speeds up the replacement process. Now you’re set to remove the old faucet and install the new one.
Removing Old Faucet
Removing an old bathroom sink faucet might seem daunting, but breaking it down into smaller tasks can make the process manageable. You’ll need to tackle the disconnection of water lines, loosen mounting nuts, and finally lift out the old faucet. Each step brings you closer to a fresh and functional bathroom fixture. Ready to get your hands dirty? Let’s dive in!
Disconnecting Water Lines
Before you start, ensure the water supply is turned off. This prevents unwanted leaks and spills. You’ll find shut-off valves under the sink—turn them clockwise to stop the water.
With a wrench in hand, disconnect the water lines from the faucet. This is usually a straightforward task. If you encounter stubborn connections, a squirt of penetrating oil can be your best friend.
Once disconnected, keep a towel handy to mop up any residual water. Ever had a minor flood under your sink? A towel can save the day.
Loosening Mounting Nuts
Look under the sink for mounting nuts securing the faucet. These nuts hold everything in place, and loosening them is crucial. A basin wrench can help reach tight spots.
Turn the mounting nuts counterclockwise. If they’re too tight, a little patience and persistence usually does the trick. Have you ever spent more time than you thought loosening a nut? This step might test your resolve.
Once loosened, you’re one step closer to removing the old faucet. The sense of progress can be surprisingly satisfying.
Lifting Out The Old Faucet
With water lines and mounting nuts disconnected, it’s time to lift the faucet out. Use both hands for a firm grip and gently lift it upwards.
If the faucet resists, check for any overlooked connections. Sometimes mineral deposits can make removal tricky. Would you believe that a little wiggle and pull can solve most issues?
Once removed, take a moment to appreciate your handiwork. You’re now ready to install the new faucet. Doesn’t it feel good to be handy?
In replacing your bathroom sink faucet, each step is a small victory. By focusing on these tasks, you make the process efficient and stress-free. Ready to tackle more DIY projects? Your bathroom awaits transformation.

Credit: www.youtube.com
Preparing The Sink
Replacing a bathroom sink faucet involves careful preparation. It’s important to ensure that your sink is ready for the new fixture. Proper preparation will save time and prevent issues later. Begin by focusing on the sink surface and checking for any leaks or damage.
Cleaning The Sink Surface
Start by cleaning the area around the sink. Use a mild soap and warm water. This removes dirt and grime. A clean surface allows for a better seal with the new faucet. Dry the area thoroughly with a soft cloth. This prevents water spots and keeps the area tidy.
Checking For Leaks Or Damage
Inspect the sink and pipes closely. Look for any signs of leaks. Water stains or puddles indicate a problem. Check the faucet connections and pipes. Ensure there are no cracks or corrosion. Fix any issues before installing the new faucet. This ensures a smooth replacement process.
Installing New Faucet
So, you’ve decided to upgrade your bathroom sink faucet. Installing a new faucet can seem daunting, but with the right steps, you can do it confidently. Whether you’re updating your style or fixing a leaky fixture, this guide will help you through the process with ease and clarity. Let’s get into the nitty-gritty of installing your new faucet.
Positioning The Faucet
Start by positioning the faucet into the designated holes on your sink. It’s essential to ensure the faucet is centered and aligned with the sink’s edge. Double-checking the alignment now can save you from a lopsided fixture later. Remember when I installed my first faucet, I overlooked this step and had to redo it. Lesson learned: always take a moment to verify the position.
Securing With Mounting Nuts
Once your faucet is in position, it’s time to secure it. Use the mounting nuts provided with your faucet. These typically screw onto the faucet from underneath the sink.
Tighten the nuts by hand at first, and then use a wrench for a snug fit. Be cautious not to overtighten, as this can damage the sink or faucet. Finding that balance is key.
Attaching Water Supply Lines
Now, connect the water supply lines to the faucet. The lines should match up with the hot and cold inlets on the faucet. Make sure the connections are secure to avoid any leaks.
It’s often a good idea to turn on the water gently at first, checking for any drips or leaks. Adjust as needed. If you encounter a leak, tightening the connection usually fixes it. Remember, a small oversight can lead to larger issues, so take your time during this step.
With these steps, you’re on your way to a successful faucet installation. Have you ever faced any unexpected challenges during a DIY project? Share your experiences in the comments below!
Connecting Drain Assembly
Start by removing the old drain assembly under the sink. Next, install the new drain, ensuring each part fits snugly. Tighten connections to prevent leaks, maintaining a secure fit for optimal function.
Replacing your bathroom sink faucet may seem daunting, but connecting the drain assembly is one of the most satisfying parts of the process. This step ensures your sink is functional and ready for use. You might wonder, how do you make sure everything fits perfectly and doesn’t leak? Let’s dive into connecting the drain assembly with a focus on attaching and sealing it properly. ###Attaching The Pop-up Drain
Attaching the pop-up drain is like putting together a puzzle. Start by inserting the drain body through the sink’s drain hole. If you’ve ever struggled with mismatched pieces, you’ll appreciate the snug fit of a properly aligned drain. Ensure the rubber washer is placed beneath the sink to prevent leaks. Next, connect the drain tailpiece and tighten it securely. Double-checking this connection can save you from future headaches. Remember, a loose fit can lead to leaks. ###Sealing The Drain Connection
Sealing the drain is crucial. You’ll want a tight, leak-proof connection. Apply a generous amount of plumber’s putty around the underside of the drain flange. Think of plumber’s putty as your insurance against water damage. It molds easily, ensuring a perfect seal. Press the drain down firmly, allowing the putty to form a watertight barrier. Clean off any excess putty with a damp cloth. This step not only keeps things tidy but also ensures a professional finish. Have you ever wondered why some sinks look flawless while others seem a bit off? It’s all in the details. Connecting the drain assembly can be straightforward if you pay attention to each step. So, as you move forward with your faucet replacement, ask yourself—how meticulous are you willing to be to ensure a lasting result?Testing The Installation
You’ve put in the hard work to replace your bathroom sink faucet, and now it’s time for the crucial final step: testing the installation. It’s not just about admiring your handywork; it’s about ensuring everything functions perfectly. This step ensures all your efforts don’t go down the drain—literally! Let’s dive into how you can make sure your new faucet is operating smoothly and efficiently.
Turning On Water Supply
Begin by slowly turning on the water supply valves located under your sink. This process helps avoid any sudden pressure that might cause leaks or damage. Listen carefully for any unusual sounds, like hissing or gurgling, which could indicate a problem.
Does the water flow smoothly? If not, you might need to check if there are any blockages. Sometimes, debris from the installation process can restrict water flow. A quick cleanup can often solve this issue.
Checking For Leaks
Checking for leaks is essential to prevent future water damage. Run both hot and cold water through the faucet and look underneath the sink for any drips or pools. Even small leaks can lead to significant problems if not addressed.
What should you do if you find a leak? Tighten any loose connections and inspect the seals. A small adjustment might be all that’s needed to stop unwanted water escape.
Adjusting Water Flow
Once you’re sure there are no leaks, adjust the water flow to your preferred pressure. This step ensures your faucet is not only functional but tailored to your needs. Whether you prefer a gentle trickle or a strong gush, make sure the flow matches your daily requirements.
Are you satisfied with the pressure? If not, consider checking the aerator—a small screen at the tip of the faucet. Sometimes, cleaning or replacing the aerator can enhance water flow and pressure.
Congratulations! You’ve successfully replaced and tested your bathroom sink faucet. Do you feel more confident in your DIY skills now? Remember, every small home improvement task adds to your expertise. Keep your tools handy; you never know when you’ll tackle your next project!
Final Touches
Replacing a bathroom sink faucet can be a rewarding DIY project. Once the faucet is installed, it’s crucial to focus on the final touches. These steps ensure the faucet works well and looks great. Paying attention to details can make your sink area shine.
Cleaning The Area
Start by removing any debris left from the installation. Use a damp cloth to wipe the sink and surrounding surfaces. This will help remove dust and fingerprints. For stubborn spots, a mild cleaner can be used. Be sure to rinse well to avoid residue. A clean area enhances the overall look of your bathroom.
Ensuring Secure Fixtures
Check all connections under the sink. Tighten any loose nuts or bolts. Make sure the faucet is not wobbly. Secure fixtures prevent leaks and ensure longevity. Test the water flow to check for any drips. Adjust fittings if necessary to stop leaks. A secure faucet provides peace of mind.
Frequently Asked Questions
Can I Replace A Bathroom Sink Faucet Myself?
Yes, you can replace a bathroom sink faucet yourself. Gather necessary tools, follow instructions, and ensure water supply is off. Watch online tutorials for guidance. It’s a manageable DIY task with patience and careful handling, saving money on professional services.
How Do You Remove An Old Bathroom Sink Faucet?
To remove an old bathroom sink faucet, first turn off the water supply. Next, disconnect water lines and unscrew mounting nuts. Carefully lift the faucet from the sink, ensuring all components are detached. Clean the area thoroughly before installing a new faucet.
Proper tools and patience are essential for this task.
Do All Bathroom Faucets Fit The Same?
Bathroom faucets don’t universally fit all sinks. They vary by installation type: single-hole, centerset, or widespread. Measure the sink’s hole configuration before purchase. Check manufacturer specifications for compatibility. This ensures the faucet fits your existing setup. Correct sizing is crucial for optimal functionality and aesthetic appeal.
What Holds A Bathroom Faucet In Place?
A bathroom faucet is secured by mounting nuts or screws underneath the sink, ensuring stability. Rubber gaskets or washers create a watertight seal. Proper installation prevents leaks and maintains functionality. Regular checks help ensure everything remains tight and secure for optimal performance.
What Tools Do I Need To Replace A Faucet?
You’ll need a wrench, screwdriver, plumber’s tape, and a basin wrench.
Conclusion
Replacing a bathroom sink faucet can be a simple task. With the right tools, anyone can do it. Start by gathering your materials. Turn off the water supply. Remove the old faucet carefully. Follow instructions for installing the new faucet.
Check for leaks after installation. Tighten connections if needed. A new faucet can refresh your bathroom’s look. Enjoy the satisfaction of doing it yourself. Remember, patience is key. Practice makes perfect. Soon, you’ll feel like a pro. Share your experience with friends.
Encourage them to try too. Happy plumbing!