Are you tired of crooked cabinet handles ruining the look of your kitchen or bathroom? Installing cabinet handles might seem like a straightforward task, but without the right tools, it can quickly become a frustrating challenge.
Fortunately, there’s a simple solution to ensure perfect alignment every time: using a template. You’ll discover a foolproof method to install cabinet handles with precision. Say goodbye to uneven handles and hello to a polished, professional finish. Whether you’re a DIY enthusiast or a first-time renovator, this guide is designed to make the process easy and stress-free.
Stick around, and you’ll be mastering this skill in no time!
Tools And Materials Needed
Installing cabinet handles can seem daunting. With the right tools and materials, it becomes much easier. A template ensures precise placement, saving time and avoiding mistakes. Proper preparation is key to a successful installation. Gather all necessary items before starting. This ensures a smooth and efficient process.
Tools Required
Several tools are essential for installing cabinet handles. A drill is necessary for making holes. Choose a drill bit that matches the handle screw size. A screwdriver helps secure the handles. Both Phillips and flathead screwdrivers may be needed. A measuring tape ensures accurate spacing. Marking pencils or pens are useful for marking drill spots. A level helps ensure handles are straight. A mallet might be needed for gently tapping handles into place.
Materials Needed
Materials are equally important. Cabinet handles are the primary component. Ensure you have enough for all cabinets. A template makes the process easier. Many templates are adjustable for different handle sizes. Screws come with most handles. Double-check that you have enough. Some cabinets require longer screws. Consider buying extras. Protective eyewear is important for safety. Dust masks prevent inhaling debris. Sandpaper smooths any rough edges after drilling. Tape can hold the template in place temporarily.
Preparation Tips
Preparation is crucial. Lay out all tools and materials. Check the template is suitable for your handle size. Ensure the drill is charged or plugged in. Clear the workspace of any obstructions. Wear protective gear before starting. Review the instructions provided with the handles. Familiarize yourself with the template markings. Double-check measurements before drilling. Keep spare screws and handles nearby. This saves time in case of errors.
Credit: www.thehappyhousie.com
Choosing The Right Template
Selecting the perfect template simplifies installing cabinet handles. It ensures precise placement and uniformity, avoiding crooked installations. Templates serve as reliable guides, making the process quicker and more efficient.
Choosing the right template for installing cabinet handles is like finding the perfect pair of shoes for a long walk. It’s essential for ensuring your cabinet handles are aligned perfectly and enhance the look of your cabinetry. But how do you pick the right one? Let’s delve into some key considerations to guide your choice.Understanding Your Cabinet Dimensions
Before grabbing any template, measure your cabinet doors and drawers. Are they standard or custom sizes? Knowing the dimensions helps you select a template that fits perfectly, avoiding any misalignments. You wouldn’t want handles to end up crooked, would you?Material Considerations
Templates come in various materials such as plastic, metal, or cardboard. Think about durability. A sturdy metal template might last longer, especially if you plan multiple installations. Yet, a cardboard template can be easier to adjust or modify. Which material suits your DIY style?Template Design Features
Some templates offer adjustable features, allowing you to customize the distance between holes. Others are fixed, providing a straightforward guide. If you’re working with different handle sizes, an adjustable template might save you time. What’s more important to you: simplicity or flexibility?Ease Of Use
Choose a template that doesn’t require a degree in rocket science to use. Look for clear markings and instructions. You want to spend your time installing handles, not deciphering a complex guide. Have you ever tried using a tool that felt like a puzzle with missing pieces?Reviews And Recommendations
Check online reviews or ask friends for recommendations. Personal experiences can offer insights into what templates work well or which ones to avoid. Ever bought something based on glowing reviews and it turned out to be a game-changer? By considering these aspects, you’ll not only find a template that fits your needs but also ensures a smooth installation process. Your cabinets will look professionally finished, enhancing the overall aesthetic of your space. Ready to make your cabinets the envy of the neighborhood?Preparing Your Workspace
Installing cabinet handles becomes easy with a template. First, gather tools and clear the workspace. Then, align the template for precise drilling, ensuring handles are evenly spaced.
Transforming your kitchen or bathroom cabinets with new handles can significantly enhance their appearance. However, before you get started, it’s crucial to prepare your workspace properly. A well-organized area not only makes the task easier but also ensures you avoid mishaps. Let’s look at some key steps to help you set up your workspace for installing cabinet handles with a template.Clear Your Area
Begin by clearing off any items around your cabinets. This means removing dishes, decorative pieces, or any clutter that might obstruct your work. A clear space allows you to focus better and avoid accidents.Gather Your Tools
Having all your tools within reach is essential for a smooth installation process. You’ll need a drill, screws, screwdriver, measuring tape, pencil, and the handle template. Place them on a nearby table or a tool belt to avoid unnecessary trips looking for tools.Ensure Proper Lighting
Good lighting is crucial when you’re working with precise measurements and handling tools. Use a bright overhead light or a portable lamp to illuminate your workspace. This helps you see clearly, reducing the chances of drilling mistakes.Protect Surfaces
Lay down a protective sheet or old towel over your countertops and cabinet surfaces. This protects them from scratches or accidental drill slips. It’s a simple step, but it can save you from costly damages.Check Your Template
Before you start drilling, double-check your handle template. Make sure it fits the handle size and aligns with your cabinet design. A mismatched template can throw off your entire installation. With your workspace set, you’re ready to install those cabinet handles efficiently. Have you ever tried setting up a workspace for a DIY project? How did it change your experience? Preparing beforehand can make all the difference!
Credit: www.apinchofjoy.com
Measuring And Marking
Installing cabinet handles with precision can transform the look and functionality of your kitchen or bathroom. The secret to a flawless installation lies in the measuring and marking process. Accurate measurements ensure that your handles are aligned perfectly, creating a professional finish. With a template, this task becomes less daunting and more efficient. Let’s dive into the steps of positioning the template and marking the drill holes.
Positioning The Template
Begin by selecting a template designed for cabinet handles. These templates often come with pre-set measurements, making your job easier. Place the template on the cabinet door or drawer front, ensuring it aligns with the edge or center, depending on your design preference.
Check the symmetry with adjacent handles. Hold the template steady and visualize how the handles will look once installed. Adjust the template slightly if needed, ensuring consistency across all cabinets.
Have you ever installed handles only to realize they look off? Positioning the template correctly prevents such mishaps. A slight tilt in the template can lead to misaligned handles, causing frustration and extra work.
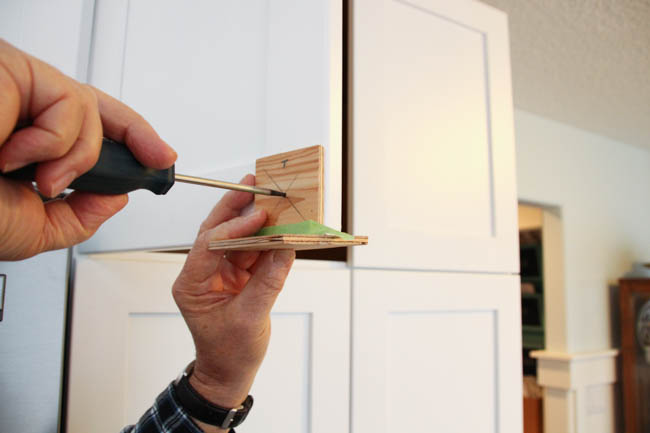
Marking Drill Holes
Once the template is positioned, use a pencil to mark the drill holes through the template. Make sure the marks are visible but not too dark, as you don’t want them to stain your cabinet surface.
Double-check each mark against the template before you remove it. This ensures that every mark corresponds exactly to the intended hole placement. Consistency is key; any deviation can affect the final look.
Imagine the satisfaction of seeing perfectly aligned handles after installation. Accurate marking is the foundation for achieving this. Wouldn’t you agree that taking a few extra seconds here can save hours of correction later?
In the world of DIY, precision is your best friend. Have you ever tried installing cabinet handles without a template? If so, you know how challenging it can be to achieve uniformity. Using a template simplifies the task and enhances your results.
Remember, the template is your guide, and the marks are your roadmap. Together, they ensure a seamless installation process. Enjoy the transformation your new cabinet handles bring to your space!
Drilling The Holes
Drilling holes for cabinet handles requires precision. The right technique ensures a smooth installation. A template provides guidance for accuracy. It reduces errors and saves time. Proper drilling is crucial for a professional look. Let’s explore the essentials for drilling cabinet handles.
Choosing The Right Drill Bit
Selecting the correct drill bit is important. It prevents damage to cabinets. Use a bit that matches the handle’s screw size. A bit too large or small causes issues. For wooden cabinets, a brad-point bit works well. It creates clean holes with minimal splintering. For metal cabinets, use a high-speed steel bit. Ensure the bit is sharp for efficient drilling.
Drilling Techniques
Proper drilling techniques ensure success. Start by securing the template to the cabinet. Use clamps to hold it steady. Align the drill bit with the template’s guide holes. Apply steady pressure while drilling. Avoid forcing the bit through the material. This prevents splitting or cracking. Drill at a consistent speed. This helps maintain control and accuracy. Always drill straight to keep holes aligned. Double-check alignment before drilling all holes.
Installing The Handles
Installing cabinet handles can change your kitchen’s look. It seems simple, but requires precision. Using a template can make the job easier. It ensures your handles are aligned and secure. Follow these steps for a smooth installation.
Aligning The Handles
First, align the template with the cabinet door edge. Ensure it sits flat and even. Templates usually have several holes. Choose the one that matches your handle size. Mark the drill spots with a pencil. Double-check your markings. They should be consistent on all doors.
Securing The Handles
Drill pilot holes where you marked earlier. This prevents wood splitting. Use a drill bit slightly smaller than your screws. Hold the handle against the door. Insert screws through the handle and into the pilot holes. Tighten them with a screwdriver. Check that the handle is firmly attached. It should not wobble or move.
Final Touches
The final touches of installing cabinet handles are what truly make your hard work shine. You’ve measured meticulously, drilled patiently, and now it’s time to ensure everything is perfect. These last steps will give your cabinets the polished look they deserve, elevating the overall aesthetic of your space.
Checking Alignment
Once your handles are installed, step back and take a moment to inspect them. Are they straight and aligned across all cabinet doors and drawers? A simple way to check is by using a level or even a straight edge like a ruler.
Observe from different angles, especially from eye level. Sometimes what looks aligned from one angle may appear crooked from another. This step is crucial because even a slight misalignment can catch the eye and disrupt the visual harmony of your cabinets.
Adjusting If Necessary
If you notice that a handle is slightly off, don’t worry—adjustments are part of the process. You might feel a bit frustrated, but remember, this is your chance to perfect your work. Loosen the screws gently and shift the handle into the correct position.
Re-tighten the screws and check the alignment again. It’s like fine-tuning a musical instrument; small adjustments can make a big difference. If multiple handles need adjusting, prioritize the most visible ones first, as these will impact the overall look the most.
Installing cabinet handles can be a satisfying DIY project. Have you found any tips or tricks that helped in your installation process? Share your insights and join the conversation with other DIY enthusiasts. Your experience might just be the missing puzzle piece someone else needs!

Credit: www.thehappyhousie.com
Tips For Success
Installing cabinet handles becomes easy with a template. Align the template on the cabinet door. Mark the spots for drilling. Drill the holes carefully to avoid damage. Securely attach the handles, ensuring they’re straight. This method saves time and ensures precision, giving your cabinets a professional look.
Installing cabinet handles might seem like a simple task, but using a template can make the process even smoother and more precise. Whether you are revamping your kitchen or sprucing up your bathroom, attention to detail is key. Here are some tips for success to ensure your cabinet handle installation goes off without a hitch.Common Mistakes To Avoid
One frequent mistake is assuming all cabinet doors are the same size. Measure each door and drawer separately to ensure uniform placement of handles. This prevents a lopsided look that can detract from your aesthetic. Rushing through the process can lead to misaligned handles. Take your time to mark the spots carefully using the template. Double-check your measurements before drilling. Another common error is using the wrong drill bit size. Ensure your drill bit matches the size of the screws provided with your handles. This avoids wobbly handles that could loosen over time.Enhancing Durability
To enhance the durability of your cabinet handles, consider using a small dab of wood glue when attaching them. This provides extra hold and ensures your handles stay secure for years. Always use high-quality screws that are resistant to rust and wear. Stainless steel is a reliable choice, especially in areas with high humidity. Consider the material of your handles. Brass, stainless steel, and brushed nickel are not only stylish but also durable options that withstand daily use. Installing cabinet handles can be a satisfying DIY project. By avoiding common pitfalls and focusing on durability, you ensure your hard work pays off. Have you ever installed cabinet handles before? What did you learn from the experience? Share your thoughts and tips in the comments!Frequently Asked Questions
How To Use Ikea Handle Template?
Use the IKEA handle template by aligning it to your cabinet door. Mark screw holes, then drill. Attach handles securely using screws. Ensure proper alignment for a polished look. This template simplifies installation, saving time and ensuring uniform handle placement.
Always check measurements before drilling for best results.
What Is The 1/3 Rule For Cabinet Pulls?
The 1/3 rule for cabinet pulls suggests placing handles one-third of the cabinet width from the edge. This ensures balance and functionality, enhancing aesthetics and accessibility in kitchen or bathroom design. This rule helps achieve a cohesive look while maintaining practical use.
How Do You Layout Cabinet Handles?
Measure handle placement for consistency. Align handles horizontally or vertically. Use a template for precise drilling. Ensure symmetry for aesthetics. Mark positions before installation for accuracy.
How To Make A Template For Kitchen Door Handles?
Trace the handle’s outline on a piece of cardboard. Cut it out carefully. Mark screw holes with a pencil. Drill pilot holes on the template. Use this template to mark accurate positions on cabinet doors. Ensure alignment for a perfect fit.
How Do I Choose The Right Template For Cabinet Handles?
Choose a template that matches your handle size. Most come with adjustable settings.
Conclusion
Installing cabinet handles with a template is easy and efficient. Templates simplify the process. They ensure accurate and consistent handle placement. This saves time and reduces errors. Start by gathering your tools and template. Follow the steps carefully for best results.
Make sure your measurements are precise. Double-check before drilling to avoid mistakes. This method is perfect for both beginners and pros. It adds a polished look to any kitchen or bathroom. Practice makes perfect. With a template, your cabinets will look professional and stylish.
Enjoy the satisfaction of a job well done!