Are you tired of looking at a faucet head that’s lost its shine? Mineral deposits and grime can dull even the most beautiful fixtures.
But don’t worry; there’s an easy, natural solution waiting in your kitchen. You can use vinegar and baking soda to restore your faucet head to its former glory. With these common household items, you can banish the buildup and bring back the sparkle in no time.
Imagine the satisfaction of seeing your faucet gleam again! In this guide, you’ll discover a simple, effective cleaning method that not only saves you time and money but also keeps harsh chemicals out of your home. Ready to transform your faucet head with minimal effort? Let’s dive into the steps you need to know to achieve that spotless shine!
Materials Needed
Gather white vinegar, baking soda, a bowl, a toothbrush, a soft cloth, and a rubber band. These items are essential for cleaning faucet heads effectively. Keep them handy for a smooth cleaning process.
Cleaning your faucet head with vinegar and baking soda is a simple yet effective way to maintain its shine and functionality. Before you dive into the process, let’s gather all the materials you’ll need. It’s always better to be prepared than to find yourself scrambling for supplies mid-cleaning. You’ll be surprised at how these common household items can transform your faucet head from grimy to gleaming. ###Vinegar
Vinegar is the star player in this cleaning routine. It tackles mineral build-up and grime with ease. White vinegar is your best bet as it’s strong enough to dissolve stubborn deposits. Have a cup ready, or perhaps more, depending on the size and condition of your faucet head. ###Baking Soda
Baking soda complements vinegar perfectly. It acts as a gentle abrasive, scrubbing away dirt without scratching surfaces. A tablespoon or two should suffice, but keep extra on hand for tougher spots. Mixing it with vinegar creates a fizzing action that helps lift grime efficiently. ###Plastic Bag
You’ll need a plastic bag to soak the faucet head in vinegar. A ziplock bag works well for this purpose. Ensure it’s large enough to fit over the faucet head comfortably. This allows the vinegar to penetrate and break down mineral deposits effectively. ###Rubber Bands Or Twist Ties
These will hold the plastic bag in place around your faucet head. Rubber bands are particularly handy because they can stretch to accommodate different sizes. Twist ties are also a good option if you prefer something more adjustable. ###Old Toothbrush Or Small Brush
An old toothbrush or a small brush is perfect for scrubbing the faucet head. The bristles can reach into crevices and effectively remove trapped dirt. Don’t use your current toothbrush, though—you’ll want one dedicated to cleaning tasks. ###Soft Cloth Or Sponge
After soaking and scrubbing, a soft cloth or sponge will help wipe away any remaining residue. Choose a material that won’t scratch or damage your faucet’s finish. A microfiber cloth is a great choice for a streak-free shine. ###Warm Water
Warm water is essential for rinsing off the baking soda and vinegar solution. It helps to clear away any remaining particles, leaving your faucet head clean and refreshed. Make sure you have easy access to warm water during the cleaning process. Armed with these materials, you’re all set to tackle your faucet head cleaning project. Have you ever noticed how a simple cleaning task can lead to discovering new ways to repurpose household items? It’s fascinating how vinegar and baking soda, staples in your pantry, can double as powerful cleaning agents. Ready to see your faucet head sparkle like new?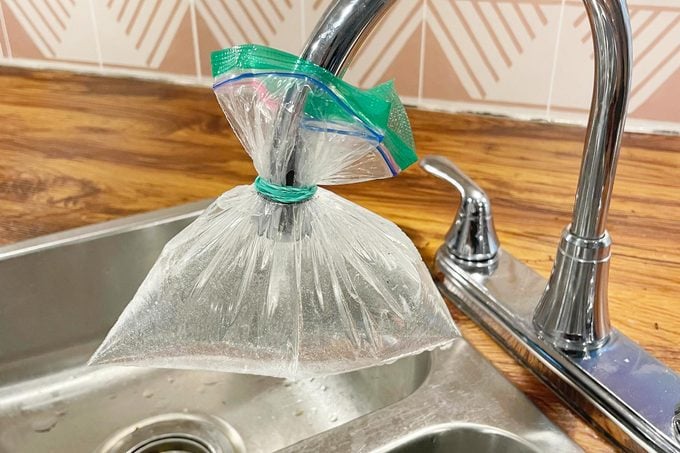
Credit: www.rd.com
Preparation Steps
Start by preparing a mix of vinegar and baking soda. Soak the faucet head in this solution. Scrub gently to remove buildup and rinse thoroughly with water.
Cleaning your faucet head with vinegar and baking soda is an easy and eco-friendly way to maintain a sparkling kitchen or bathroom. Before diving into the actual cleaning process, it’s crucial to prepare adequately. Proper preparation ensures that you have everything you need at your fingertips and that you carry out the task safely and efficiently. ###Gathering Supplies
Start by gathering all the necessary supplies. You will need white vinegar, baking soda, a plastic bag, a rubber band, a toothbrush, and a soft cloth. These are common household items, so you might already have them in your pantry. Having everything on hand will prevent interruptions. Imagine getting halfway through and realizing you need to run to the store—frustrating, right? Preparing ahead saves time and keeps your momentum going. ###Safety Precautions
Safety should always come first. Although vinegar and baking soda are gentle cleaning agents, they can still irritate sensitive skin. Consider wearing gloves to protect your hands. Ensure the area around your sink is dry to avoid slips. If you’re using a step stool to reach a high faucet, make sure it’s sturdy. Safety in small tasks like these is often overlooked, but it’s worth the extra minute to double-check. Reflect on a time when you skipped safety steps and regretted it. A simple precaution today can save you from unnecessary mishaps. Are you ready to clean effectively and safely?Removing The Faucet Head
Cleaning a faucet head might seem like a daunting task, but it’s simpler than you think. A few common household items can help you restore its shine and functionality. Before you get started with the cleaning process, you need to remove the faucet head. This step ensures you can thoroughly clean every nook and cranny. Let’s dive into the details of removing the faucet head effectively.
Tools Required
To remove the faucet head, you’ll need a few basic tools. A pair of pliers can be handy for unscrewing the head if it’s tightly attached. A wrench might also help, depending on the design of your faucet.
Keep a towel nearby to prevent any scratches or damages while handling the faucet head. This simple tool can save you a lot of trouble.
Finally, having a small container or a zip-lock bag is useful for storing any small parts you detach, ensuring they don’t get lost.
Detaching Process
Start by locating the aerator, which is usually at the end of the faucet head. You might need to unscrew it using pliers or a wrench. Be gentle to avoid damaging the threads.
Once the aerator is detached, inspect it for any visible dirt or debris. This is often the main culprit of reduced water flow. If you have trouble unscrewing it, try wrapping a towel around the faucet head for a better grip.
After removing the aerator, check the faucet head for any additional detachable parts. This might include a screen or rubber washer. Carefully remove these components and keep them safe for cleaning.
Have you ever wondered why your faucet might be losing pressure? Often, it’s due to sediment buildup in these parts. Removing and cleaning them can restore the flow effortlessly.
Cleaning With Vinegar
Vinegar is an effective cleaner. It breaks down mineral deposits and grime. It’s natural and safe for household use. Cleaning a faucet head with vinegar is simple. It requires minimal effort and supplies.
Soaking The Faucet Head
Start by removing the faucet head. Place it in a bowl or bag. Fill the container with vinegar. Ensure the faucet head is fully submerged. Let it soak overnight. This allows the vinegar to dissolve deposits. It softens stubborn grime and mineral buildup.
Scrubbing Off Deposits
After soaking, remove the faucet head. Use a toothbrush or scrub brush. Gently scrub the surface. Focus on areas with heavy deposits. The vinegar softens them, making removal easy. Rinse the faucet head with water. Ensure no residue remains. Reattach the faucet head securely.
Applying Baking Soda
Cleaning a faucet head is easy with vinegar and baking soda. Soak the head in vinegar to loosen grime. Then scrub gently with baking soda for a sparkling finish.
Cleaning your faucet head with baking soda can be effective. This natural cleaner tackles stubborn grime and mineral deposits. Baking soda is gentle yet powerful, making it ideal for this task. Let’s dive into the steps to ensure your faucet head shines.Creating A Paste
Start by mixing baking soda with water. Aim for a thick paste consistency. Use about one part water to three parts baking soda. Stir until smooth. This paste will cling to the faucet head, enhancing cleaning.Applying To Stubborn Areas
Identify areas with the most buildup. Use an old toothbrush or sponge. Apply the paste generously onto these spots. Cover all angles and surfaces. Let it sit for at least 15 minutes. This allows the paste to break down deposits. Scrub gently after the paste has set. The baking soda will lift grime with ease. Rinse with warm water to remove residue. Your faucet should now be free of stubborn buildup.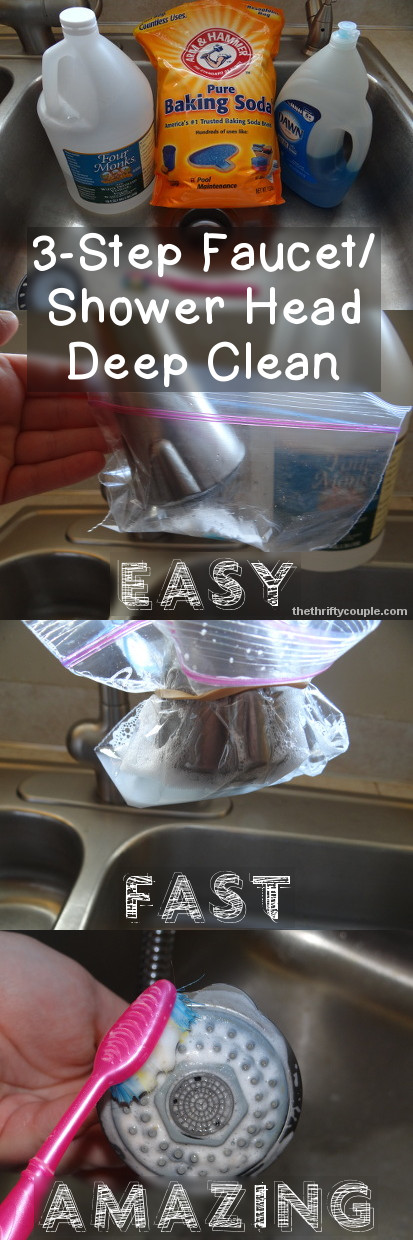
Credit: thethriftycouple.com
Reassembling The Faucet
Cleaning a faucet head with vinegar and baking soda helps remove limescale and dirt. Mix vinegar and baking soda to create a paste. Apply this mixture on the faucet head, let it sit, and scrub gently for a shiny finish.
Reassembling your faucet after cleaning might seem daunting, but it’s quite straightforward. Once you’ve scrubbed away the grime with vinegar and baking soda, it’s time to put everything back together. This is where precision meets patience, ensuring your faucet works like new. Let’s dive into the final steps of reassembling your faucet head.Reattaching The Faucet Head
Begin by carefully aligning the cleaned faucet head with the spout. This is often a simple click or twist action. Ensure it fits snugly to avoid any loose connections. You might remember that satisfying click from when you first installed it—aim for that same secure feeling.Testing For Leaks
Once reattached, turn on the water gently. Look closely for any signs of dripping or leaks around the faucet head. If you spot a leak, tighten the connections or check if the seal is properly in place. As you test for leaks, consider the effort you’ve put into cleaning. Does the water flow more smoothly now? A leak-free faucet is a testament to your thorough work. Keep an eye out for any persistent drips, and don’t hesitate to retighten or readjust. Remember, a perfect reassembly means enjoying a functional and efficient faucet.Maintenance Tips
Clean your faucet head easily using vinegar and baking soda. Mix them to create a cleaning solution. Soak the faucet head in this solution to remove grime and mineral deposits. Enjoy a sparkling clean faucet without harsh chemicals.
Maintaining your faucet head isn’t just about keeping it shiny; it’s about ensuring it functions optimally. Regular maintenance prevents mineral build-up, which can affect water flow and pressure. By adopting a few simple cleaning habits, you can keep your faucet in top condition with minimal effort.Regular Cleaning Schedule
Creating a regular cleaning schedule is your first line of defense against stubborn deposits. A weekly wipe-down with a damp cloth can prevent grime from building up. Every month, dedicate a few minutes to a deeper clean. Mixing equal parts vinegar and water, soak the faucet head to break down any hidden residues. Imagine how much easier your life could be if the faucet always worked seamlessly. Consistent cleaning ensures that it does.Preventing Mineral Build-up
Mineral deposits can be tricky, especially in areas with hard water. These deposits often sneak up on you, affecting water flow and appearance. A simple solution is using vinegar and baking soda. The acidity of vinegar dissolves mineral deposits, while baking soda scrubs them away. You might be surprised how effective this natural duo can be. To prevent build-up, consider installing a water softener or using a filter to catch minerals before they reach your faucet. Have you ever tried these methods? If not, it’s time to give them a shot. You’ll notice the difference in both appearance and performance. Taking small steps regularly can save you from bigger problems down the line. A little effort goes a long way in faucet maintenance.
Credit: www.reddit.com
Frequently Asked Questions
Can I Use Baking Soda And Vinegar To Clean A Faucet Head?
Yes, baking soda and vinegar effectively clean faucet heads. Mix them to create a paste, apply, scrub, and rinse. The mixture removes mineral deposits and grime, ensuring a sparkling clean finish. Use a toothbrush for thorough cleaning in hard-to-reach areas.
It’s eco-friendly and safe for most finishes.
Can I Mix Baking Soda And Vinegar To Clean A Shower Head?
Yes, you can mix baking soda and vinegar to clean a shower head. This combination effectively removes mineral deposits and grime. Simply soak the shower head in the solution for a few hours, then rinse thoroughly for best results. This natural method is safe and eco-friendly.
How Do I Clean My Faucet Head?
To clean your faucet head, soak it in a vinegar solution for 20 minutes. Scrub with a toothbrush and rinse thoroughly. Reattach and run water to clear any remaining debris. This method removes mineral buildup and keeps your faucet functioning efficiently.
How Long Should I Soak My Faucet In Vinegar?
Soak your faucet in vinegar for about 30 minutes to an hour. This helps remove mineral deposits effectively. Use a cloth soaked in vinegar for stubborn areas. Rinse thoroughly with water after soaking to ensure all residues are cleared. Regular cleaning maintains faucet shine and functionality.
How Does Vinegar Clean Faucet Heads?
Vinegar dissolves mineral deposits. Its acidic nature breaks down grime and bacteria. Simple and effective cleaning.
Conclusion
Cleaning your faucet head with vinegar and baking soda is simple. This method helps remove grime and mineral buildup. Vinegar dissolves deposits, while baking soda scrubs away dirt. It’s a natural and effective way to keep your faucet sparkling. No harsh chemicals needed, just household items.
Regular cleaning extends your faucet’s life and improves water flow. Try this easy solution today for better results. Your bathroom or kitchen will look fresh and clean. Follow these steps for a hassle-free cleaning experience. Enjoy a shiny faucet with minimal effort.
Happy cleaning!