Are you ready to transform your kitchen or bathroom with a fresh new look? Installing cabinet pulls is an easy way to upgrade your space without breaking the bank.
But what if you don’t have a template? Don’t worry; you don’t need one! In this guide, you’ll discover the straightforward steps to install cabinet pulls without a template, ensuring precision and style with every pull. Picture your cabinets looking sleek and sophisticated, all thanks to your handy skills.
You’ll not only save money by doing it yourself, but you’ll also feel the satisfaction of a job well done. Let’s dive in and get those cabinet pulls perfectly aligned, making your space shine with a personal touch.
Tools And Materials Needed
Gather a measuring tape, drill, screwdriver, and pencil for the installation. Select screws matching the cabinet pulls and ensure they’re the right length. It’s helpful to have a spirit level to maintain alignment.
Installing cabinet pulls can elevate your kitchen or bathroom’s aesthetic without the need for a template. Knowing the right tools and materials is crucial for achieving a professional finish. Think about this: what if you could master this skill with just a handful of items? Let’s dive into what you need to get started.
###
Essential Tools
To begin, you’ll need a drill. This is the most important tool for the job. Ensure it’s charged and ready to handle the task. I once tried using a manual screwdriver, and trust me, it was a long day. The drill speeds up the process and ensures precision.
Next, grab a measuring tape. Accurate measurements are key for symmetrical pulls. You wouldn’t want to end up with uneven handles. It’s your best friend for ensuring every pull is perfectly aligned.
You’ll also need a pencil. This might sound simple, but marking your drill points is crucial. A small dot can save you from misaligning your pulls.
Materials Needed
Start with the cabinet pulls themselves. Choose a style that complements your space. This is where you can add a personal touch. Are you going for a modern look or something more rustic?
You’ll need screws that match your cabinet pulls. Check their length to ensure they fit your cabinet doors. You don’t want to find out they’re too short after you’ve drilled the holes.
Finally, have a level on hand. This tool ensures your pulls are straight. A crooked pull can be a real eyesore, and a level helps you avoid this.
Additional Tips
Consider using a piece of masking tape to mark your drill points. It prevents splintering and can be easily removed.
Keep a screwdriver handy. It’s useful for tightening screws after drilling.
What other tools do you think are essential for this task? Could a simple trick make the job easier? Dive in and discover how these tools and materials can transform your cabinets effortlessly!
Credit: www.thehappyhousie.com
Measuring Cabinet Doors And Drawers
Installing cabinet pulls without a template involves accurate measuring of doors and drawers. Mark your preferred location carefully. Use a ruler or measuring tape to ensure even placement on each cabinet door.
Installing cabinet pulls can transform the look of your kitchen or bathroom, but getting the placement right is crucial. Measuring cabinet doors and drawers accurately ensures a professional finish without needing a template. Let’s dive into how you can achieve perfect alignment and symmetry.
Understanding The Basics Of Measurement
Start by gathering a few simple tools: a measuring tape, a pencil, and a level. These are your best friends in this project.
Measure the width and height of your cabinet doors and drawers. This will help you find the center point or the perfect spot for your pulls.
Finding The Center Point
Locate the horizontal and vertical center of each cabinet door. Mark it lightly with a pencil.
For drawers, measure the length and divide by two to find the midpoint. This is where you will install your pull.
Deciding On The Right Height
Consider the functionality of your pulls. They should be easy to reach and use.
For upper cabinet doors, the pull is usually placed at the bottom third of the door. Lower cabinet pulls are often placed at the top third.
Maintaining Consistent Placement
Uniformity is key for aesthetic appeal. Ensure each pull is the same distance from the edges of all doors and drawers.
Use a piece of tape as a guide if you’re worried about making mistakes. This ensures your measurements are consistent and saves time.
Practical Tips For Accurate Measurements
Double-check your measurements before drilling any holes. Mistakes can lead to uneven pulls and a lot of frustration.
Consider practicing on a piece of scrap wood to gain confidence. This can help you avoid costly errors on your cabinets.
Have you ever tackled a DIY project where precision was key? Share your experience in the comments!
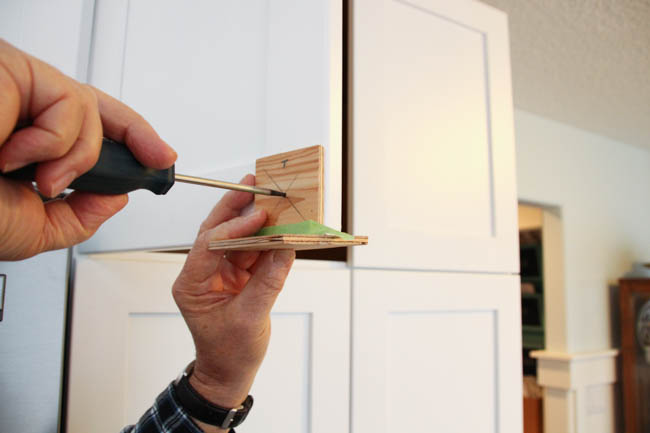
Marking The Drilling Points
Measure carefully to ensure accurate drilling points for cabinet pulls. Use a ruler or measuring tape for precision. Mark the spots with a pencil before drilling to avoid mistakes.
Marking the drilling points is a crucial step in installing cabinet pulls. It ensures that the pulls are aligned and functional. You don’t need a template to achieve precise markings. With a few simple tools, you can mark drilling points accurately. This process requires attention to detail and some patience. Let’s dive into the steps to make this task simple and effective.
Using A Ruler And Pencil
Start by gathering a ruler and a pencil. These tools help you mark the cabinet accurately. Position the ruler along the edge of the cabinet door or drawer. Measure to find the center point where you want the pull. Mark this spot lightly with a pencil.
Measure the distance between the screw holes on the pull. Divide this measurement by two. Use this result to mark equidistant points from your center mark. These marks indicate where you will drill. Ensure your pencil marks are visible but not too dark. They should be easy to erase after drilling.
Ensuring Symmetry
Symmetry is key to a neat cabinet look. To achieve this, ensure each pull is at the same height on all doors. Use your ruler to measure the distance from the top of the cabinet door to your pencil mark. Repeat this measurement for each door or drawer.
Check that the pulls are aligned horizontally. Use a straight edge or level for this task. Place the level across the marked points. Make adjustments as needed until everything aligns perfectly.
These methods simplify the installation process. They ensure your cabinet pulls look professional and polished.
Drilling Holes
Installing cabinet pulls without a template might seem daunting, but drilling holes is a straightforward task if you follow some key steps. Whether you’re a seasoned DIYer or a first-timer, the right approach ensures your cabinet pulls are perfectly aligned and securely installed. Let’s dive into the essentials of drilling holes.
Choosing The Right Drill Bit
Your choice of drill bit can make or break the success of your installation. The size of the drill bit should match the screws that come with your cabinet pulls. For instance, if your screws are 3/16 inches, use a drill bit of the same diameter. This ensures the screws fit snugly, providing a secure hold.
Don’t overlook the material of your cabinets. If you have wooden cabinets, a standard drill bit works fine. But for metal or laminate cabinets, you might need a specialized bit. Always check the manufacturer’s recommendations for drill bit types suited to your cabinet material.
Drilling Techniques
Precision is key when drilling holes. Mark the spot where you want to drill with a pencil or a small piece of tape. This acts as a guide, reducing chances of mistakes. Use a level to ensure your marks are even. Uneven cabinet pulls can be an eyesore.
When drilling, apply steady pressure. Rushing can lead to crooked holes or damage to your cabinets. If you’re nervous about drilling directly, practice on a scrap piece of wood first. This builds confidence and ensures you have the technique down.
Have you ever drilled into a cabinet only to find your pull doesn’t sit right? It’s frustrating, but avoidable. Double-check your measurements and markings before drilling. A small error can lead to a big headache.
Remember, patience and precision go hand in hand. If you take your time, your efforts will pay off with perfectly aligned cabinet pulls.
Attaching The Cabinet Pulls
Installing cabinet pulls without a template requires careful measurement. Mark the spot for each pull using a ruler and pencil. Drill holes at the marks and attach the pulls securely.
Attaching cabinet pulls without a template can seem daunting, but it’s a task you can accomplish with a little patience and focus. This process allows you to customize your kitchen or bathroom cabinets with just the right touch of style and functionality. With some basic tools and a clear plan, you can achieve a professional look without the need for a pre-made template.
Aligning The Pulls
Start by measuring the cabinet door or drawer front to find the exact center. This ensures symmetry and balance in your kitchen or bathroom. Use a pencil to lightly mark the center point where each pull will be attached.
A helpful tip is to cut a piece of painter’s tape the same width as your drawer or cabinet. Fold it in half to find the midpoint and mark it. This method is not only simple but also prevents marking errors on your cabinet surface.
Think about the visual alignment. Do you want the pulls horizontally centered, or do you prefer them slightly higher on the door? Test different positions using sticky tack to hold the pulls temporarily. This way, you can step back and visualize the final look.
Securing With Screws
Once you’re satisfied with the alignment, it’s time to drill the holes. Use a drill bit that matches the size of the screws provided with your cabinet pulls. Keep a steady hand to ensure the hole goes straight through.
When drilling, place a piece of scrap wood behind the cabinet door to avoid splintering the wood. This small step can save you from unwanted damage and ensure a cleaner finish.
Now, insert the screws through the back of the door or drawer into the pull. Tighten the screws with a screwdriver, but be cautious not to over-tighten. Over-tightening can strip the screw hole or damage the pull itself.
Stand back and admire your work. Doesn’t it feel great to know you’ve added a personal touch to your space? If you find any pulls aren’t perfectly aligned, adjust them slightly. Remember, the goal is not perfection but creating a space that feels uniquely yours.
What’s the best part about this process? You’ve learned a skill that not only enhances your home but also boosts your confidence in tackling similar projects. So, what’s stopping you from taking on the next DIY challenge in your home?
Tips For Consistent Results
Installing cabinet pulls can be simple without a template. Measure carefully to ensure alignment. Use masking tape to mark drill points for consistent placement.
Installing cabinet pulls without a template can seem daunting, but with the right tips, you can achieve consistent results. Whether you’re updating your kitchen or adding a finishing touch to a new cabinet, precise installation is key. Let’s explore some practical advice to help you get those pulls aligned perfectly.
Double-checking Measurements
Accurate measurements are your best friend when installing cabinet pulls. Before drilling, measure the distance between the screw holes on the pull and mark the cabinet accordingly.
Double-check these measurements with a ruler or measuring tape. This extra step can prevent costly mistakes and save you from unwanted holes in your cabinets.
Personal experiences often highlight the importance of precision. Imagine the frustration of drilling holes, only to realize they don’t match the pull spacing. Avoid this by verifying measurements twice. It’s worth the extra minute.
Using A Level
A level is essential for achieving a professional look. Place it horizontally across the cabinet to ensure your markings are even. This ensures that each pull will sit straight, avoiding a crooked appearance.
Consider the time you spent meticulously choosing your cabinet pulls. You want them to enhance the look, not detract from it. A level helps maintain symmetry and balance.
What if you don’t have a level on hand? You can use a smartphone app designed for leveling. This quick solution provides the accuracy you need without additional tools.
By focusing on these tips, you can install cabinet pulls confidently and with precision. Remember, the goal is not just functionality but also aesthetics. With careful measurements and leveling, your cabinets will look stunning. What tricks have you discovered for consistent results? Share your insights and let’s make this process easier for everyone.
Troubleshooting Common Issues
Installing cabinet pulls without a template can be rewarding, but it often comes with its own set of challenges. You might face issues like misaligned holes or splintered wood, which can be frustrating. However, with a few practical tips, you can troubleshoot these common problems and achieve a professional look.
Fixing Misaligned Holes
Misaligned holes can make your cabinet pulls look uneven and unprofessional. Double-check your measurements before drilling to prevent this issue. Consider using a piece of painter’s tape as a guide, marking precisely where the holes should go.
If you’ve already drilled the holes and they’re misaligned, don’t worry. You can fill the incorrect hole with wood filler and let it dry completely. Once dry, sand it smooth and repaint or stain the area if needed, then carefully redrill the hole in the correct position.
Are you worried about visible mistakes after fixing misaligned holes? A simple fix is to use larger or decorative washers that can cover minor errors and still look stylish.
Dealing With Splintered Wood
Splintered wood can occur if the drill bit is dull or if too much pressure is applied. To avoid this, use a sharp drill bit and apply steady, gentle pressure. Placing a piece of masking tape over the drilling area can also help reduce splintering.
If splintering has already happened, smooth the area with fine-grit sandpaper. This will help to minimize the appearance of any rough edges. You might be surprised at how much a little sanding can improve the overall look.
Consider using a wood repair kit for larger splinters. These kits often include fillers and touch-up markers that can match your cabinet’s finish, making repairs almost invisible.
Have you ever thought about testing on a scrap piece of wood first? This can help you avoid splintering on your actual cabinets by perfecting your technique beforehand.
By addressing these common issues, you can install cabinet pulls confidently and enhance the look of your cabinetry. What’s the most challenging part of this process for you? Share your experiences and solutions in the comments below!

Credit: thepalettemuse.com
Maintenance And Care
Installing cabinet pulls without a template is simple with precise measurements and careful marking. Use a ruler to align the pulls evenly. Drill holes accurately for a neat finish.
When you install cabinet pulls without a template, it’s crucial to consider their maintenance and care. Proper upkeep ensures that your newly installed pulls remain functional and visually appealing for years. Neglecting them can lead to wear and tear, diminishing the overall look of your cabinets.
Regular Cleaning
Regular cleaning keeps your cabinet pulls looking fresh. Use a soft cloth with mild soap and water to wipe them down. Avoid harsh chemicals as they can damage the finish.
Avoiding Moisture Damage
Moisture can be a silent destroyer. In kitchens and bathrooms, it’s easy for water to accumulate around the pulls. Make it a habit to wipe them dry after use, especially in high humidity areas.
Tightening Loose Screws
Over time, screws can become loose. Check your pulls periodically to ensure they’re firmly attached. A quick twist of a screwdriver can prevent long-term damage to your cabinets.
Inspecting For Wear And Tear
Do you notice any scratches or dents? Regularly inspect your cabinet pulls for signs of wear. Early detection allows for timely repairs or replacements, maintaining the aesthetic of your space.
Protecting Against Corrosion
Corrosion can affect metal pulls over time. Consider applying a thin coat of clear nail polish or wax to protect them. It acts as a barrier, keeping rust at bay.
Handling With Care
Handle your pulls gently. Refrain from using them as makeshift hangers for heavy items. Excessive force can strain and eventually break them.
Choosing The Right Cleaning Products
Not all cleaning products are safe for your cabinet pulls. Always read labels and choose products designed for the material of your pulls. This simple choice can prolong their lifespan significantly.
Seeking Professional Help
If your cabinet pulls require more than a DIY fix, don’t hesitate to seek professional help. Sometimes, expertise is needed to restore them to their original glory. Wouldn’t you rather invest in a professional solution than risk further damage?
By dedicating a little time to maintaining your cabinet pulls, you can ensure they remain a stylish and practical addition to your space. What strategies will you implement today to keep yours in top shape?
Frequently Asked Questions
What Is The 1/3 Rule For Cabinet Pulls?
The 1/3 rule suggests choosing cabinet pulls that are one-third the length of the cabinet or drawer. This ensures a balanced and aesthetically pleasing appearance, enhancing the overall design of the kitchen or bathroom space.
How To Line Up Holes For Cabinet Handles?
Use a template or measuring tape to mark holes. Ensure even spacing by measuring from the cabinet edges. Double-check alignment before drilling. Use a level to maintain straight lines. Drill pilot holes carefully to avoid splitting. Secure handles with screws, ensuring they fit snugly.
How Do You Install Cabinet Knobs Without Drilling?
Use adhesive backing or glue to attach cabinet knobs without drilling. Clean the surface, apply adhesive, and press firmly. Ensure the adhesive is strong enough to hold the knobs securely. Allow it to dry completely for optimal results. This method preserves cabinet integrity and avoids tool use.
How Do You Align Cabinet Pulls?
Align cabinet pulls by measuring equal distances from edges. Use a template for precise positioning. Mark drill points carefully. Ensure consistent placement across all cabinets. Double-check alignment before securing screws.
What Tools Do I Need To Install Cabinet Pulls?
You need a drill, screwdriver, measuring tape, and pencil. These tools help ensure accurate placement and secure installation.
Conclusion
Installing cabinet pulls without a template is simpler than it seems. Precise measurements and patience are key. Start by marking your drill points carefully. Use a ruler for accuracy. Test fit each pull before drilling. Double-check alignment to ensure a straight line.
This method saves time and avoids errors. Your cabinets will look neat and professional. You can achieve great results with basic tools. Practice makes perfect, so don’t rush. Enjoy your new cabinet look without any hassle. Keep these tips handy for future projects.
Happy decorating!