Experiencing issues with your Netgear WiFi extender? You’re not alone.
Many face challenges in maintaining a stable connection. A reliable WiFi connection is crucial in today’s digital age. Netgear WiFi extenders can help, but they sometimes have problems. Troubleshooting these devices can seem daunting. But don’t worry. This blog will guide you through common issues and solutions.
Whether it’s connectivity drops or setup difficulties, understanding the basics can help. You’ll learn simple steps to fix frequent problems. This will ensure your internet runs smoothly. With clear instructions, you’ll tackle any WiFi extender challenge. Let’s dive into making your Netgear device work perfectly.
Common Setup Issues
Setting up a Netgear Wifi Extender can enhance your internet experience. Yet, users often face common setup issues. These obstacles can prevent your device from working correctly. Understanding these problems is key to a successful installation.
Incorrect Network Configuration
Incorrect network settings can disrupt your extender’s performance. Ensure your router and extender use compatible frequencies. Double-check the WiFi password entry. Incorrect passwords can block network access. Verify the SSID matches your main network.
Device Compatibility Problems
Not all devices work well with every extender. Check compatibility with your current router model. Older routers may need updates. Ensure your extender supports your internet plan speed. Compatibility ensures optimal performance.
Connection Problems
Are you tired of dealing with connection problems when using your Netgear WiFi extender? You’re not alone. Many users experience issues that disrupt their internet experience, leaving them frustrated. But don’t worry—you’re about to discover some practical solutions to common connection problems that could make a real difference.
Weak Signal Strength
Weak signal strength can feel like trying to listen to a conversation through a wall. Your WiFi extender is meant to boost your signal, but if it’s not positioned correctly, it might be underperforming. Consider placing your extender in a central location between your router and the area where you need coverage. This can maximize the extender’s ability to amplify the signal.
Sometimes, the problem isn’t just about location. Have you checked for any physical obstructions? Walls, furniture, and even large appliances can interfere with the signal. Try moving your extender to a spot with fewer barriers, and see if your signal strength improves. You might be surprised at how much difference a few feet can make.
Intermittent Connectivity
Intermittent connectivity issues can be like having a light switch that flickers on and off. It’s unreliable and frustrating. A common culprit for this issue is outdated firmware. Ensure your Netgear extender’s firmware is up-to-date. You can usually check and update it through the Netgear Genie app or the extender’s web interface.
Another factor could be interference from other devices. Microwave ovens, cordless phones, and Bluetooth gadgets can disrupt your WiFi signal. Try changing your extender’s channel settings to reduce interference. With fewer interruptions, you might find your connection becomes more stable.
Connection problems don’t have to be a permanent fixture in your internet experience. What steps will you take to improve your connectivity today? Remember, a little adjustment can lead to a big improvement. By addressing these issues, you can ensure your Netgear WiFi extender works efficiently, providing you with the seamless internet access you deserve.
Firmware Updates
Keeping your Netgear WiFi extender’s firmware up-to-date is crucial. Firmware updates fix bugs and improve performance. They also ensure your device runs smoothly and securely. Regular updates protect against vulnerabilities and enhance features.
Importance Of Up-to-date Firmware
Outdated firmware can cause connection issues. You might experience slow speeds or drops in connection. Updated firmware solves these problems. It boosts the efficiency of your WiFi extender. Up-to-date firmware helps maintain strong security. This is vital for safeguarding your network.
Steps To Update Firmware
Begin by connecting your extender to your network. Use a computer or mobile device. Open a web browser and type your extender’s IP address. Log in using your credentials. Look for the firmware update section. Follow the instructions to download the latest version. Ensure your device stays connected during the update. Restart your extender after the update completes.
Credit: www.youtube.com
Signal Interference
Signal interference can disrupt the performance of your Netgear WiFi extender. Various electronic devices and physical obstructions can cause this. Identifying and minimizing these interference sources can enhance your internet experience. Let’s explore how you can tackle this issue effectively.
Identifying Interference Sources
Many devices emit signals that interfere with your WiFi. Microwaves, baby monitors, and cordless phones are common culprits. Physical barriers like walls and floors also weaken WiFi signals. Identifying these obstacles helps in addressing interference issues. Check your home for these potential disruptions. Note where your Netgear extender is placed. This initial step is crucial for improving your WiFi strength.
Minimizing Interference
Once you identify interference sources, take steps to minimize them. Relocate your Netgear extender to a more open area. Keep it away from microwaves and cordless phones. Adjust the position of your router and extender for optimal coverage. Consider changing your WiFi channel to reduce overlap with neighboring networks. These small adjustments can lead to a noticeable improvement in your connection.
Device Placement
Placing your Netgear WiFi Extender in the right spot is crucial for optimal performance. You might think any location would do, but strategic placement can enhance your internet experience significantly. Let’s dive into some practical tips on how to choose the best spot for your extender.
Ideal Locations For Extender
Think about the areas in your home where you experience the most WiFi issues. Is it the basement where you binge-watch your favorite series, or the kitchen where you follow recipes online? These spots can be ideal for your extender.
Place the extender halfway between your router and the dead zone. This ensures the extender receives a strong signal from the router. You want your extender to catch the strongest signal possible to effectively boost it.
Consider positioning your extender near frequently used devices like smart TVs or gaming consoles. It can improve streaming and reduce lag. Experiment with different spots and see how your internet speed changes.
Avoiding Obstructions
Don’t hide your extender behind furniture or in a closed cabinet. WiFi signals are easily blocked by large objects. Placing it out in the open ensures better signal distribution across your space.
Keep the extender away from electronic devices like microwaves and cordless phones. These gadgets can interfere with WiFi signals. You want your extender to be free of interference to maximize speed.
Think about the walls in your home. Thick walls can weaken WiFi signals. Try placing the extender in areas with fewer barriers for a stronger connection.
Have you ever moved your extender just a few feet and noticed a change in WiFi speed? Share your experience in the comments below. Could your current setup benefit from these tips?
Credit: mywifiextblog.com
Login And Access Issues
Many users face login and access issues with their Netgear WiFi Extender. It can be frustrating to not access your extender settings. This section will guide you through resolving these common problems. Follow these simple steps to regain control of your device.
Accessing Extender Settings
To access your extender’s settings, connect your device to the extender’s network. Open a web browser and type “mywifiext.net” in the address bar. This should take you to the login page. If it doesn’t, try using the IP address “192.168.1.250”. Enter your username and password to access the settings. If you can’t reach the login page, check your internet connection.
Resetting Login Credentials
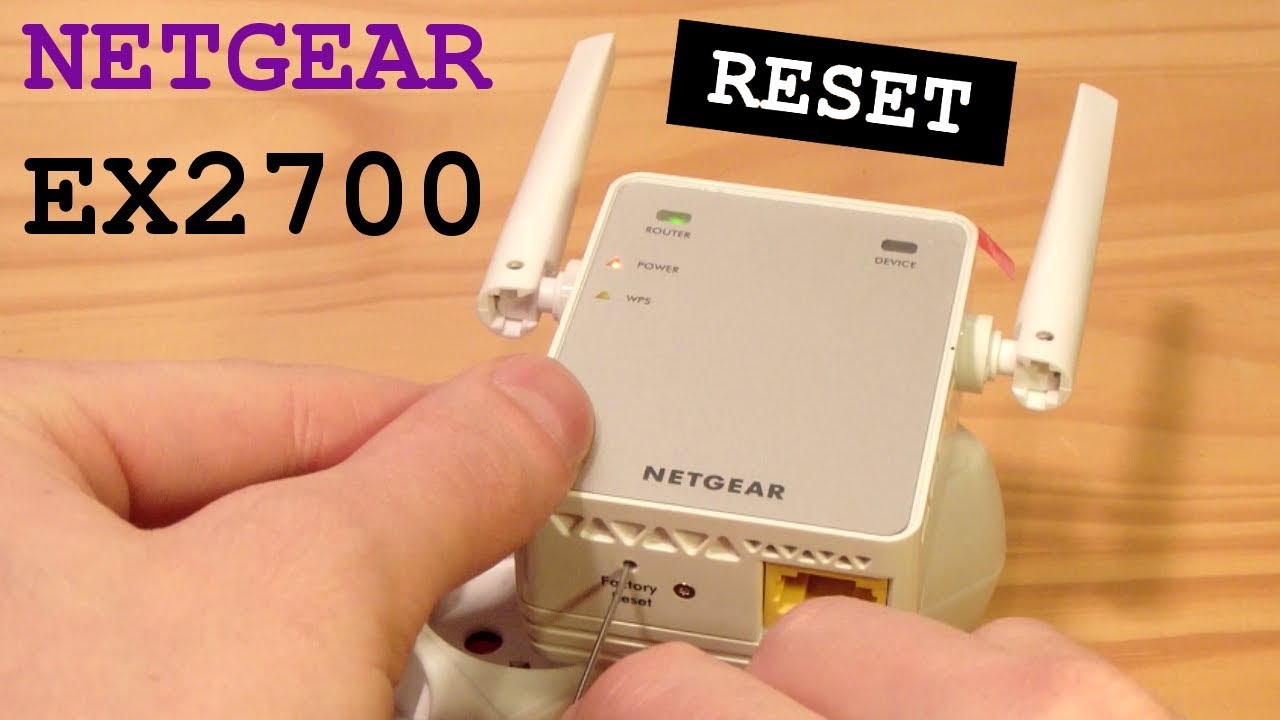
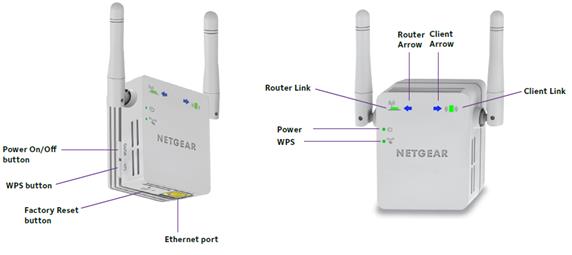
If you forget your login credentials, reset them. Locate the reset button on your extender. Usually, it is a small pinhole button. Use a paperclip to press and hold the reset button for 10 seconds. Release the button, then wait for the extender to reboot. Once done, use default login credentials to access the settings. Change them to something memorable afterwards.
Led Indicators
LED indicators play a crucial role in troubleshooting Netgear WiFi extenders. Each light signals specific issues or statuses, helping users quickly identify connection problems. Understanding these indicators ensures efficient resolution of connectivity challenges.
LED indicators on your Netgear WiFi extender are more than just tiny lights. They are crucial guides that help you understand the status and performance of your device. Recognizing what these lights signify can save you from unnecessary frustration and help you address any issues promptly.Understanding Led Colors
Each LED color on your Netgear WiFi extender conveys a specific message. Green typically indicates a strong connection, while amber suggests a weaker signal that might need attention. If you notice a red light, it’s a clear sign that something requires urgent troubleshooting. Imagine you’re streaming your favorite show and suddenly, the WiFi drops. You glance at your extender, and the red light is flashing. This is your cue to check the connections or possibly move your device closer to the router.Troubleshooting Led Alerts
Facing a blinking LED can be daunting, but it often signals a straightforward fix. Start by checking if your extender is too far from the router. A simple repositioning might restore that green glow. If the issue persists, consider resetting the device. Most extenders have a reset button that can help clear any glitches. Remember, a steady green light typically means everything is back on track. Have you ever thought about the impact of a simple LED? The next time you see an unexpected color, instead of panicking, use it as a tool to guide your troubleshooting steps. Understanding and responding to these LED signals can enhance your WiFi experience significantly. Are there other indicators or patterns you’ve noticed with your extender? Share your experiences and let’s unravel the mysteries of those tiny lights together!Credit: www.netgear.com
Factory Reset
Factory resetting your Netgear WiFi extender can solve many connectivity issues. It wipes out all previous settings, returning the device to its default state. This process often resolves persistent network problems. Understanding when and how to perform a reset is crucial for maintaining optimal performance.
When To Perform A Reset
A factory reset is necessary when the extender stops connecting to the network. It is also needed if you forget the admin password. Another scenario is when software updates cause unexpected behavior. Resetting clears all configurations, allowing you to start fresh.
Steps To Reset Extender
First, locate the reset button on your Netgear extender. It is usually a small, recessed button on the side or back. Use a paper clip or similar object to press and hold the button. Keep it pressed for about 10 seconds until the LED lights blink. Release the button, and the extender will reboot.
After the reset, reconnect the extender to your network. This process restores factory settings, enabling a new configuration. Ensure your device is powered on during the reset procedure. Follow these steps carefully for a successful reset.
Frequently Asked Questions
What Lights Should Be On My Netgear Extender?
Your Netgear extender should have a solid green power light, indicating it’s on. The Wi-Fi light must be solid green or amber, showing connectivity. The Device to Extender light should be green for a strong connection, amber for fair, and red for poor.
Ensure lights are stable, not blinking.
How Do I Resync My Netgear Extender?
To resync your Netgear extender, press the WPS button on the extender and then on your router. Wait for the LED lights to stabilize, indicating a successful connection. If needed, reboot both devices for better synchronization. Ensure both are within range for optimal performance.
Why Is My Wifi Extender Not Connecting?
Ensure the extender is within range and connected to the correct network. Check for firmware updates and reset if needed. Confirm your WiFi password is correct and see if other devices connect. Avoid interference from electronics and physical obstacles.
Do Netgear Wifi Extenders Go Bad?
Netgear WiFi extenders can degrade over time due to hardware issues or outdated firmware. Regular updates and maintenance help prolong their lifespan. If experiencing connectivity problems, consider resetting or updating the extender. Sometimes, replacing the device is necessary for optimal performance.
How Do I Reset My Netgear Wifi Extender?
Press the reset button for 10 seconds. Wait for the extender to reboot. It restores factory settings.
Conclusion
Solving Netgear Wifi Extender issues can be simple. Start with basic checks. Ensure proper power supply and connection. Reset the extender if needed. Check for software updates regularly. Keep your extender’s firmware current. Adjust the extender’s placement for better signal.
Avoid interference from walls or devices. Consider contacting support for persistent issues. Knowledge helps in maintaining smooth connectivity. Practice patience and troubleshooting skills. Enjoy your seamless internet experience. Your home network deserves reliability. Tackle problems with confidence. Stay connected without hassle.
Happy browsing!