Polymerase Chain Reaction (PCR) is a powerful tool in molecular biology. It helps amplify DNA sequences for various applications.
But even experts face challenges with PCR sometimes. PCR troubleshooting can be tricky, but it’s essential for successful experiments. Problems like unexpected bands or no amplification are common. Understanding the root causes can save time and frustration. This guide will explore common PCR issues and offer practical solutions.
Whether you’re a beginner or seasoned scientist, these tips will help you achieve better results. Let’s dive into the world of PCR troubleshooting and make your experiments more reliable.
Introduction To Pcr Troubleshooting
Polymerase Chain Reaction (PCR) is a crucial technique in molecular biology. It amplifies DNA sequences, allowing scientists to study genes. But, PCR often faces issues that hinder accurate results. This section will help you understand and troubleshoot common PCR problems.
Importance Of Accurate Pcr
Accurate PCR ensures reliable data for research and diagnostics. Mistakes can lead to false results. These errors can affect studies and patient care. High precision in PCR is essential for valid outcomes.
Common Pcr Challenges
Several issues can arise during PCR. Contamination is a frequent problem. It can cause misleading results. Using clean reagents and tools can prevent this.
Another challenge is primer-dimer formation. This happens when primers bind to each other. It reduces the efficiency of the reaction. Ensuring proper primer design can minimize this issue.
Sometimes, nonspecific amplification occurs. Unintended DNA sequences get amplified. This can obscure the target DNA. Optimizing reaction conditions helps achieve specificity.
Additionally, suboptimal DNA template quality can affect PCR. Degraded or impure DNA can hinder amplification. Using high-quality DNA improves the chances of success.
Temperature settings are also crucial. Incorrect annealing temperatures can cause problems. Following the recommended protocols ensures better results.
Issues With Dna Template
When it comes to PCR (Polymerase Chain Reaction), the DNA template is the star of the show. It’s where the magic begins. However, if the DNA template isn’t up to par, your PCR can turn into a nightmare. Let’s dive into some common issues and how to troubleshoot them.
Quality And Quantity
First and foremost, the quality and quantity of your DNA template are crucial. Too little DNA, and the reaction won’t have enough to amplify. Too much, and you might get non-specific amplification.
- Quality: Make sure your DNA is intact. Degraded DNA can lead to incomplete or poor amplification.
- Quantity: Use a spectrophotometer or fluorometer to accurately measure your DNA concentration.
Remember, balance is key. Aim for a Goldilocks zone—not too much, not too little, but just right!
Contaminants
Contaminants are sneaky culprits that can sabotage your PCR. They can come from various sources, but here are the usual suspects:
| Contaminant | Source | Solution |
|---|---|---|
| Proteins | Poor DNA extraction | Use a proteinase K step during extraction |
| Phenol | Phenol-chloroform extraction | Perform an extra ethanol wash |
| RNA | Co-extraction with DNA | Add an RNase treatment step |
Make sure to check your DNA for these contaminants. They can be the difference between a successful PCR and a frustrating failure.
Primer Design Problems
Designing primers for PCR can sometimes feel like solving a puzzle. You have to get all the pieces right to get the perfect match. When primers are not designed correctly, it can lead to many problems. Let’s dig into two common issues: specificity concerns and secondary structures.
Specificity Concerns
Have you ever tried to make a recipe, only to find you’ve used the wrong ingredients? That’s what happens when primers lack specificity. They might bind to multiple sites, creating a mess of unwanted products.
To avoid this, you need to check your primers’ specificity. Here’s a handy table to guide you:
| Parameter | Ideal Value |
|---|---|
| Length | 18-25 bases |
| GC Content | 40-60% |
| Melting Temperature (Tm) | 50-60°C |
These values help ensure your primers bind to the correct site. Think of it like picking the right key for a lock. If your primers are too short or have too much GC content, they might fit more than one lock, causing all kinds of trouble.
Secondary Structures
Imagine trying to untangle a knot in your shoelaces. Frustrating, right? That’s what happens when primers form secondary structures, like hairpins or dimers.
These structures can stop primers from binding where they should. Here are some tips to avoid them:
- Avoid sequences that can form hairpins (e.g., a run of four or more G’s or C’s).
- Check for primer-dimer formations by using software tools.
- Ensure your primer’s 3’ end is not too complementary to avoid self-annealing.
Think of secondary structures as roadblocks. They prevent your primers from reaching their destination. By designing primers carefully, you can avoid these roadblocks and ensure a smooth journey for your PCR.
Primer design might seem daunting, but with careful planning, you can avoid common pitfalls. Remember, the right primers are the key to unlocking perfect PCR results. Happy troubleshooting!
Credit: www.bio-rad.com
Optimization Of Annealing Temperature
When it comes to PCR (Polymerase Chain Reaction), optimizing the annealing temperature is like finding the perfect recipe for a cake. Too hot, and your primers might not bind well. Too cold, and you might get a mishmash of unwanted products. Let’s dive into the details and explore some techniques to get this just right.
Gradient Pcr Techniques
One of the most effective ways to nail down the ideal annealing temperature is through Gradient PCR Techniques. Imagine you’re testing different temperatures in a single run. This method allows you to see which temperature produces the best results without having to run multiple reactions separately.
- Set up a gradient PCR machine.
- Run your reaction with a range of temperatures, typically spanning 5-10°C.
- Analyze the results to identify the temperature where your primers bind best and produce the cleanest bands.
This approach saves time and resources, and it often feels like a magic trick when you see that perfect band appear at a specific temperature.
Avoiding Non-specific Bands
Dealing with non-specific bands can be a real headache. It’s like trying to find the right radio station but getting a lot of static. Here are some tips to avoid these unwanted guests:
- Increase the Annealing Temperature: A slightly higher temperature can help ensure that only the specific primers bind to your target sequence.
- Adjust Primer Concentration: Using the right amount of primers can make a world of difference. Too much can lead to non-specific binding, while too little might not give you enough product.
- Optimize Magnesium Ion Concentration: Magnesium ions play a crucial role in the PCR process. Too much or too little can affect the specificity of your reaction.
Remember, each PCR setup is unique, and a bit of trial and error may be necessary to find the sweet spot. But once you do, it’s smooth sailing!
So, whether you’re using gradient PCR techniques or tweaking your protocol to avoid non-specific bands, remember that optimizing the annealing temperature is a critical step in PCR troubleshooting. It might take some patience, but the results are worth it.
Enzyme Selection And Handling
Proper enzyme selection and handling are key to successful PCR experiments. Even small mistakes can lead to failed reactions. Choosing the right polymerase and handling it correctly is crucial. Below, we will discuss how to select the right enzyme and offer some tips for storage and usage.
Choosing The Right Polymerase
Different polymerases have unique characteristics. Some are more suited for specific applications. Consider the type of DNA template and the desired product length. High-fidelity polymerases are ideal for applications needing high accuracy. For routine PCR, Taq polymerase works well. It is reliable and cost-effective. For GC-rich regions, choose a polymerase with special additives.
Storage And Usage Tips
Proper storage of polymerases extends their shelf life. Always store enzymes at -20°C. Avoid repeated freeze-thaw cycles to maintain activity. Use aliquots to minimize freeze-thaw damage. Thaw enzymes on ice before use. Mix gently by pipetting or inverting the tube.
Use the recommended buffer for each polymerase. Different enzymes have specific buffer requirements. Check the manufacturer’s guidelines for optimal results. Ensure that all reagents are free from contaminants. Even small amounts of impurities can affect PCR performance.
Credit: www.bio-rad.com
Reaction Component Concentrations
When it comes to PCR (Polymerase Chain Reaction), getting the reaction component concentrations just right can make or break your experiment. Think of it as baking a cake; too much or too little of an ingredient can lead to a disastrous outcome. Here, we will delve into the specifics of buffer and MgCl2 levels, and balancing dNTPs and primers to help you achieve PCR perfection.
Buffer and MgCl2 Levels
The buffer and magnesium chloride (MgCl2) are like the backbone of your PCR reaction. The buffer maintains the pH and ionic strength, ensuring that the enzyme remains active and stable. MgCl2, on the other hand, is crucial because it acts as a cofactor for Taq polymerase, the enzyme responsible for DNA synthesis.
Here’s a quick tip: too much MgCl2 can lead to non-specific amplification, while too little can reduce the yield of your desired product. A good starting point is usually 1.5 mM, but you might need to tweak this based on your specific requirements.
| Concentration | Effect |
|---|---|
| Low MgCl2 | Low yield, poor amplification |
| High MgCl2 | Non-specific amplification |
Dntp And Primer Balancing
Balancing dNTPs (deoxynucleotide triphosphates) and primers is another critical aspect. dNTPs are the building blocks of DNA, and you need to ensure they are in the right proportions. Too much dNTPs can inhibit the PCR reaction and lead to errors in the DNA sequence.
Primers are short sequences that start the DNA synthesis. If your primers are not balanced, you might face issues like primer-dimer formation or non-specific binding. A good rule of thumb is to use equimolar concentrations of primers, typically in the range of 0.1-0.5 μM.
Remember my first PCR disaster? I had used 1 mM of dNTPs thinking more is better. The result? A big, fat zero. No amplification. Lesson learned: stick to 200 μM of each dNTP for a standard reaction.
- Primer concentration: 0.1-0.5 μM each
- dNTP concentration: 200 μM each
In conclusion, mastering the concentrations of reaction components in PCR is like finding the sweet spot in your favorite recipe. It requires patience, some trial and error, and a bit of scientific know-how. But once you get it right, the results are definitely worth the effort.
Cycling Conditions Adjustments
Adjusting cycling conditions can solve many PCR issues. The right cycling conditions ensure efficient and specific DNA amplification. This section covers key adjustments: cycle number optimization and extension time modifications. These tweaks can help achieve better PCR results.
Cycle Number Optimization
Cycle number is crucial in PCR. Too few cycles yield insufficient product. Too many cycles cause non-specific amplification. Start with 25-35 cycles. Adjust based on DNA concentration and target size. Low DNA amounts need more cycles. High DNA amounts need fewer cycles. Monitoring product formation during cycling helps find the optimal number.
Extension Time Modifications
Extension time is vital for accurate DNA replication. It depends on polymerase speed and target length. Standard extension time is 1 minute per kilobase. For longer targets, increase extension time. For shorter targets, decrease extension time. Ensure polymerase has enough time to complete the extension. This prevents incomplete products and improves yield.
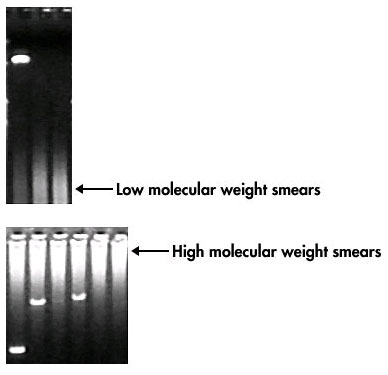
Detection And Analysis Of Pcr Products
So, you’ve run your PCR and now it’s time to see if it worked. It’s like Christmas morning, but instead of unwrapping presents, you’re analyzing DNA bands. This process might seem daunting, but with a few tips and tricks, you’ll be interpreting results like a pro. Let’s dive into the world of gel electrophoresis and the art of reading those elusive bands.
Gel Electrophoresis Tips
Gel electrophoresis is your go-to method for visualizing PCR products. Here are some tips to ensure you get the best results:
- Use Fresh Gel: Old gels can lead to smearing and poor resolution. Always prepare a fresh gel for clear bands.
- Proper Loading: Carefully load your samples to avoid cross-contamination. A steady hand and a pipette are your best friends here.
- Run Time: Don’t rush it. Allow the gel to run for the recommended time to achieve proper band separation.
- Dye Choice: Use a dye that provides a clear contrast with your DNA bands. Ethidium bromide is popular, but safer alternatives like SYBR Green are also effective.
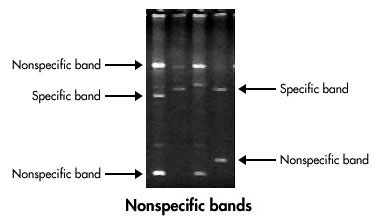
Interpreting Results
Now that you have your gel, it’s time to interpret the results. This step is crucial for determining if your PCR was successful.
- Compare Bands: Look at the bands against a DNA ladder. This helps you estimate the size of your PCR products.
- Check for Specificity: Ensure there is a single, clear band at the expected size. Multiple bands can indicate non-specific amplification.
- Intensity Matters: The brightness of the band can give you an idea of the quantity of PCR product. Dim bands might mean low yield, while very bright bands suggest high yield.
- Negative Controls: Always include a negative control. No bands here mean no contamination, which is good news!
- Positive Controls: A positive control ensures your PCR worked as expected. If this fails, it’s time to troubleshoot your reaction conditions.
Remember, analyzing PCR products is like being a detective. You gather clues, compare them to known standards, and draw conclusions. And like any good detective, patience and practice will make you better at solving the mysteries of DNA amplification.
So, next time you run a PCR, keep these tips in mind. With a bit of practice, you’ll go from novice to expert in no time. Happy amplifying!
Preventing Contamination
Contamination is a major issue in PCR (Polymerase Chain Reaction) processes. It can lead to inaccurate results. Preventing contamination is crucial for reliable outcomes. Here are some key practices to help avoid contamination in your PCR experiments.
Lab Practices
Proper lab practices are essential. Always wear gloves and lab coats. Change gloves frequently to avoid cross-contamination. Use pipette tips with filters to prevent aerosol contamination. Clean your workspace before and after experiments. Use 70% ethanol to wipe down surfaces. Dedicate separate areas for reagent preparation and sample handling. This reduces the risk of contamination. Label your tubes and reagents clearly. This helps avoid mix-ups.
Use Of Controls
Controls are vital in PCR troubleshooting. Always include a negative control. This control contains all reagents except the DNA template. It helps identify contamination in your reagents. Positive controls are equally important. They ensure that the PCR reaction works as expected. Use a known DNA template for your positive control. Compare it to your sample results. This helps verify the accuracy of your experiment.
Advanced Troubleshooting Strategies
Polymerase Chain Reaction (PCR) can sometimes be tricky. Even experienced scientists face challenges. Advanced troubleshooting strategies can help overcome common issues.
These methods can improve PCR success rates. Let’s explore two effective strategies: Nested PCR and Touchdown PCR.
Nested Pcr
Nested PCR offers a solution for specificity problems. It uses two sets of primers. The first set amplifies a larger DNA segment. The second set targets a smaller, more specific region within the first PCR product.
This technique reduces non-specific binding. It enhances the accuracy of the PCR. Nested PCR is particularly useful for samples with low DNA concentration.
Touchdown Pcr
Touchdown PCR helps in optimizing annealing temperatures. It starts with a higher annealing temperature. The temperature decreases gradually in subsequent cycles.
This strategy increases the specificity of primer binding. It minimizes non-specific products. Touchdown PCR is effective in complex or variable templates.
These advanced strategies can greatly improve PCR results. They offer practical solutions to common problems in PCR experiments.
Frequently Asked Questions
What Is Troubleshooting In Pcr?
Troubleshooting in PCR involves identifying and resolving issues in the polymerase chain reaction process. Common problems include contamination, suboptimal conditions, and primer-dimer formation. Steps include checking reagents, optimizing conditions, and ensuring proper equipment calibration. Accurate troubleshooting ensures reliable PCR results.
What Is The Major Cause Of Pcr Failure?
The major cause of PCR failure is poor template quality. Contaminants or degraded DNA can inhibit the reaction.
What Are The Errors That Occur During Pcr?
Errors during PCR include contamination, primer-dimer formation, nonspecific amplification, and errors due to DNA polymerase inaccuracies.
How To Troubleshoot Pcr Contamination?
To troubleshoot PCR contamination, use separate workspaces for pre- and post-PCR processes. Regularly clean surfaces and equipment. Utilize dedicated pipettes and reagents. Always wear gloves and change them frequently. Implement negative controls to identify contamination sources.
What Causes Pcr To Fail?
PCR can fail due to incorrect temperatures, poor primer design, or contaminated reagents.
Conclusion
Effective PCR troubleshooting requires patience and a systematic approach. Identify and address common issues like contamination and primer problems. Adjust reaction conditions to improve results. Document changes and outcomes for future reference. Consistency and careful monitoring will lead to successful PCR experiments.
Keep experimenting and refining your techniques. Remember, practice leads to perfection. With these tips, you’ll troubleshoot PCR confidently. Happy experimenting!