Understanding how to troubleshoot the Vibration Analyzer Model 469-1621 is essential. This tool is vital for diagnosing machinery issues.
The Vibration Analyzer Model 469-1621 helps detect vibrations in machinery, ensuring smooth operations. But, like any tool, it can sometimes have problems. Knowing how to troubleshoot these issues is crucial for maintaining productivity. This guide will provide clear steps to identify and resolve common problems with the Vibration Analyzer Model 469-1621.
Whether you’re a beginner or an experienced user, this information will help you get the most out of your equipment. Let’s dive into the troubleshooting process to ensure your machinery runs efficiently.

Introduction To Vibration Analyzer Model 469-1621
The Vibration Analyzer Model 469-1621 is a crucial tool in the maintenance of machinery. It helps detect and diagnose issues related to vibration in various industrial equipment. Understanding its purpose and common uses can significantly improve your troubleshooting efficiency.
Purpose And Function
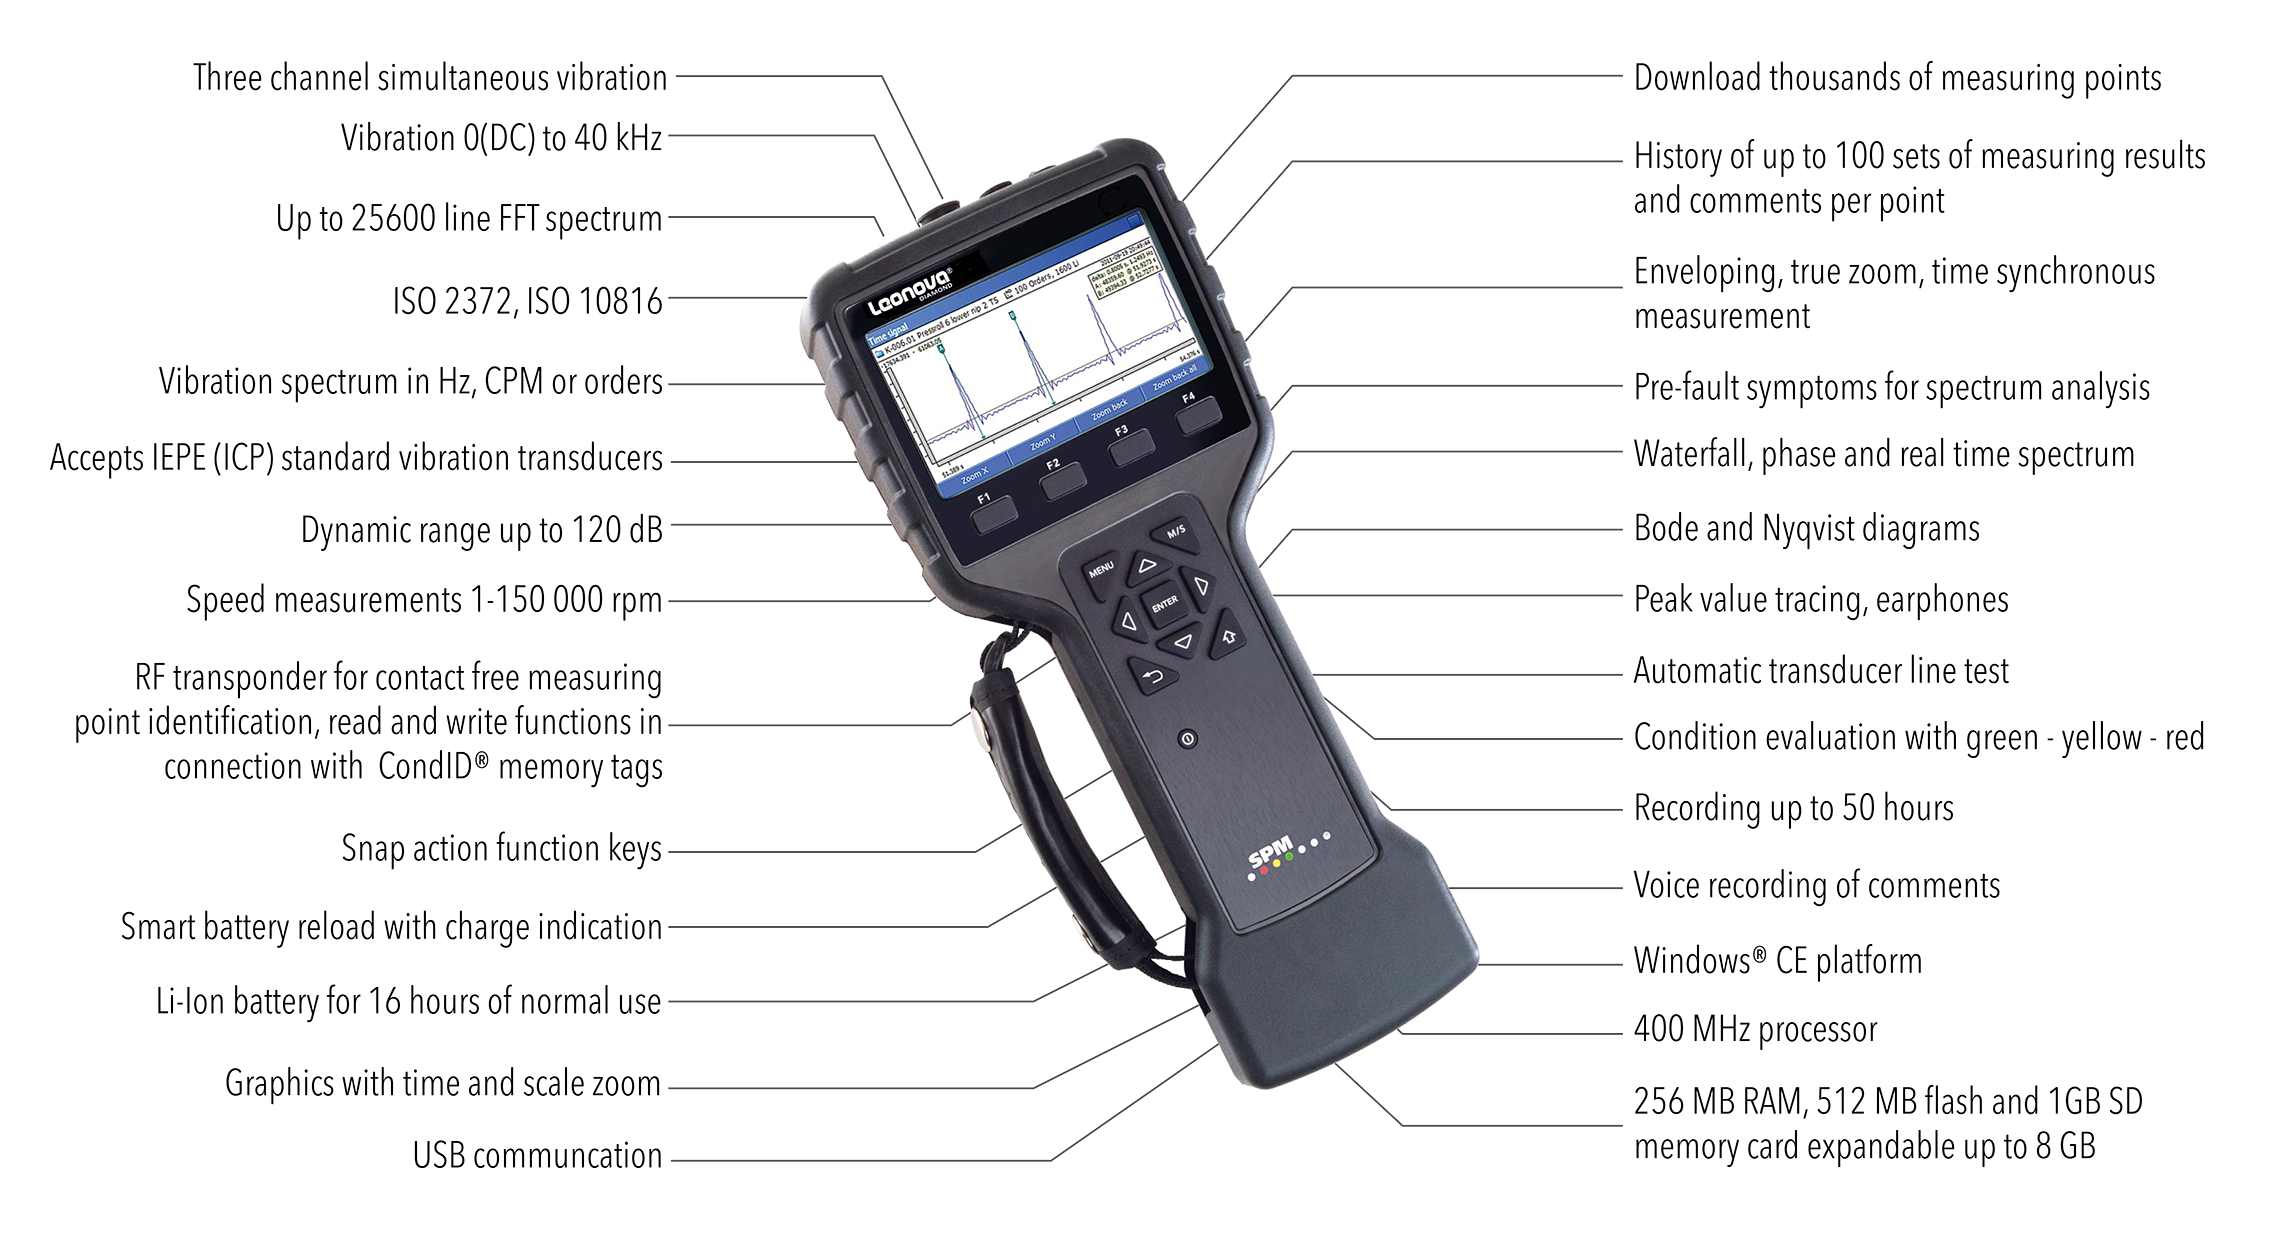
The Vibration Analyzer Model 469-1621 measures the vibration levels of machinery. It helps in identifying potential problems before they become severe. This tool provides accurate data, which is essential for maintenance and repair. It ensures that machines run smoothly and efficiently.
It is designed for easy use. Even those with minimal technical knowledge can operate it. The device records vibration readings and displays them clearly. This helps users make informed decisions about necessary repairs or adjustments.
Common Uses
This model is commonly used in various industries. Factories use it to monitor motors, pumps, and other rotating equipment. It helps detect imbalances, misalignments, and bearing failures. These issues can cause significant downtime if not addressed promptly.
In the construction sector, this analyzer monitors the vibration levels of heavy machinery. It ensures that equipment like excavators and bulldozers are in good working condition. This reduces the risk of sudden breakdowns and extends the lifespan of the machinery.
Power plants also rely on this device. It helps maintain generators and turbines, ensuring they operate efficiently. By regularly monitoring vibration levels, maintenance teams can prevent costly repairs and improve overall plant performance.
Identifying Common Issues
The Vibration Analyzer Model 469-1621 is a crucial tool for monitoring and diagnosing machinery. But, like all devices, it can encounter problems. Identifying these issues early is essential for maintaining optimal performance. This section covers the common symptoms of malfunction and frequent error codes. This will help you troubleshoot effectively.
Symptoms Of Malfunction
Recognizing the symptoms of a malfunctioning vibration analyzer can save time and prevent equipment damage. Here are some common symptoms:
- Inconsistent Readings: If the readings fluctuate without reason, the analyzer may be faulty.
- No Power: A dead unit might indicate battery or internal circuit issues.
- Frozen Screen: The display screen might freeze, indicating a software or hardware problem.
- Unusual Sounds: Strange noises from the device could point to internal mechanical issues.
- Overheating: If the unit becomes too hot, it may have an internal fault.
Frequent Error Codes
Error codes are the analyzer’s way of communicating specific issues. Understanding these codes can expedite troubleshooting. Here are some common error codes and their meanings:
| Error Code | Description | Solution |
|---|---|---|
| E01 | Battery Low | Replace or recharge the battery |
| E02 | Sensor Fault | Check sensor connections and replace if necessary |
| E03 | Memory Full | Clear memory or transfer data |
| E04 | Overload | Reduce the input signal level |
| E05 | System Error | Restart the device or update firmware |
By understanding these symptoms and error codes, you can maintain your Vibration Analyzer Model 469-1621 in good working condition.
Initial Diagnostic Steps
When facing issues with your Vibration Analyzer Model 469-1621, it’s important to follow initial diagnostic steps. These steps will help identify the problem quickly. Let’s break down the process into two main areas.
Visual Inspection
Start with a visual inspection of the device. Look for obvious signs of damage. Check the casing for cracks or dents. Inspect the cables and connectors. Ensure there are no frayed wires or loose connections. A quick visual check can often reveal the problem.
| Component | What to Check |
|---|---|
| Casing | Cracks, dents, or other physical damage |
| Cables | Frayed wires, loose connections |
| Connectors | Secure and intact connections |
Basic Tests
Next, perform some basic tests to ensure the device’s functionality. These tests will help you determine if the problem is internal or external.
- Power Test: Verify the device powers on. Check the power supply and battery.
- Self-Test: Many devices have a built-in self-test. Run it to check for internal issues.
- Sensor Check: Ensure sensors are working. Attach a known good sensor and verify readings.
If the device fails any of these tests, note the issue. This information is crucial for further troubleshooting or when seeking professional repair.
Credit: www.spminstrument.com
Hardware Troubleshooting
When dealing with the Vibration Analyzer Model 469-1621, hardware issues can arise. These problems often stem from connection faults or sensor malfunctions. Below, we’ll walk through some key steps for effective hardware troubleshooting.
Checking Connections
First, ensure all cables are securely connected. Loose cables can cause data errors.
- Power Cable: Verify the power cable is firmly plugged into the power source and the analyzer.
- Data Cables: Check that data cables are not damaged or frayed.
- Connector Pins: Inspect connector pins for any bending or breakage.
Use a multimeter to test the continuity of the cables. This helps to identify any broken wires within the cable.
Inspecting Sensors
Sensors are critical for accurate data collection. Ensure they are in good condition.
- Visual Inspection: Look for physical damage on the sensor body.
- Sensor Mounting: Ensure sensors are securely mounted to avoid loose connections.
- Calibration: Check the calibration date. Out-of-date calibration can affect accuracy.
Use a test signal to verify sensor functionality. This helps to ensure the sensors are responding correctly.
| Component | Action |
|---|---|
| Power Cable | Ensure firm connection |
| Data Cables | Check for damage |
| Connector Pins | Inspect for bending or breakage |
| Sensor Body | Look for physical damage |
| Sensor Mounting | Ensure secure mounting |
| Calibration Date | Verify calibration |
Software Troubleshooting
Dealing with software issues in your Vibration Analyzer Model 469-1621 can be quite challenging. This guide aims to help you by providing troubleshooting tips for common software problems. Follow these instructions carefully to ensure your device operates smoothly.
Firmware Updates
Keeping your firmware up to date is crucial for the efficient operation of your vibration analyzer. Outdated firmware can cause compatibility issues and software glitches. Follow these simple steps to update your firmware:
- Visit the official website of the vibration analyzer.
- Navigate to the support or downloads section.
- Find the latest firmware version compatible with your model.
- Download the firmware update file to your computer.
- Connect your vibration analyzer to the computer using a USB cable.
- Run the firmware update software and follow the on-screen instructions.
After the update, restart your device. This ensures that all changes take effect.
Configuration Settings
Incorrect configuration settings can lead to various software issues. Resetting the settings to default can often resolve these problems. Here’s how:
- Turn on your vibration analyzer.
- Navigate to the settings menu.
- Select the option to reset settings to default.
- Confirm the reset action.
After resetting, reconfigure the necessary settings according to your requirements. Ensure that all parameters are set correctly for your specific application.
For ease of reference, here’s a quick table summarizing the steps:
| Action | Steps |
|---|---|
| Firmware Update | Download update file > Connect device > Run update software |
| Configuration Reset | Navigate to settings > Select reset > Confirm action |
Following these steps ensures that your vibration analyzer’s software runs smoothly and efficiently. Keep your firmware updated and settings correctly configured for optimal performance.
Advanced Diagnostic Techniques
Advanced diagnostic techniques are essential for effective vibration analysis. They help in identifying and resolving complex issues. Utilizing these techniques ensures the longevity of machinery. Let’s explore two primary methods used in advanced diagnostics: signal analysis and component testing.
Signal Analysis
Signal analysis is a critical technique in vibration diagnostics. It involves examining vibration signals to identify patterns. These patterns can indicate potential problems. By analyzing frequency, amplitude, and phase, you can pinpoint issues. Effective signal analysis requires proper tools and software. This method helps in early detection of faults, reducing downtime.
Component Testing
Component testing focuses on individual parts of the machinery. Each component is tested for performance and reliability. This method identifies specific faulty parts. Testing can include bearings, gears, and motors. Proper component testing ensures each part functions correctly. This technique is crucial for preventing system failures.
Preventative Maintenance Tips
Preventative maintenance for your Vibration Analyzer Model 469-1621 is crucial. Regular upkeep ensures that the device performs optimally. It also extends its lifespan. Follow these tips to keep your equipment in top condition.
Regular Inspections
Conduct regular inspections to identify potential issues early. Check for any signs of wear or damage. Inspect cables and connectors for proper attachment. Verify that all buttons and controls function correctly. Document any anomalies for further investigation.
Cleaning Procedures
Keep the Vibration Analyzer clean to ensure accurate readings. Use a soft, dry cloth to wipe the surface. Avoid using harsh chemicals or abrasive materials. Clean the screen gently to prevent scratches. Regular cleaning prevents dust buildup, which can affect the device’s performance.
Credit: mde.maryland.gov
Expert Solutions And Advice
Troubleshooting the Vibration Analyzer Model 469-1621 can be challenging. However, with the right guidance, you can resolve issues quickly. Below, we provide expert solutions and advice to help you get the most out of your device.
Consulting Professionals
Sometimes, the best course of action is to seek help from professionals. Consulting with experts who have experience with the Vibration Analyzer Model 469-1621 can save you time and effort.
- They can identify problems quickly.
- Provide solutions based on past experiences.
- Offer maintenance tips to avoid future issues.
Professional consultants can also ensure that your device is calibrated correctly. This can lead to more accurate readings and better overall performance.
Training And Resources
Access to quality training and resources can make troubleshooting much easier. Investing time in learning about the Vibration Analyzer Model 469-1621 can pay off in the long run.
| Resource Type | Description |
|---|---|
| Online Courses | Interactive lessons on device usage and troubleshooting. |
| User Manuals | Comprehensive guides provided by the manufacturer. |
| Community Forums | Platforms where users share tips and solutions. |
These resources can help you become more familiar with the device. They provide valuable insights and practical tips for effective troubleshooting.
Frequently Asked Questions
What Are The Common Issues With Vibration Analyzer 469-1621?
Common issues include incorrect readings, power failure, and software glitches.
How Can I Fix Incorrect Readings On My Vibration Analyzer?
Check the sensor connections. Ensure they are secure and clean. Recalibrate if needed.
Why Is My Vibration Analyzer Not Powering On?
Verify the power source. Check the battery and power cables for damage.
How Do I Update The Software On My Vibration Analyzer?
Visit the manufacturer’s website. Download the latest software version. Follow the installation instructions.
What Should I Do If The Display Screen Is Blank?
Restart the device. Ensure the display settings are correct. If the issue persists, contact technical support.
Conclusion
Troubleshooting the Vibration Analyzer Model 469-1621 can be straightforward with these tips. Regular maintenance checks prevent major issues. Always consult the user manual for guidance. Keep the analyzer clean and store it properly. These steps ensure accurate readings. Understanding the basics helps in efficient troubleshooting.
This knowledge saves time and minimizes downtime. Practice these steps to keep your analyzer in top shape. Stay proactive in your maintenance approach. This way, your device remains reliable and efficient.