Keurig B155 owners often face common issues with their machines. Troubleshooting can help you fix these problems quickly.
The Keurig B155 is a popular choice for both home and office use. Its convenience and efficiency make it a favorite among coffee lovers. But, like any machine, it can sometimes run into issues. From not brewing to strange noises, these problems can be frustrating.
Understanding how to troubleshoot your Keurig B155 can save time and money. This guide will walk you through the most common issues and how to resolve them. With a few simple steps, your Keurig B155 will be back to making perfect coffee in no time. Let’s dive in and fix those pesky problems!
Machine Not Powering On
Is your Keurig B155 not powering on? Don’t worry. This is a common issue and can be fixed easily. Here are some steps to troubleshoot the problem.
Check Power Source
First, ensure the machine is connected to a working power outlet. Sometimes the issue is as simple as a loose plug or a faulty outlet.
- Check if other devices work when plugged into the same outlet.
- If not, switch to another outlet.
Inspect Power Cord
Next, inspect the power cord for any visible damage. A damaged cord could prevent the machine from receiving power.
- Look for cuts, frays, or kinks in the cord.
- If you find any damage, stop using the machine immediately.
Using a damaged cord can be dangerous. Replace it with a new one from the manufacturer.

Credit: www.amazon.com
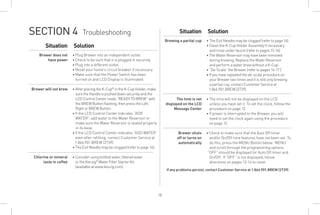
Brewer Not Heating
Is your Keurig B155 not heating? A cold cup of coffee can be very frustrating. There are several steps to troubleshoot and resolve this issue. This guide will walk you through some simple solutions.
Reset The Machine
Sometimes a simple reset can fix heating issues. Unplug the machine from the wall. Wait for about 30 seconds. Plug it back in and turn it on. This can often solve minor glitches. Check if the machine heats up properly now.
Descale Your Brewer
Mineral buildup can affect the heating element. Descaling your Keurig B155 can help. Use a descaling solution or white vinegar. Fill the water reservoir with the solution. Run a brewing cycle without a K-cup. Discard the hot water. Repeat until the reservoir is empty. Rinse the reservoir thoroughly with fresh water. Run several water-only cycles to remove any residue. This process can restore proper heating.
Water Not Dispensing
Is your Keurig B155 not dispensing water? This problem can be frustrating. The good news is, it is often an easy fix. Follow these steps to get your Keurig back to normal. Let’s explore the common reasons and solutions for this issue.
Check Water Reservoir
First, check the water reservoir. Ensure it is properly seated. Sometimes, the machine won’t dispense if the reservoir isn’t aligned. Remove the reservoir and reattach it. Make sure it clicks into place.
Next, inspect the water level. If it is too low, the machine won’t dispense. Fill it up to the max fill line. Also, check for any debris or blockages in the reservoir. Clean it if necessary.
Clean Dispensing Line
The dispensing line can get clogged. This stops water flow. To clean it, unplug the machine first. Use a paperclip to clear any blockages in the needle. Be gentle to avoid damage.
Run a brew cycle with just water. This helps flush out any remaining clogs. Repeat this step a few times if needed. Ensure the water flows smoothly.
These simple steps can often solve the water dispensing issue. If the problem persists, consider contacting Keurig support.

Credit: www.amazon.com
Machine Leaking Water
Experiencing a machine leaking water can be a common issue with the Keurig B155. Addressing this problem involves a few simple checks and adjustments. Follow these steps to troubleshoot and resolve the issue effectively.
Inspect Water Reservoir
Start by inspecting the water reservoir. This component can be the source of leaks. Remove the reservoir and check for any visible cracks or damage. Even small cracks can lead to significant leaks.
Next, ensure the reservoir is properly seated. Misalignment can cause water to escape. Reattach the reservoir, making sure it clicks into place.
Check Internal Seals
If the reservoir is intact, check the internal seals. These seals ensure water stays inside the machine. Over time, they can wear out or become loose.
To inspect the seals, unplug the machine and open the top. Look for any visible damage or wear on the seals. If you find any, they may need to be replaced.
| Potential Issue | Solution |
|---|---|
| Cracked Water Reservoir | Replace the reservoir |
| Misaligned Reservoir | Reattach and ensure proper alignment |
| Damaged Internal Seals | Inspect and replace seals |
Regular maintenance can prevent future leaks. Always handle components carefully and follow the user manual instructions.
Error Messages Displayed
The Keurig B155 coffee maker is a popular choice for many users. But, like any other machine, it can sometimes display error messages. These error messages can be confusing, but they often have simple solutions. Understanding these messages is key to getting your coffee maker back in working order.
Common Error Codes
The Keurig B155 may display several common error codes. Knowing these codes can help you quickly identify and fix the problem. Here are some of the most frequent ones:
- Error Code 1: Water Pump Issue
- Error Code 2: Heater Overheating
- Error Code 3: Water Reservoir Not Seated
- Error Code 4: Descale Needed
Steps To Resolve Errors
Once you identify the error code, follow these steps to resolve the issue:
| Error Code | Solution |
|---|---|
| Error Code 1 | Check the water pump for blockages. Clean or replace it if needed. |
| Error Code 2 | Turn off the machine and allow it to cool. Restart it after 30 minutes. |
| Error Code 3 | Ensure the water reservoir is properly seated. Refill and reattach it. |
| Error Code 4 | Run a descaling cycle using a descaling solution or white vinegar. |
For more detailed instructions, follow these steps:
- Turn off the machine and unplug it.
- Check the water reservoir. Ensure it’s filled and properly placed.
- Inspect the water pump. Clean it if necessary.
- Wait for the machine to cool if it overheats.
- Run a descaling cycle if prompted.
By following these steps, you can resolve most Keurig B155 error messages. This ensures your coffee maker continues to function properly. Enjoy your coffee without interruptions!
Poor Coffee Quality
Experiencing poor coffee quality from your Keurig B155 can be frustrating. The taste of your coffee can significantly impact your day. Let’s explore some simple troubleshooting steps to improve your coffee’s quality.
Use Fresh Water
Using fresh water is essential for a great cup of coffee. Stale or old water can make your coffee taste bad.
- Always use clean, filtered water.
- Avoid using water that has been sitting out for long.
- Refill the water reservoir daily.
Fresh water makes a big difference in flavor.
Clean Brew Chamber
A dirty brew chamber can affect the taste of your coffee. Regular cleaning is necessary.
- Turn off the Keurig and unplug it.
- Remove the brew chamber and wash it with warm, soapy water.
- Rinse thoroughly to remove all soap residues.
- Dry the brew chamber completely before reinstalling it.
Cleaning the brew chamber every week helps maintain optimal coffee quality.
| Step | Action |
|---|---|
| 1 | Turn off and unplug the machine |
| 2 | Remove the brew chamber |
| 3 | Wash with warm, soapy water |
| 4 | Rinse thoroughly |
| 5 | Dry completely before reinstalling |
Regular Maintenance Tips
Regular maintenance of your Keurig B155 is essential for its long-term performance. Keeping your machine clean and replacing parts as needed ensures it runs smoothly. Follow these tips to extend your brewer’s life.
Cleaning Schedule
Cleaning your Keurig B155 regularly is crucial. Start by emptying the drip tray daily. Wipe it down with a damp cloth. Clean the water reservoir weekly. Use warm, soapy water and rinse thoroughly. Descale the machine every three months. This removes mineral buildup. Use a descaling solution or a mix of vinegar and water. Run several brew cycles with water only to rinse.
Parts Replacement
Replace certain parts of your Keurig B155 periodically. Check the water filter every two months. Replace it if it looks dirty. The needle that pierces the K-Cup can get clogged. Clean it every few weeks with a paperclip. If it’s damaged, replace it. The brewer’s pump can wear out over time. If the machine struggles to brew, consider replacing the pump. Always use genuine Keurig parts for replacements.
Credit: www.slideshare.net
Frequently Asked Questions
Why Is My Keurig B155 Not Brewing?
Your Keurig B155 might not brew if the water reservoir is empty or not properly seated. Check and fill it.
How Do I Descale My Keurig B155?
To descale, mix descaling solution with water, run through the machine, then rinse with clean water. Follow manual.
Why Is My Keurig B155 Leaking Water?
Leaks can happen if the water reservoir is cracked or not seated correctly. Inspect and adjust the reservoir.
What Should I Do If My Keurig B155 Won’t Turn On?
Check the power cord and outlet. Ensure the machine is plugged in securely. Reset if needed.
How Do I Clean The Needle On My Keurig B155?
Turn off the machine. Use a paperclip to clear clogs from the needle. Refer to the manual for detailed steps.
Conclusion
Troubleshooting your Keurig B155 doesn’t have to be difficult. Follow these steps. Identify the issue first. Then, apply the corresponding solution. Regular maintenance prevents many problems. A well-maintained machine provides consistent coffee enjoyment. Simple fixes often restore functionality quickly. Always refer to the user manual.
It offers valuable guidance. Happy brewing with your Keurig B155!